I posted about my homemade laundry detergent back on February 7th and to this day I am still using the same batch I whipped up then, that's almost 2 months and with a 5 month old I do at least 1 load of laundry a day usually 2 including cloth diapers. I have had no issues with stains coming out, none that I wouldn't have with any other detergent. I have a tendency to forget to use a stain treatment on the many bibs my little one gets bright orange carrots on, but I consider that my fault due to lack of attention to details.
I am just now getting to the end of my batch, probably still have at least 5 or more loads I can get out of it before I absolutely have to make more. I'm super excited about how long it's lasted and how well it's done on our clothes, completely worth the little bit of time it took, and a bargain compared to other detergents.
I also made baby wipes, I posted about here. I have been using homemade baby wipes ever since then except for when we go out, which isn't very often, then I use store bought wipes. I don't think this would really be necessary. The homemade wipes would probably hold up just fine in a to-go case. I bought a large package of 6 Bounty paper towels for $6. I cut each of them in half and half a roll lasts us about a week, sometimes a little more or less depending on how many blow out BM's we have in a week. So 1 package of paper towels lasts us about 12 weeks or 3 months, that's about $2 a month on baby wipes, not bad huh?
I have changed the recipe I use for the wipes just because I ran out of baby oil and didn't really want to spend money on more. The recipe I use now is 1cup water, 1/4 cup baby wash (probably a little less than this because I don't measure), and a couple squirts of baby lotion. Now the wipes are not quite as soapy but still work just as well.
Thursday, March 31, 2011
Wednesday, March 30, 2011
Homemade Croutons
I was walking through Walmart the other day doing my usual weekly grocery shopping and what do I find, loaves of french bread for $0.56, Score! I was so excited, a bought a loaf without really knowing what I wanted to use it for, but who can pass up bread for $0.56.
We are having a dinner for my in-laws next weekend to celebrate my mother-in-laws birthday. We planned on having steak, baked potato, salad, and dessert. So I thought why not make homemade croutons for the salads. I had been wanting to try them for a while now but just never got around to it. Here's how I made mine:
I used about half a loaf of the french bread
salt
pepper
italian seasoning (you could also use garlic if you wanted)
olive oil
Heat the oven to 400 degrees. Cut your bread into approximately 1/2inch chunks a place in bowl. Drizzle olive oil on top. Use salt, pepper, and seasoning of your choice to taste. I used a good amount of salt and pepper but was nervous about getting too much italian seasoning, after they were finished I wished I would have put more on. So don't be scared, season liberally for good flavoring. Mix all ingredients together until bread chunks are evenly covered. Spread out onto a baking sheet, and bake for approximately 7-10 minutes. Here's what you end up with:
 Place in air tight container or a ziploc bag, and enjoy on salads or to snack on.
We are having a dinner for my in-laws next weekend to celebrate my mother-in-laws birthday. We planned on having steak, baked potato, salad, and dessert. So I thought why not make homemade croutons for the salads. I had been wanting to try them for a while now but just never got around to it. Here's how I made mine:
I used about half a loaf of the french bread
salt
pepper
italian seasoning (you could also use garlic if you wanted)
olive oil
Heat the oven to 400 degrees. Cut your bread into approximately 1/2inch chunks a place in bowl. Drizzle olive oil on top. Use salt, pepper, and seasoning of your choice to taste. I used a good amount of salt and pepper but was nervous about getting too much italian seasoning, after they were finished I wished I would have put more on. So don't be scared, season liberally for good flavoring. Mix all ingredients together until bread chunks are evenly covered. Spread out onto a baking sheet, and bake for approximately 7-10 minutes. Here's what you end up with:

Tuesday, March 29, 2011
Applique Onesie
I also started on the applique onesie for little Sophie Marie. I used Heat and Bond I purchased from Walmart. There were two kinds, I bought the sewable. I cut out the fabric I wanted, then pinned it to the Heat and Bond and cut around that. Next put the shiny side of the Heat and Bond on the wrong side of your fabric and iron over top. This makes the Heat and Bond stick to your fabric. Next peel off the paper backing, place your fabric where you want it on your onesie and iron over top of that. Here is what mine looks like.


Once you have ironed your picture on your onesie you will need to applique around the edges. I like to blanket stitch mine but you could also machine stitch.

Here it is completely finished:

I wanted to have a ruffle butt on this onesie but after making the ruffles, sewing them on, and looking at it I decided it was a complete disaster. It looked really bad, so I ripped them out and nixed the whole idea of ruffles. Maybe next time.
Monday, March 28, 2011
Binky Clips Tutorial
Finally I'm back in full swing and feeling like myself again. I'll tell ya the flu can really knock you on your rear. Anyways, I have seen many tutorials for these, most use snaps, but snaps and I don't get along so I use velcro. This is probably the quickest and easiest baby project and it is one of my go-to's for a shower gift.


Here's what you need:

Ribbon of your choice, suspender/mitten clips (you can find these in the notions section at Hobby Lobby or Joann's, they are approx $2 for 2), and velcro.
Measure and cut your ribbon to the length you desire. Mine are about 12 inches.

Fold over the ends of your ribbon approximately 1/4 inch and stitch so there will be no fraying.

Take your suspender/mitten clip and fold your ribbon through it. Stitch the ribbon in place.

Cut your velcro small enough so it fits on your ribbon. I have no measurement for this because it depends on how thick your ribbon is. Then sew on your pieces approximately 2 inches apart.

Here's the finished binky clip.

I love easy and quick projects like these.
Thursday, March 24, 2011
It Has Been Awhile
I feel like it has been forever since I have been on here. The flu hit me hard on Sunday night, full blown with a fever for 3days, vomiting, and now a cough that just won't quit. Let me tell ya it is completely exhausting trying to care for a 4 month old when you don't even have the energy to lift your head off the pillow. I don't think I have had more than a 24 hour stomach virus in the last 3 years, and that's saying something because I worked in doctor's office with all kind's of sick people coming in and out.
Anyway, on top of that my husband has been laid off. Yes our only source of income is now obsolete until he finds something else. Oh the trials and tribulations we go through as adults, haha. So there has been a lot going on and alot of stress this week. I do have a few crafts that were started pre-flu however they are not finished completely so it may be a few days before I can actually post something good.
Here is what I have in the works:
-Grant's Easter Basket
- Cloth shoes for baby Sophie
-Binky clips
-Apron (after years I am finally making one for myself, whoo hoo)
Hopefully I will have something for you soon!
Friday, March 18, 2011
New Play Toy
Grant was doing so well at putting himself to sleep. We used to let the swing put him to sleep but seeing as he is now 20lbs and the weight limit is approximately 25lbs on our swing, I decided a little over a month ago it was time for him to start napping in his bed like a big boy.
We had a few rough days of crying and fussing but over all he did great in the transition. Fast forward to the last week or so and we have a new distraction, feet. Yes he has discovered he has two feet and loves nothing more than to play with them and suck on them. While I find this extremely cute and have taken a dozen or more pictures of him playing with this new toy, this is not good for nap time. You see Grant is a very stubborn 4 month old little boy who hates, yes hates, going to sleep. He has fought it since he was two weeks old, and tends to wear me out more than himself most of the time. He even fights eating a bottle at times because it puts him to sleep, so rather than just laying there relaxing and eating he will take a few drinks with his eyes rolling back and proceed to kick his feet, throw his arms and start screaming, only to take a few more drinks and repeat the same process all over again.
So now when he starts to get sleepy and I put him in his bed he dozes off for a moment or two then realizes he is going to sleep and begins playing with his two favorite things, his feet, a toy I can't take away or make him forget about. Hence my dilemma. As I type this my little one is talking to his mobile with his feet in his hand having a grand ol' time when only a few minutes ago he was practically asleep in my arms sucking his thumb. Haha, what's a mom to do?
Thursday, March 17, 2011
Broccoli Cheese Soup
I made this per my husband's request the other night and it was really good, and I'm not even a big fan of broccoli cheese soup. I found this recipe online, where exactly I have no clue, but as usual I ended up changing some of it.
Broccoli Cheese Soup
2 (16oz) bags frozen broccoli
3 (14.5 oz) cans chicken broth (I used 6 cups water and 4 chicken bullion cubes)
1 1/2 lbs velveeta cheese (I used 1 lb regular velveeta and 1/2 lb mexican velveeta)-cubed
pepper
1 onion-chopped
2 cups milk
1/2 cup flour
6T butter
Simmer broccoli in chicken broth until tender. In a medium sized pan saute onion in butter for about 5 minutes. Flour to make a thick pastry like paste. Add milk about a half cup at a time and stir until thick. Add the onion/milk mixture to your broccoli and broth, stir well. Add your cubed velveeta cheese and stir until its melted completely. Do not let your soup boil. Add as much pepper as you like.
My husband likes spicey and hot flavors and I had both kinds of velveeta, if you only have regular velveeta I'm sure the soup would still be as good, the mexcian just adds a little more flavor to it. The bonus to this recipe is it should freeze well. As anyone who has read some of this blog of mine knows I love recipes that freeze well. My husband doesn't like many things leftover but I hate wasting food. Not to mention financial times are tough and it is always in the back of my mind that there may come a time when we don't have much money to spend on groceries. It makes me feel good knowing we have extra stocked up in our freezer if we are in need or someone we know is in a rough spot.
Happy Eating!
Wednesday, March 16, 2011
Graduation Gift
My sister is graduating from high school this May, yes I still can't believe it's true. I still remember the day she was born. Haha. Now I sound like my grandmother. Anyways I was trying to rack my brain to come up with a cute gift. She is going to the community college in the fall so dorm stuff wouldn't work. I new I would give her some money so she could put that towards books or a laptop but I wanted to give her something cute as well.
I finally came up with the idea of a Late Night Study Session gift basket. In it: Starbucks Frappacino drinks, to-go coffee mug, mocha instant mix (she has no clue how to make coffee so it needs to be instant haha), Mountain Dew, chips, her favorite candies-Dove chocolates and Sweet Tarts, some study tools like highlighters, pens, permanent markers, and possibly a day planner. The only other thing I could think of that reminded me of studying late at night was pizza, however I couldn't think of a way to incorporate that into the basket except for a gift card and I wasn't crazy about that idea.
We are on a budget of course, so I had to start thinking of ideas early so I could start looking for clearence items and coupons. I have already purchased the Frappacinos for $3.99 for a 4-pack, highlighters for $0.58, permanent markers for $0.68, and 5-pack of pens for $2.88.

My mom and I started talking about the graduation party, I agreed to make some poms (courtesy of Martha Stewart), a banner (thanks to my Cricut), the cake, and centerpieces. Did I get in over my head? I just love planning parties and get together's.
Tuesday, March 15, 2011
Buttercream Recipe
We were invited to 2 cookouts this weekend, one Saturday and one Sunday, and I was asked to bring the dessert for both of them. Sunday was also my husband's birthday so I needed to make him his usual strawberry cheesecake. For the cookout on Sunday I decided to make chocolate cupcakes with homemade buttercream icing and boy were they ever tasty.

You can google buttercream recipe and find a million different combos, I combined a few different ones I liked and came up with the recipe above.
Enjoy!

Buttercream Icing
1/2c shortening
1/2c real butter
4 c powdered sugar-sifted
1T vanilla
few drops of clear butter flavoring (or more depending on your taste)
3oz (6T) heavy whipping cream
cream shortening and butter til fluffy. add powdered sugar about a cup at a time, mix until smooth and creamy. add vanilla, mix. add cream 2T at a time and mix well after each addition. add butter flavor, mix well. Add more powdered sugar if you need a more stiff icing.
You can google buttercream recipe and find a million different combos, I combined a few different ones I liked and came up with the recipe above.
Enjoy!
Monday, March 14, 2011
Night Shirt
Since my little Grant is growing so fast, I have found myself altering some of the clothing I buy to either fit him now or fit him longer. I bought 2 sets of pajamas from the Family Dollar store for $3 each, both of them 12 months. After I removed the tags and tried to put them on him I found the sleeves were too tight for his chubby little arms. Instead of trying to return them without the tags I decided to just shorten the sleeves. I'm sure everyone out there knows how to do this but just in case there is someone who was like me a few years ago, I'm going to show what I did.
I hate measuring so I decided how long I needed the sleeves to be, including seem allowance, and cut. Then I took the piece that was cut and used it as a guide to cut the other sleeve the same length.
 Then I turned the shirt right side out and turned the end of the sleeve under about 1/4 inch and stitched it with my sewing machine. I hate pinning as much as I hate measuring so I didn't even pin my edges under before stitching them. Here is what the sleeves look like finished.

 That's it, easy peasy, hopefully now he will get some use out of them, at least a few weeks, haha.
I hate measuring so I decided how long I needed the sleeves to be, including seem allowance, and cut. Then I took the piece that was cut and used it as a guide to cut the other sleeve the same length.


And here is the new short sleeved night shirt.

Saturday, March 12, 2011
Wipes Case with Tutorial
I made a wipes case for little Sophie to match her changing pad and I'm so excited with how it turned out, I think its adorable. These tutorials are all over the internet so I'm sure everyone has seen how to do them but just in case I'll show how I make mine.


First I layed the wipes case on top of the fabric I wanted and cut around it. I don't measure exactly or follow any pattern because I found it was easier to do it this way. Cut leaving extra to fit around, I usually just cut a wide square.

Set that fabric aside and now you will need to cut your quilt batting. I do use a pattern for cutting the batting, its at Homemade By Jill. Cut your batting and heat up your hot glue gun, this may get a little messy, haha, just kidding. Hot glue your batting to your wipes case. It should like something like this:

No worries if it's not perfect. Now if you are like me and tend to burn yourself multiple times whenever the glue gun comes out, here is my tip for you. Buy yourself a pair of cheap gloves from Walmart and wear them while you glue, it has saved my hands from many burns, and my mouth from many swear words. These are what mine look like:

I wanted this wipes case to have a monogram on the front. If you don't need this part just skip to the next step. I used my cricut to make a stencil 'S' and a quilt pen to trace it onto the fabric. I then used a satin stitch to make my monogram. If you are doing this make sure you figure out where the center of your case will be before you start tracing your letter.

Open your case and lay it on your fabric so your monogram will be in the center or the front. Get your glue gun back out and start glueing around the edges, be sure to pull the fabric taut. I find it's easier to glue with the case closed, however I also have a tendency to glue my case closed in places when I do this, so just make sure your don't glue yours closed. Here is what it should look like when it's glued all around. You will have excess around the edges, no worries we will get rid of that in the next step.

Open the case and start trimming your excess fabric as close to the case as you can. Don't worry if it's not perfect, it doesn't need to be. The edges will be covered in the end and no one will know the difference.

Pick out what you want to go around the edges. This can be ribbon, ric rac, or trimming like I have (I havn't a clue what it's actually called, oops). Start at the bend of the case and start glueing again. Glue the trim as close to the edge as possible without lapping over it. I think it's easier to do this with the case open. Every time I have done it the other way I glue it closed and mess something up.

Here is what the edges will look like when all your trim is glued and finished.

Sit back and give yourself a pat on the back, you're done.

Friday, March 11, 2011
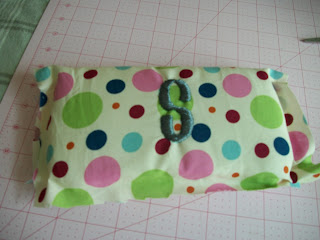
Baby Changing Pad
I finally finished the changing pad I have been wanting to make for my stepbrother's baby. I made 2 of these for myself before Grant was born and I absolutely love them. They have come in handy many times. I don't like the changing tables in public restrooms because I know some people are not as germaphobic as me. Funny how I was not like that before he was born. Anyway, I've also used mine when changing him in the backseat of the car and at other people's houses. I didn't come up with this idea myself. I saw it on a blog called Livin' Life Patino Style. It's super simple. All you need is some fabric and a hand towel (I used a bathroom hand towel for mine but any kind would work).
First lay your hand towel on the wrong side of your fabric and pin it in place. Cut leaving about 1 inch extra all around the towel, this is so you can fold it over twice and stitch around.
Sorry I didn't get any pictures during the process of making this one. I had approximately 10 minutes to start and finish it before little man woke up from a nap, so no time for step by step pictures. Hopefully you will be able to tell from the finished product how to do it.
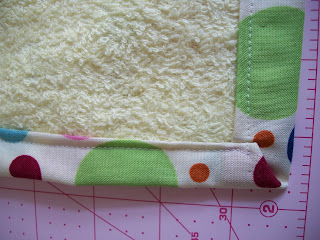
Here is how the fabric should look when it's folded and stitched around the edges.

Here is the finished product. For this changing pad I used some leftover terry cloth fabric I had on hand and used a hand towel to measure it for sizing.

Tuesday, March 8, 2011
Giving Up
Right now I am sitting here with my son in my arms waiting for him to finally give in and fall over asleep. He fights it like no baby I have ever known. I tried rocking him at which time he yelled, yes I typed yelled, not a cry or a whine a yell, at me, and began flinging his arms and legs around. He is crying in my lap at this exact minute with his thumb in his mouth, eyes rolling back in his head.
You would think that would be it and he would give up, but no. He pops the thumb out and begins yelling at me some more. What do I do you ask? I give up. After 4 months I have learned to just give up and let him wear himself completely and totally out. I no longer rock, bounce, make laps through the house, or sing. Turning on the mobile in his bed no longer works either. I have come to realize these things only make him more mad because even at four months he knows I am trying to put him to sleep. So I guess I feel like why wear myself out and stress about it when eventually he will be 100% exhausted and fall asleep.
When he was smaller I would worry myself sick trying to make him stop crying. I think I felt like if he were crying that meant I wasn't doing something right and that I wasn't a good mom. Fast forward to now and I think that is pure bologna. I have learned everytime I think I have this child figured out he changes it up on me and decides he wants to be different and throw me for a loop. I think he likes keeping me on my toes, and I'm a little concerned this is a precurser for things to come. I have this vision of him when he is supposed to be in bed, as a 4 year old, playing with his toys instead of sleeping even after I tell him multiple times to quit playing and go to bed. In the morning I will find him on the floor passed out in the middle of all these toys. It makes me smile now. He is one stubborn little one, full of energy, and personality. Huh, wonder where he gets that from?
My 1st Pie
What did I spend the better part of 2 hours doing last night? Making this Chocolate Cream pie, every bit of it from scratch (excuse the picture, I took it with my cell phone because I was so excited I text messaged it to my husband).

However my excitement was short lived when I went to see if it had cooled to put it in the fridge. Aparently the meringue (is that even how you spell it, oh well you know what I mean) wasn't "sealed" well enough. What the heck does it mean when the stupid thing says to seal the meringue, would have been nice to have some sort of definition in the Better Home and Garden Cookbook, so I wouldn't have wasted so much of my time and messed up my entire kitchen. The meringue pulled away from the edge and there was watery (is that even a word?) crap between the meringue and the chocolate filling. Needless to say all I really wanted to do was chuck the whole thing, pie plate and all, out the back door.
The biggest disappointment was the ruining of my vision. You see every time I cook or bake I feel like I am getting in touch with the 1950's housewife in me. You know the one whose hair is done perfectly, and is standing in front of the stove in her heels, dress, and apron, waiting for the hubby to come through the door and rave about how wonderful it smells and how great everything tastes. No this is not at all how I look while I am cooking. Usually I am in my sweats, hair pulled back in a ponytail, no makeup, and part of the food on the front of my shirt. To prove it my husband came home the other day, I was wearing a pair of jeans and an Aeropostale polo shirt, and he asked me why I was so dressed up? Haha. How sad is that?
Anyway I always have that vision and I had it when I pulled this gorgeous pie out of the oven. I was so proud of myself. My poor husband, out of the goodness of his heart, cut into it (watery crap leaking all around) and tried a piece. I swears it was ok and it just needed to cool in the fridge to set up more. I disagree and I know no matter how long it sits in the fridge it will remain a sloppy, watery, congealed mess.
From now on I think I will stick to the recipes that don't have a million steps and make sure the steps they do have are very clear. This is what I get for baking instead of sewing, I knew I should have locked myself in my sewing room, I'm sure my results would have been a lot better.
Monday, March 7, 2011
The Weekend
So this weekend I had grand plans of getting some of my sewing projects done. With ideas of all the posts I would have lined up to show anyone out there who may look at this little blog of mine. How much sewing did I get done? None. Not one thing did I get done, instead I spent the weekend running errands, grocery shopping, and waiting around for other people to do the things they needed to get done, inbetween changing diapers, naps, and bottles.
I have to get some done this week, no excuses! There is a baby shower in Ohio on the 20th and I have to send my gifts. What am I planning on making you ask, of course my go to gift cloth shoes, with a matching ruffle butt onesie (I think they are so adorable), binky clips, changing pad with matching wipes case, and a binky bag, and I am still debating on whether or not to make a diaper bag. I guess that will depend on when I get the other items finished. None of them will take very long if I could just kick my butt into gear and get them started.
I did get a couple things done, not sewing of course but still its something. I purchased supplies to start practicing my cake decorating skills, with the hopes that I will be a natural, haha. Joann's has a coupon commotion week until the 12th so I bought what I needed and used coupons for everything. I also went to Target and bought Bambi for Grant's Easter basket. I had a $10 off coupon so I used that as my excuse for not being able to leave the store without it.
At least I can feel like the weekend wasn't a complete lack of accomplishment. My hope is that I will have something great to post in the next couple of days. We will see!
Saturday, March 5, 2011
Potato Head
Have you seen this?

Are they not the cutest little toys ever. Well I bought some felt the other day to make my own version. Every time I see this picture I get the itch to dig it out and start creating my own potato. I realize my son will not be able to play with it for over a year but I just can't help myself.
So one more project added to my list. Maybe I should finish a few of the ones I've already started haha.
I started cutting out the pieces yesterday and this is what I have so far. None of it is sewed together yet or stuffed but hey it's a start.

For some odd reason I can't seem to start and finish a project without stopping in the middle and starting on something else. Oh well I will come back to the potato when I get the itch again. Hopefully I'll get a little time to myself this weekend to finish a few projects. Cross your fingers!
Friday, March 4, 2011
More PJ Pants
Grant is growing so fast these days, he is 4 months old and wearing 12 month clothing and even 18 month pajamas. I know most babies aren't in the same size as their age but I've never known a 3 or 4 month old to wear 12 month. Anyway I've been scouring the stores for clearence items because it seems like we go through them the fastest. I have found a few sets for $3 a piece but I refuse to pay much more than that since I know he won't wear them more than a few weeks.
I thought about the Christmas pj pants I made him a few months ago and thought I needed to make some more since I have a ton of flannel stashed in my closet. I use this tutorial from Handmade Mommy. This is one of my favorite tutorials and one of the quickest projects. I have purchased multiple Simplicity patterns for pj pants and after using this tutorial they will remain unused. Here is the finished project:
 They seem huge to me but I know he will be in them before I know it. I bought this fabric the day after Thanksgiving for a little over a $1 a yard, what a steel! These took me about 10 minutes. The more I make them the faster I get at it, and I am all about quick projects. I have 2 other kinds of flannel ready to be cut into pants, and I'm so anxious to get them started.
I thought about the Christmas pj pants I made him a few months ago and thought I needed to make some more since I have a ton of flannel stashed in my closet. I use this tutorial from Handmade Mommy. This is one of my favorite tutorials and one of the quickest projects. I have purchased multiple Simplicity patterns for pj pants and after using this tutorial they will remain unused. Here is the finished project:

Thursday, March 3, 2011
A Little Disturbing
My mom is a junior high teacher's assistant and works in the study hall room. We were talking the other day and she told me the students are no longer required to memorize their times tables, most don't know how to tell time unless it's on a digital clock, and all students are allowed to have a calculator at all times so they don't know how to work out math problems on paper.
Does anyone else find this a little disturbing? I asked why they weren't teaching these basic things anymore and she informed me they were teaching it but due to the state exams they need to pass, they were called proficiency tests in my day, they don't have time to spend teaching one topic if everyone doesn't pick it up immediately. This is just sad to me. I remember learning my times tables, and I don't think it should be necessary for a child to use a calculator to figure out that 3x4=12, and not everywhere you go will you find a digital clock.
It concerns me that if teachers don't have time for kids to really learn these concepts, due to the focus that's put on state testing, what else are they not having time for. Is passing a state test so important that we should skip over these basic things, and will this not hinder them in the future. When I took my State Boards for nursing I don't remember being able to use a calculator and there were many tests in college I was not allowed to use one either. How are they going to be able to succeed in some areas later down the road if they don't know these things?
I have a great respect for teachers and I think most of them do a great job with all they are given now a days. My uncle is a principal and was an amazing teacher for many years. I don't think our educators are given enough credit for all they do and put up with, nor do they get paid what they are worth, and now they aren't even given enough time to teach kids how to tell time. .
Wednesday, March 2, 2011
Another Mom Moment
There is something so satisfying the moment you feel like you "know" your baby. When after months of sleepless nights, endless worrying, and countless moments of looking at your crying baby thinking to yourself "I have no clue what you need", you finally realize those moments are now fewer and farther between. I feel like I have finally learned my son and we have finally settled into a routine of sorts. I now know by they way he sucks his thumb and puts his hand on his face that he is tired. I know his tired cry, from his irritated cry, from his hungry cry.
My husband unfortunately doesn't get to spend as much time with him as I do so he hasn't learned the same routine. He was off work yesterday and while I absolutely love having him around and I know Grant does too, it's sometimes makes me smile to watch him try to get him to sleep. I've tried really hard to get Grant to put himself to sleep. After 3 months and countless hours of rocking and bouncing him I finally realized it was time to let him learn a little self-soothing. My husband doesn't like to listen to him cry, I don't either but because I'm home with him every day it doesn't phase me as much. When he starts crying my husband undoubtedly will go into the room and start talking to him trying in some way to reason with him and if that doesn't work he will pick him up and start rocking or bouncing to get him to sleep. Maybe it's a mom thing but knowing that he can put himself to sleep and knowing how hard I worked to get him to this point I will not get into the habit of picking him up every time he makes a peep.
Maybe it's in my head but it seems that when I follow the routine of putting him in his bed, covering him up, turning on his mobile, kissing him goodnight, and leaving the room, he goes asleep alot easier than if my husband puts him to bed. It's almost as if even at 4 months he knows I won't get him out of bed but with a few tears it might work on dad.
I love these moments. With all the joy I get daily from him it makes me want another little one, well almost. Haha.

Tuesday, March 1, 2011
Chocolate Covered Strawberries

This post is a little belated but hey, better late than never. Every year for Valentine's Day I make my husband chocolate covered strawberries. The first year I made them I didn't have a clue and messed up most of my batch, so I thought I would post how I make them in case there is someone else who doesn't have a clue about dipping fruit in chocolate haha.
Supplies I used:


Strawberries-rinse and pat dried
Vanilla Almond Bark
Gulf Wax
foil
I shred some of the gulf wax with a vegetable peeler before I get started so it's ready. Break off a few squares of the almond bark and melt it in a small saucepan on low heat. Once it's melted add the gulf wax, this will prevent the chocolate from getting clumpy and make it shiny once the strawberries are dipped and dried. When the gulf wax is stirred in you're ready to start dipping the strawberries. Place them on the foil to harden, and you're done!
Guilt Free Chocolate Ladies!
I've been at my mom's in Ohio for the last week and I have to say I miss them terribly, when I'm there I love watching the cooking channel and food network. I get a little obsessed actually but anyway I started watching a show called Hungry Girl. I had seen her cook books before but thought it would probably be filled with not so great tasting food and expensive ingredients. Not the case in this recipe. It takes all of 2 ingredients and is about 160 calories. What are they you ask, Chocolate Brownie Muffins.
Here's the recipe for anyone who may want to give it a whirl.
Chocolate Brownie Muffins
Ingredients:
1 box store bought chocolate cake mix
1 can pumpkin (not pumpkin pie filling)
now pour your cake mix in a bowl (do not add the eggs, oil or anything else just the dry mix), add the pumpkin, mix together thoroughly. Scoop into muffin cups and bake at 350 for about 18 minutes and your done.
Now when my mom and I saw this recipe we thought, eww pumpkin in a chocolate brownie, but you can't taste the pumpkin. The pumpkin gives it moist texture and it still tastes all chocolatey and wonderful.
Eat Up!

The above picture is why I usually don't put pictures in my posts about recipes, doesn't look amazing but I swear it's good.
Subscribe to:
Posts (Atom)