Showing posts with label felt. Show all posts

Sunday, December 22, 2013

Felt Batman/Spiderman Dress Up & 2 Matching Peg Dolls

Grant is still having fun wearing his Teenage Mutant Ninja Turtle costume and it made me think I should make him a couple more to change things up every now and then.  He is just starting to recognize super heroes.  He runs around at times saying "Mama, I a superhero". 

He can always point out Spiderman so I knew he would be on my list to make, and I also chose Batman because I thought it would be simple and quick to sew.  I made them both out of felt and made them the same way I made the Teenage Mutant Ninja Turtle costumes.  The actual sewing of the pieces took less than a naptime (which for my son is all of an hour if I'm lucky).  So you could whip these up after your little  one goes to bed if you're wanting to add to their dress up collection.


I made the masks using the patterns from this site.  I made 2 identical ones and sewed them together for durability.  For the Spiderman mask I hand embroidered the web details.  You could easily use black puff paint if you wanted to make it a little easier and less time consuming.  I also hand appliqued the Batman emblem using a blanket stitch, and embroidered the black webbing details on the front of the Spiderman costume.  Again, puff paint would make this easier and faster, I just have a thing for hand embroidering stuff.

After making the batman costume I realized I probably should have made it a dark grey instead of all black but this was more simple and Grant won't know the difference yet anyway.  There is no cape on the batman costume, at least not yet.  I didn't realize my black felt wasn't wide enough for the costume so it will be attached at a later date. 


I had some leftover wood peg dolls after making the Ninja Turtles earlier this year and decided to make a Spiderman and Batman doll to go with the costumes.  Grant, my niece, and the 2 year old I babysit still play with the Ninja Turtle peg people so I know they will be played with often.

I can't wait to see Grant running around as Batman and Spiderman on Christmas Day.

Thursday, December 5, 2013

Felt Tree Advent Calendar

I jumped on another bandwagon this year, the Advent Calendar.  I've been wanting to make one
 for about 2 years now and never could decide how I wanted it to look or what I wanted to make it from, cardstock, felt, fabric, etc.  Last year I saw this advent on Homemade By Jill and thought it was perfect.  I had grand plans of starting way early and creating all these really intricate and beautiful felt ornaments for Grant to place on the tree each day.  Then reality hit and November came to a close and I was scrambling to get them all done.  I'm really proud of the ornaments I made.  I didn't really follow any patterns because I think felt can be difficult to work with when you're cutting small intricate shapes, so I freehanded the majority of all the pieces.

I did look to google for inspiration by googling "felt advent tree calendar" and "felt ornaments".  If I saw something I liked I saved the picture and then made my own version of it.  When it came to making the tree itself I used 1/2yd of green felt, folded it in half vertically and freehanded what I thought looked like a pretty good tree shape.

I laid out all the ornaments on the tree to figure out where to sew the buttons that would be used to hang the ornaments later on, then I hand sewed each green button to the tree.

Each of the ornament pockets were made with red felt and were 3x3inch squares.  I hand sewed the numbers onto the front.

The entire project was completely hand sewn using a blanket stitch around the tree and trunk and each of the pockets.  One thing I didn't really think about when making this calendar was the size it was going to turn out into.  My calendar ended up being about 5ft tall.  I think my ornaments were a tad larger than other blogs I looked at and that required my tree and pockets to be larger as well.  Regardless I think it turned out really nice and I'm so glad it's finished because it was definitely a small labor of love.

 
I went ahead and made some patterns for those of you out there who work better with them than going freehanded.  I'd love to be able to say I have a pdf of them but I'm not that computer savy.


If you notice there are patterns for 3 ornaments I ended up not using, the bird, the round bird, and the skate.  I left them on the pattern pages because I thought maybe someone else might need them but I had forgotten I made 3 ornament balls with mine, Grant's, and Derrick's name on them so I didn't have room for the other 3.
 
Happy Advent Sewing!


Wednesday, November 6, 2013

Felt Ninja Turtle Costume Tutorial

I posted here about the Ninja Turtle costume I made my son and like most things I make him, I had to make one for my niece as well.  I originally wanted to make her Donatello, or he purple turtle, but when I realized I only had red felt and no purple I figured it was better to go with red so I wouldn't have to buy any extra felt.

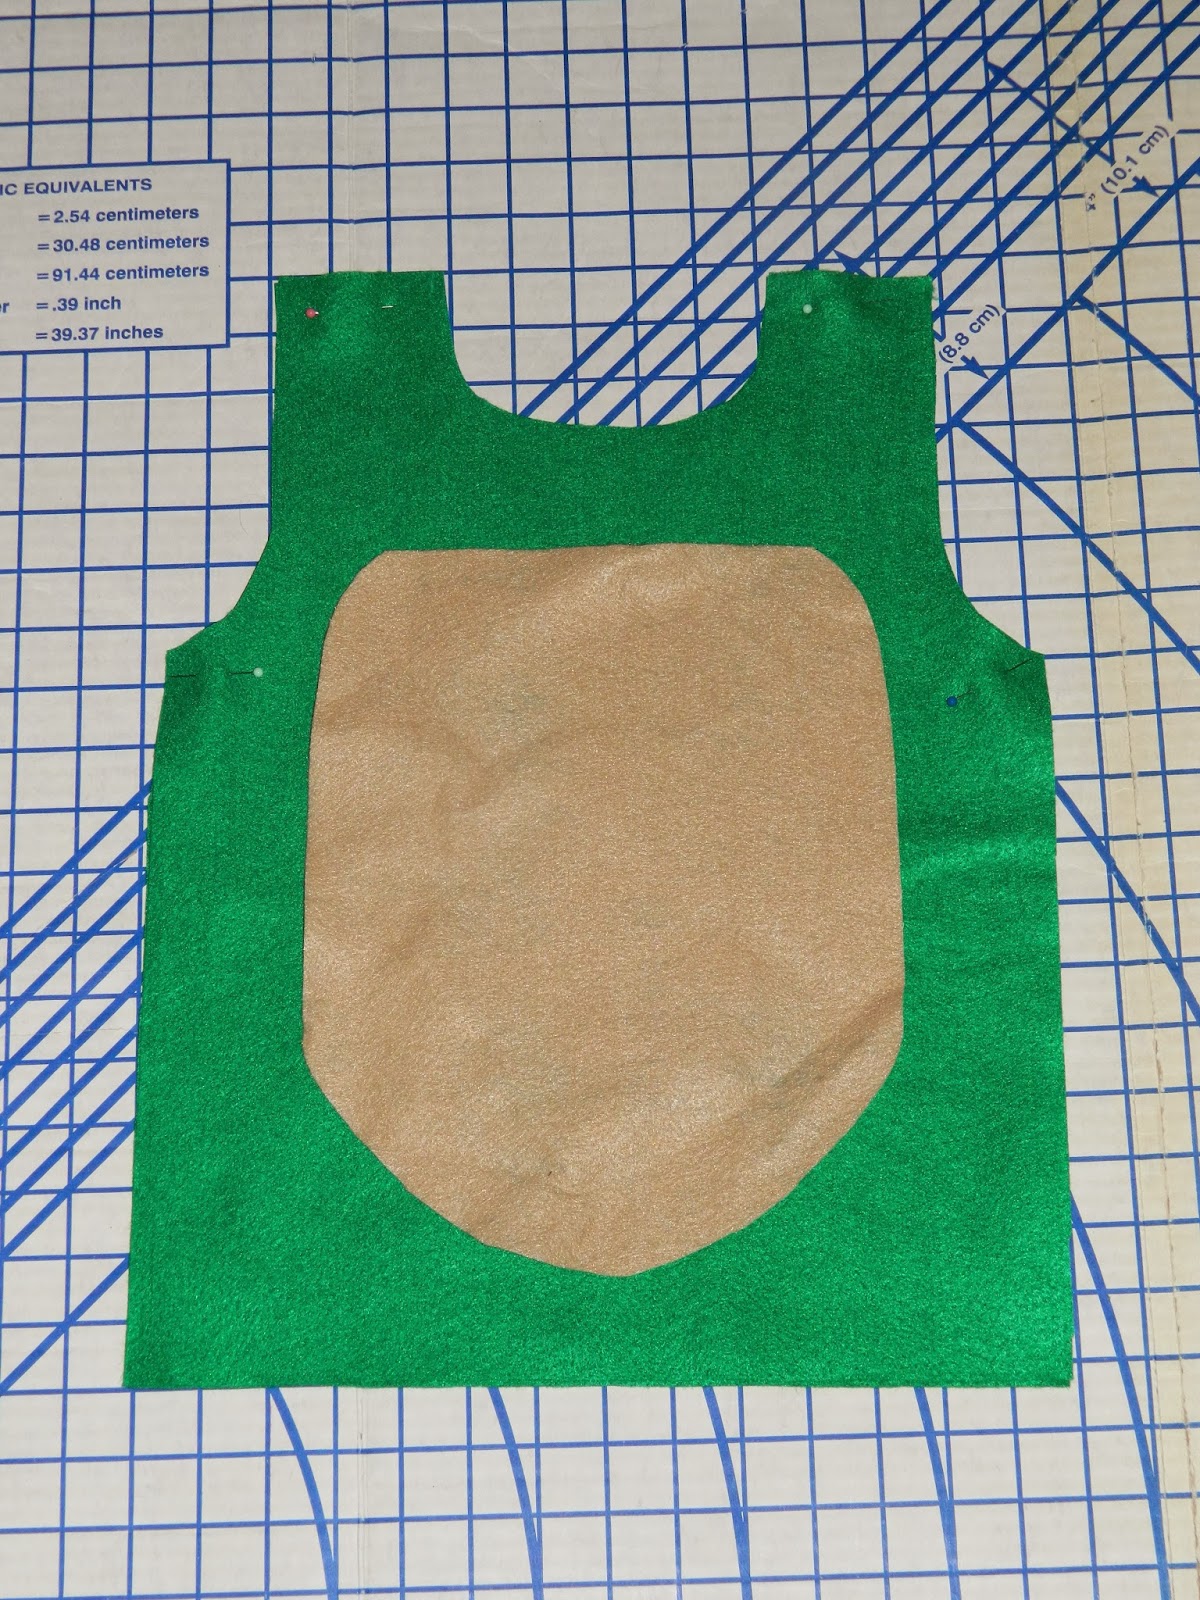
I used the same measurements for my 3 year old son and my 2 year old niece.  The shoulder pieces were 2.5 inches wide with a 5.5 inch opening for the neck.  The width of the body of the costume was 14 inches, the length was 16 inches.  This size fit my 3 year old perfectly and was a little big on my niece, but this just means she will have some growing room in it.  It wasn't falling off of her or anything so in my world it fit perfectly, lol.


I didn't do any measurements for the arm holes I just made them as long as I thought they would need to be for easily taking the costume on and off.  I think, when in doubt make them a little bigger.
 
 I used an 8x12 piece of tan felt to cut the stomach of the turtle.  I didn't use a pattern, just cut it in what I thought was the right shape.
 
To give it some dimension I cut a piece of quilt batting to go underneath the tan piece of felt.  I stitched the layers of the green body, tan stomach piece, and quilt batting in the same pattern as the Ninja turtles on tv.
 
I cut a piece of 2inch wide brown felt for the belt.  I stitched it to one shoulder at an angle, then pinned it down and stitched the yellow buckle in place going through all the layers of felt,
 
I kept the shoulder strap not sewed down until I got the waist belt in place and stitched, this way I knew for sure how long the shoulder strap needed to be.  After the waist belt was stitched down trimmed the shoulder strap.
  
Next I an extra strip of green felt to either side of the body pieces (right sides together).  This is just so the costume hangs easily and moves freely.  You don't want it to be in any way restricting.
 
 For the shell I cut a random oval shape, cutting 2 pieces of quilt batting to make it more dimensional.  For Grant's costume I used some polyfil I had in my stash to make his more rounded.  The I stitched the layers together in the shell design I could remember from the cartoon.  It's far from perfect but Grant knew what it was and that's all that matters.
 
I didn't sew the whole shell onto the back of the body piece.  Instead I placed it where I wanted and stitched it by hand in 4 different spots.  Add the shoulder strap by sewing it to the shoulder and stitch the waist belt on either side and to connect the shoulder belt to the waist belt.
 
Now stitch the front and back body pieces, right sides together, at the shoulders.
 
For the masks I made them about 5- 5 1/2 inches wide and freehanded the shape of an eye mask.  I cut one out in green felt and the other, slightly smaller out of colored felt.  I stitched both together then cut out the eye holes.  I attached a 1 inch wide tie to either side.
 
 
And there you have it a Teenage Mutant Ninja Turtle Costume!  These types of costumes are great for dress up play around the house which is what I originally made them for, however they are also great for Halloween.  They are easy to have multiple layers underneath and kids can move freely in them.  Grant decided to wear his for trick or treat and he had a long john thermal shirt, a sweatshirt, and a jacket all underneath his and it still fit well enough that he could run like a Ninja Turtle from one house to the next.


Grant won't hardly take his costume off and he and Sophie ran around my mom's house like ninja turtles when I put them both in the costumes.  So score one for mom!


Thursday, January 17, 2013

Pretend Mail Set

My friend's daughter is turning 3 this month and I thought for quite awhile about what I wanted to make her.  Ultimately a play mail set was a must.  I'm all about simple toys for kids and toys they have to use their imaginations with.  I first saw a pretend mail set on the blog 12 Crafts til Christmas (which I think has been taken down since then or at least that's what google tells me) and logged it in my favorites as a "one day" project.  I guess that one day has come.

Here's the whole lot, 4 post cards, 3 envelopes, 3 letters, 7 stamps, and 5 address labels.  I think the whole set turned out really cute.  The only things missing is the mail carrier bag (still working on that) and the mailbox.  My plan is to buy one of the paper mache mailboxes at Hobby Lobby.  The only problem is they have been out of the size I need, bummer!  So I'm hoping they get it in within the next week.
 
 Postcards:
 
 
I used heavy interfacing as the main part of the post cards and a sharpie to write on them.   As you can see I'm not great at making a perfect square.  All my postcards are a bit wonky, but that's the great thing about sewing for kids, they are very forgiving of imperfections.
 
 
I used ric rac for the address part of all the postcards with a place for the stamps in the upper corner. 
 
Envelopes:
 To make the envelopes I used a sheet of computer paper and just cut it in the shape i needed.  I used a coordinating green fabric for the inside, velcro for the closer, and placed velcro on the outside for the address labels and stamps.
 
A word to the wise: make sure your letters are small enough to actually fit inside your envelopes.  I wasn't paying attention and mine almost didnt fit.  Oops!  The letters are muslin fabric with cotton on the back. I stitched them right sides together then turned them right side out and stitched a 1/4inch seam around the outside.  I used a sharpie to make the squiggle lines that represent writing.


 Address Labels:
 
 Each address label consists of 2 pieces of felt.  The top piece is hand embroidered with the person's name and the bottom piece has a piece of velcro stitched on so it will easily attach to the envelopes. Then I stitched the top piece to the bottom. 
 
 Stamps:
For the stamps I just cut a square of felt, a small heart of felt, stitched velcro on the back and stitched the heart on the front.  Ta-Daa, instant pretend stamp.  You could be a really good crafter and applique the hearts on the front so you wont see the triangle stitch but let's face it, I'm lazy and I was working during nap time.  Which means short cuts are a must!
 
 
Hopefully I'll have the mailbox and bag to show soon but I got impatient wanting to share the pieces of the gift I had finished.  My plan is to make a set for Grant for Christmas this year (maybe with that one I'll have measurements and patterns since I was a slacker with this set).  I know what your thinking, It's January, what in the heck am I thinking of Christmas for?  What can I say? It's the way my mind works!

LinkWithin

Related Posts Plugin for WordPress, Blogger...

Total Pageviews