Showing posts with label crafts. Show all posts

Thursday, May 15, 2014

Yellow/Pink and Chevron Bridal Shower Invitations

There has been very little crafting going on in our house since Miss Eva came into this world.  She is a much better sleeper than my son ever was but my days with a newborn and a 3 1/2 year old are pretty busy.  Between feedings, diaper changes, meal prep/cooking/eating, naptimes, dishes, and laundry it's difficult to squeeze crafting time into the day.


That being said, last year I told my sister I would do her bridal shower for her upcoming wedding this summer.  This was before I was pregnant, before we were living on our own, before I was babysitting another toddler.  Pretty much before I was super busy.


Now the shower is a mere 2 weeks away and I'm scrambling to get things bought, made, and together.


I finished the invites over the weekend.  There is no theme other than the colors Yellow and Pink and chevron and heart prints.  This shower is going to be a huge undertaking, the biggest party I've done so far with a guest list of about 60 people.  So for the sake of my sanity and my bank account, I'm really trying to keep things simple.


I used my Cricut for the invites to cut the scrapbook paper and cardstock.  I used the Plantin Schoolbook cartridge for the yellow rectangle  and oval wording, and the Accent Essentials cartridge for the chevron cutout. I got the wording for the invite from this site.  I thought it was really cute and since there's no real "theme", I needed wording that was universal.


I saw an idea for recipe cards and thought I saved the blog I saw it on but of course my brain is not working most of the time and I didn't.  I loved the idea of a recipe card tree instead of an advice tree.  I didn't want to go the route of advice cards because it seems to me that everyone pretty much writes the same old same old, "don't go to bed angry", etc etc.  And while that's great advice, I'll say from personal experience there will be times when unless you want to be up all night, you're probably going to go to bed angry a time or 2 in your marriage.  I've also had many times at showers I've attended/hosted when people make the comments they don't know what to write and almost seem put out by having to come up with something.  So I decided to design a recipe card and include it with the invite letting people know to bring it to the shower with their favorite recipe written on it.  Once at the shower there will be clothespins and a "tree" for them to attach it to.  I just love this idea. 


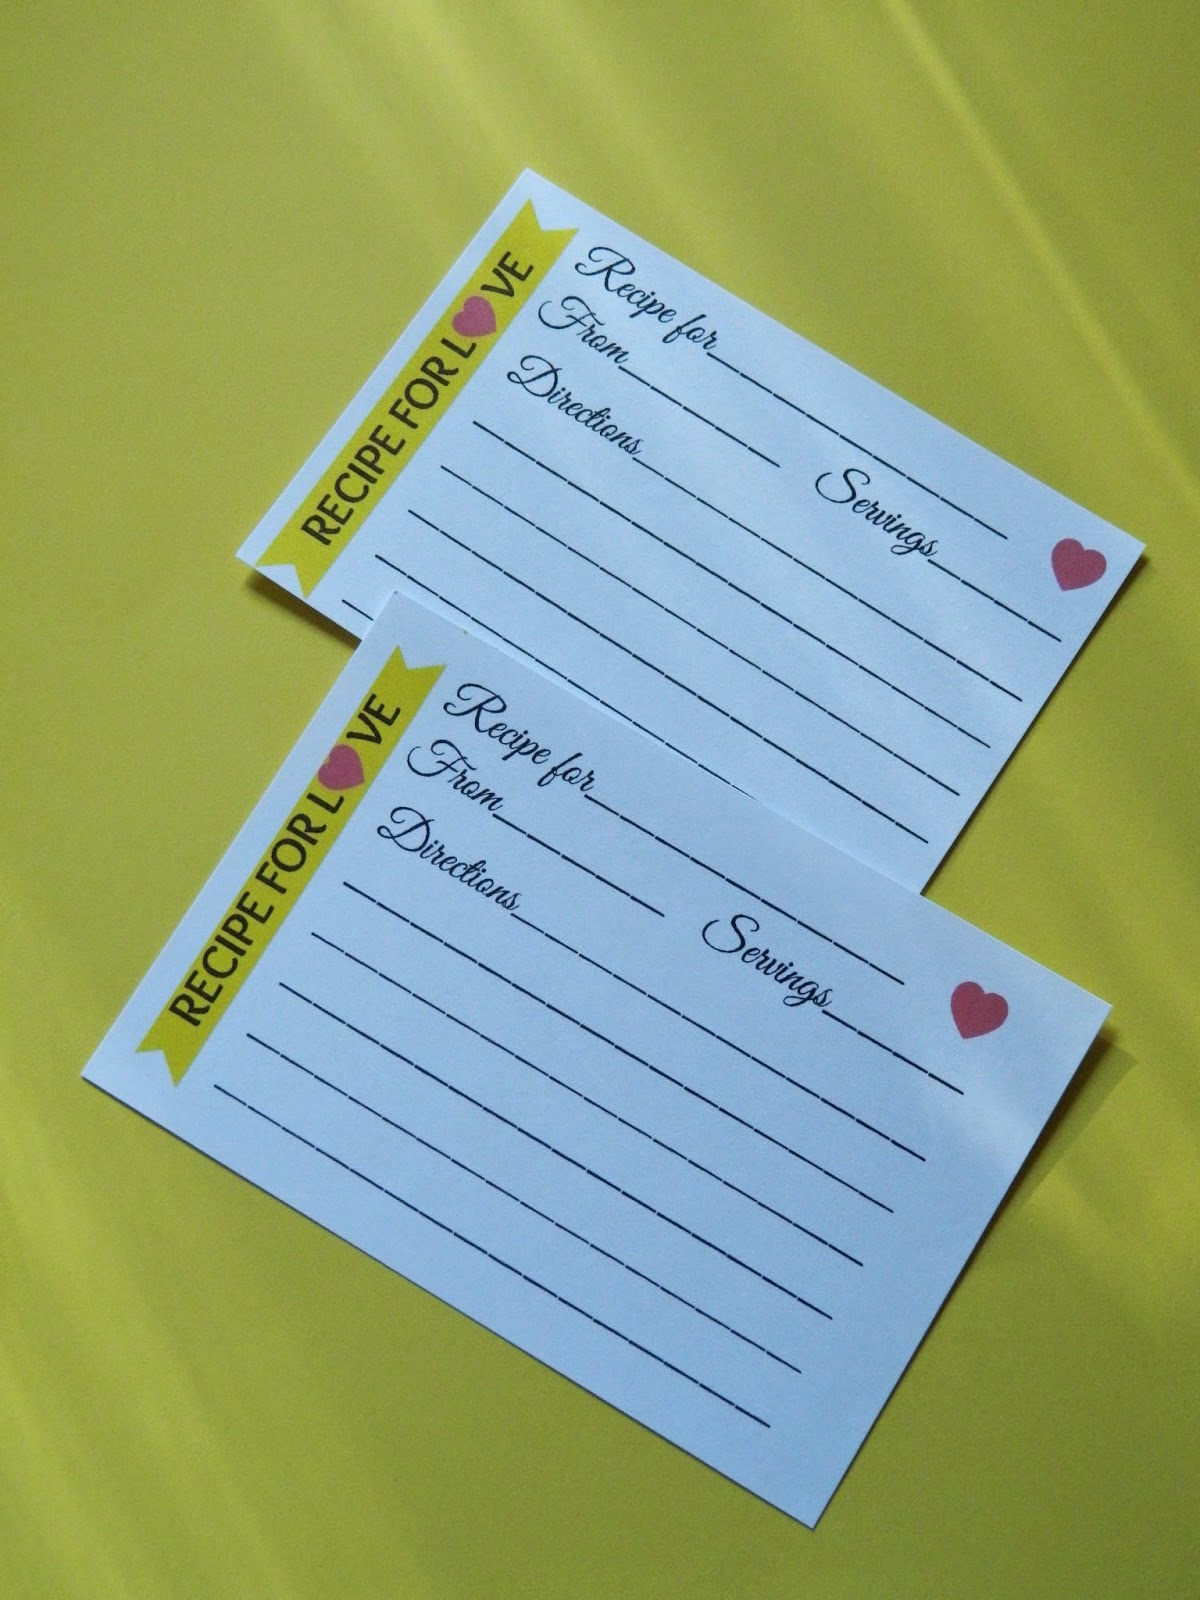
I designed the recipe card at Picmonkey.com. I seriously love this site and have used it for so many things since I found it a couple years ago.  Once created I saved the image as a photo, uploaded it to my Kodak software on my computer and printed it on white cardstock as 3x5 images (4 to a sheet).


It's a huge relief to have these finished and mailed out.  Now on to the other dozen projects I have in store for this little soirée.


Friday, December 20, 2013

Reindeer Food

I'm starting a new tradition this year, the Christmas Eve Surprise Box and reindeer food is one of the items going inside the box.

You can find tutorials or how-to's all over the internet.  I did mine a little different in that I didn't use any glitter (cuz I didn't have any) and made my own tag using picmonkey.
I used sugar I colored myself with food coloring and regular oats I had in my cabinet.

To color my sugar I put a couple spoonful's into 2 separate baggies and the oats in another baggie.

 
I used red and green gel food coloring but you can use regular if that's all you have.

 
It really only takes one drop from each of the food colorings in the baggie with the sugar.
 
Seal the baggies and move the sugar around with your fingers until the food coloring is distributed evenly.
 
Pour the sugars into the baggie with the oats and attach your tag.

 
I made this one in picmonkey using a poem I found online.  I saved it as a picture image, copied it into a Microsoft works word document and printed it onto white cardstock.
 
If you're wanting to use the same tag you can save this one as an image.
 
I know Grant is going to have fun sprinkling this all over the driveway for the reindeer on Christmas Eve.
 

Wednesday, June 19, 2013

New Burlap Placemats

Before we moved I made some placemats for the table to help the place look a little more like home.
 
I wanted something that looked a little country since that is what the rest of my kitchen and dining room look like, so I chose burlap.  Am I the only one who didn't realize burlap was stretchy and kind of difficult to work with.  I had an awful time cutting out straight rectangles but after a few attempts I finally got 4- 13x17in rectangles.
 
 
After I got them cut out I decided they needed a little color, so I added a little simple design to the side.
 
The only thing I'm not fond of is all the little fly away strings from the burlap, I tend to find them every where and can't help but wonder if maybe I was supposed to do something to prevent that.  Oh well, I love the country look of them.


Monday, May 20, 2013

Toy Story Wall Hangings

I've been really anxious to decorate our new place, you know to make it a little more homey.  The last few places we have lived were very temporary and we never even unpacked everything. How sad is that. 

I wanted to make sure not to do that this time around.  I want to be fully unpacked and the place completely put together.  I knew Grant's room would be fun and of course it's got to be done in Toy Story.  Since his first birthday, which was Toy Story themed, I knew I wanted to make his room with the same theme.  I made multiple Toy Story Cricut character cut outs for his birthday and have saved them all this time with the intention of making them into some kind of wall art.

I had planned on buying some wood plaques from Hobby Lobby and painting them, but with the cost of moving and everything, I just couldn't bring myself to spend what I didn't have to.  I found 4 8x10 canvases I bought ages ago and decided they would work just fine.  So I dug through my acrylic paint and found 4 colors that were perfect blue, red, yellow, and green.  I had Grant help me pick the characters and then just mod podged them onto the painted canvas.


Are they not the cutest!

I love them and so does Grant.  He's constantly pointing at them and showing them to everyone.


I also used some of the other Toy Story items he has to decorate.  My friend gave him 3 Golden Books and 2 character dolls for his 1st birthday, so I took a couple shelves I've had forever and put them on it.

And of course I had to hang his name up. 

In case you are wondering I am fully aware the letters are not even. 

What can I say, I hung them by myself and didn't measure a thing.  Live and learn.

I have 1 more wall to decorate and I have no clue what to put on it, I need a little inspiration, but I love the what I've started.  Not bad for some free decorating.

Monday, April 29, 2013

Wild Child Zoo Shirt and Water Bottle

I've been on the hunt for things to do with Grant this summer.  I desperately want to keep him busy and entertained, with the idea this will minimize the tantrums and fit throwings.

I know this is probably wishful thinking but a mama's gotta have hope.

We took him to the zoo last year for the first time and he loved it, we had a great time so I started looking into a membership.  Turns out they aren't too bad in price when you add in the parking fees and the fact that Grant is over the age of 2 which means we have to pay a whopping $10 admissions for him.

Which I personally think is a little crazy but whatever.

Naturally I figured if we would be going to the zoo Grant would need a zoo shirt (and since it's Kids Clothing Week I figured it's the perfect time to finish one).  I always go through the gift shops and see all these cute things I want to buy, you know as if Grant cares if he has a shirt that says zoo on it, but never want to pay the money for them.  Let's face it, most of the stuff they will never play with or only wear a short while.  And what kind of crafty Mama would I be if I didn't at least attempt to make him a shirt myself.

Since I have a new obsession with freezer paper stenciling I thought the zoo shirt was a great excuse to feed into that obsession.  I googled zoo animal silhouette and decided on a rhino.  Mainly because it seemed boyish, don't ask me why, it just did.

I printed the image in the size I wanted, traced it onto freezer paper, cut it out with an exacto knife, ironed and painted it onto the shirt.  Here was the end result:

 
I look at some blogs and they have the cutest pictures with their kids posing so nicely in the clothes they lovingly made.  It took me 10 minutes to get the picture you see above.  He kept turning to the side and turning his back to me.  Then wanted to look through all the pictures on my camera.
 
 
And it wouldn't be complete without throwing himself on the floor at least once, shouting "NO", when asked to show me his new shirt.
 
I thought "Wild Child" was the perfect  wording for the shirt.
 
 
I debated for awhile on whether or not to put the Columbus Zoo and the year on the back.  Why do I debate over such things?  In the end I decided if I were to buy one at the zoo gift shop it would have the year on it so mine should too.
 
No trip to the zoo would be complete without a water bottle.  Last year we had a regular old sippy cup but I have found I can actually get Grant to drink water if it's in a water bottle, he loves them.  I bought these at Hobby Lobby 40% off for $1.74. 
 
(please excuse the wrong turned picture, I can't for the life of me get it to upload in the right direction)
 
I used my Cricut and vinyl from Expressions Vinyl to decorate the outside with polka dots and their names.  I had to make one for my neice as well, since she will be with us on at least one trip to the zoo.
 
I'm in love with these bottles, they are too cute, and Grant carries his all over the house.


Thursday, April 18, 2013

Relay for Life Team Shirts

I posted here about our Relay shirts I'm freezer paper stenciling and after finishing 3 (of the possible 23) I have come to realize, maybe I took on too big a task.  Our Relay is in June and I'm guessing as to whether or not I'm going to be able to get them all done. 

I will say I love freezer paper stencils and already have a design made for my son's zoo shirt this year (cuz you know you have to have a special themed shirt to go to the zoo).  However I wasn't aware that I would not be able to reuse the stencils.  For whatever stupid reason I thought I could just peel and restick the design as many times as I desired.  I have found after 2 shirts the stencil needs pitched because the stickiness of the small pieces no longer works.  So that means I have to make about 12 stencils, x-acto knife them, paint them, heat bond them, and wash them.

There are loads of tutorials and tips on various websites, just do a google search and you will find dozens.  In case you don't want to go to all that trouble, I looked at this post as a reference.

the color in the pic above is a little wonky but its a really pretty pink in the right lighting.


Even though I love how they are turning out I'm thinking maybe we should have ordered some haha.

O well back to cutting and painting I go.

Monday, March 4, 2013

Popcorn boxes for a Baby shower

As I've mentioned in a few posts there are people having babies all around me.  Right now I know of 3 mommies-to-be and one of them I'm hosting a shower for at the end of April.  I'm constantly saving different baby shower themes to my favorites folder in the hopes that one day I'll get to use them on someone. 

Finally my day has come.  The last shower I hosted was back in 2011 for my cousin's twin boys.  I did a Thing 1 and Thing 2 theme and I had so much fun planning a crafting for it.  Since then I've tried to talk a few family members and friends into having another baby just so I can do their shower, haha. 

I know, that's a little crazy but I can't help it. 

Anyways my cousin is having a baby girl (it's the season for girls, every mommy-to-be I know is having a girl), and I've decided on the theme "About to POP".  Many people have used this theme, it's not original on my part but it's so  much fun!

Ok so I confess I was sold on the theme when I saw the popcorn bar most people have.  I mean seriously who doesn't love a popcorn bar of gourmet flavored popcorn.

My mouth is watering...

As usual I've scoured the internet for ideas and inspiration and my favorites folder and picture folder on my computer are bursting.  If I could figure out Pinterest my computer would thank me but that's for another day.

The biggest issue I have when planning and crafting for a shower (after I choose a theme) is the invitation.  I try to remind myself to keep things simple and classic but always end up with a million ideas floating around and can't decide on the perfect one.  With this theme I had the exact opposite happen.  I couldn't figure out how to make them at all.  It seems most people order their from Etsy or make a printable one with their computer.  Of course my mom said I could just go to Walmart or Target and pick up a package of invites and write the info on them.

"What?"   was my response.  The crafter in me just can't do that.  Just like I can't go to the party store and pick up all my decorations.  I HAVE to make them.  After all that's part of the fun....

and the stress...
 
and the frustration....
 
But mainly the fun of having a shower for someone.
 
Of course if you're going to have an "About to POP" theme with a popcorn bar, popcorn boxes are a must.  I could have found some online to purchase I'm sure, but what's the fun in that.  I did a google search and found a template, printed it out, traced the template on cardstock, cut it out, and glued the pieces together.


I used my cricut to cut out some circles out of scrapbook paper to decorate the boxes.  I decided I didn't want to use glue to attach them for fear of the paper wrinkling, or glue dots because I was afraid they might fall off or tear. 
 
So what's a girl to do?
 
Sew them on.  Before I glued the pieces of the popcorn boxes together I took one side and stitched the circles on each of them.
 
 
I made the boxes in a variety of colors.  Pretty much I went through my cardstock stack and grabbed any color I liked and that was bright.
 
I think they are super cute and can't wait to fill them up with some gourmet popcorn!!!


Friday, March 1, 2013

Baby Shower Banner

I'm so excited to be planning another baby shower.  About a year and a half ago I did a Thing 1 and Thing 2 for my cousin who was having twin boys.  I can't believe they are over a year old now.  When I found out my cousin Trevor and his fiance were expecting I immediately volunteered to do their baby shower.  I chose the theme "About to POP", mainly because I really really wanted to do a Popcorn bar but also because I knew I could use a rainbow of colors and I want this shower to be bright and cheery, full of lots of color.

I bought a scapbook paper stack from Hobby Lobby.  180 sheets of polka dot, stripes, plaid, etc in a variety of colors and I'm going to do all the decorations and invitations using them.  The first project I tackled was a banner.  After all every good party needs a banner right?  I saw this one and knew I needed to make one of my own.  I hand traced and cut each onesie out and used my cricut to cut the circles and letters to spell baby Channing's name.  I have to say after cutting all those onesies out by hand I have a new found appreciation for my beloved Cricut.
 
I used some ribbon I already had along with clothespins I already had.  Then I dug through my boxes of fabric to find some scraps I could cut up to tie in between each onsie.  I wasn't trying to make colors match or anything, I just wanted some bright colors in the mix.
 
This is not where the banner will hang during the shower but it was the only wall space that I could get a picture without toys, pictures, tables, windows, or Grant's hands in the photo.
 
 
I absolutely love this banner.  It just screams "baby", and I like that it couldn't be used for a birthday or any other kind of celebration.
 
I have many more "About to POP" projects coming up, as I'm slowly completing them marking them off my list one by one, so stay tuned!


Tuesday, February 19, 2013

Teenage Mutant Ninja Turtles!

I am so super excited to have this little project finished.  I bought these wood peg people about  a month ago from here.  The only ones I could find in the craft store were too small for my two year old, so I got online and found some that were 3 1/2 inches tall.  They ended up being the perfect size.

Anyways, so our new show around here is Teenage Mutant Ninja Turtles, or as my son calls it, "turtles".  When I first bought the wood peg people my intention was to make them all into superheroes like Spiderman and Superman (I'm sure you've seen hundreds of them around blogland), but while watching the Turtles I got the idea to make 4 of them into the green ninjas.

Are they cute or what?  I haven't seen any like these anywhere else so I just watched the cartoon to figure out the details to each turtle and used acrylic paint and paint pens.
 
 
Grant has bugged me to death since I painted them green and started painting their masks.  He immediately recognized them as the Ninja Turtles and wanted to play with them.


My intention was to give these to Grant in his Easter basket but he was so excited seeing me work on them, I just couldn't put them away and not let him play.
 
So I guess I'll have to find something else to fill his easter basket.


Thursday, January 10, 2013

Craft Hope Project 19!

I LOVE CraftHope.  I made a couple aprons to send off months ago and it felt really good knowing something so small from me could help someone else.  I've been wanting to participate in their projects ever since but hadn't found the time.  When I happened to check out their Facebook page (their website is being worked on) I saw they are collecting dolls and monkeys for the victims of hurricane Sandy, I knew immediately I had to get in on this one.  I have made many dolls using Bit Of Whimsy patterns ( I love them, they are easy to follow and come together quick, even for a simple, not so great sewer like me)  and knew I wanted to make at least one to send.  Grant doesn't really like me sewing cuz you know that means my full attention is not on him, so sewing anything becomes quite a job.

 
I actually used 2 different Bit of Whimsy patterns to create this doll.  I used the Jean doll for the body and the Beth doll pattern for the front and back of her hair.  The pig tails I cut out free handed.
 
I wanted the doll to have clothes that were removable and reversable, and I really wanted an excuse to use a new pattern I bought awhile back.  The Criss Cross and Ruffles pattern was so quick and simple and I love that it's reversable.  I only did the dress because I ran out of time and needed to get this little one in the mail but the pants look really simple as well and probably wouldn't take much time.

My intent was to make a few different stuffed toys but needless to say time got away from me.  I am glad I at least got to send this 1 doll and hopefully there is a little girl out there to love her.

Wednesday, January 9, 2013

Play Kitchen Details

I posted yesterday about the play kitchen I made for Grant and I finally was able to upload pictures!  I knew after I posted the one picture I'd figure out how to upload the rest, so here they are:

I attached (ok well technically my husband attached it but it was my idea and I painted it so I'll take the credit for now) a menu board to one side.  Grant is still a little to young to be trusted with chalk in order to actually use the menu chalkboard but I think it will be a nice touch when the times right.  I bought the chalkboard at Hobby Lobby for $4.99 (used my 40% off coupon of course), painted the outside, then used my Cricut to make a stencil out of vinyl for the MENU label.  The opposite side of the kitchen has 3 hooks, I bought at Walmart in a package of 4 for $0.97, to hold his hat, oven mitts, and dish towles.

Do you notice the fact that the oven door is missing?  Only took a few hours before Grant pushed down on it a little too long and off it ripped taking the screws out and everything.  Needless to say, learn from my mistakes and use heavy duty screws.
 
I used my Cricut, vinyl, and the Accent Essentials cartridge to make the stove burners.  I painted them on with acrylic paint.  Getting them in the right spot was the most frustrating part.
 
 
 I originally wanted a tile effect painted on the backsplash, but due to time constraints and my lack of patience I only got one row of them done.  I actually really like the way it turned out with just the one row but maybe I'm just trying to make myself feel better.
 
I bought these drawer pulls in the unfinished wood section at Hobby Lobby, painted them back with a silver dot in the center then glued them to the top of the stove.  Here's a little tid bit for anyone who doesn't already know this (of course I could be the only one out there) if you are glueing these to the top make sure it's on an unpainted surface.  My father in law informed me, after mine started falling off, if the wood is painted the wood glue has nothing to adhere to.  I ended up having my husband screw them all on.


The 2 other knobs were made from 2 1/2inch wood discs bought at Joann's and the same drawer pulls I used above.  I used a black sharpie to make the lines and words on the disc.  Again these ended up having to be screwed on after they started falling off.
 
Of course no kitchen is complete without a chef's hat, and of course I can't just go to the store and buy a chef's hat without adding my own little touch.  I embroidered the top and I am in love with how it turned out.  He looks so cute in it, I just wish he would wear it more, maybe as he get's older.
 
I am so pleased with how the kitchen turned out (with the exception of the broken oven door) and how much Grant loves play cooking for us.  It's so much fun to play with him.
 
Here's the link to my other post regarding this labor of love including links for the felt food, oven mitt, and dish towels.


Tuesday, January 8, 2013

My Labor of Love: Play Kitchen

For whatever reason Blogger has not been working well for me and I haven't been able to upload photos but I really wanted to post this.
My labor of love this Christmas was my son's play kitchen. 

 
I so love this kitchen, Fisher Price ain't got nothin' on it....of course that's just my opinion but I think it's my son's too.  We couldn't get Grant to open any other gifts because he was too busy playing with it.  My husband kept asking him if he wanted to open his other gifts, his response....Nope!
 
I searched all summer for an end table at yard sales and never found one. Who woulda guessed it? You would think I would have come across a dozen of them, oh well.  My step dad made this one for me and was kind enough to paint it too.  All the other details I did myself. 
 
I don't think my husband was sold on the idea of a kitchen for Grant this year but he loves it and has been cooking us food and pouring us milk and juice from his toy pitcher for days.
Chalk one up for mom!
 
Here are the links to the posts for the oven mitts and dish towels, felt food, and salt and pepper shakers.
 
Hopefully soon I'll be able to post about all the details like the menu board and chef's hat but until then I'll have to leave you in suspense.

Friday, December 28, 2012

On the Go Sewing Kit

Since we are spending the holiday away from home and we have a pretty long car ride ahead of us with limited space in our car, I decided I was in desperate need of a travel sewing kit.  I have had the book One Yard Wonders for a couple years and have not ever made anything from it.  Not because the ideas are not good but because I'm really not great following directions with patterns.  I prefer tutorials with pictures, lots and lots of pictures.  However, when I saw this sewing kit I thought it would be really easy to follow and decided to give it a shot.

 
I will admit, I used the same measurements as the pattern suggested but in true Lisa fashion, I did not follow any of their directions.  Don't get me wrong there was nothing wrong with the directions given in the book, they were clear and easy to follow, I'm just really really bad at following any directions, period.  Plus I also had to change a couple things because I refused to go to the craft store until after the holidays.  Here are the few changes I made:
 
 
The directions say to use snaps but I didn't have any so instead I used velcro as closures for all three of the pockets.
 
 
I also made 2 of the needle holders placing them side by side even though the directions only call for one.  One just didn't seem like enough.
 
My one piece of advice: If you look at the picture in the pattern book it will show the top pocket holding a pair of scissors, which is exactly what I wanted to put in the large top pocket of my sewing kit, however, the pocket is too small for the pair of scissors I own.  My advice is if you too want a pocket for scissors, measure your scissors and adjust the pocket size as necessary.
 
 
This project only took me a couple hours from start to finish, and probably wouldn't have taken that long if I would have turned the darn tv off (that boob tube will suck your life away :). 
 

Thursday, December 27, 2012

Peg People Dolls & A Little Girl Purse

We are traveling over the holiday to see friends and family and I'm so excited to be seeing a couple of my close friends.  I decided last minute I wanted to do a gift for each of them and one of their daughters who'se almost 3.  I've been wanting an excuse to make peg people for awhile and since I already had the wood people I thought now would be a great time.

 
I have seen some truely beautiful peg dolls all over the internet and while I know mine aren't as detailed as some or perfect, I think they are pretty darn good for my first try.  Grant couldn't stop playing with them, which of course means I have to make a set fit for a little boy next.
 
And of course I couldn't give 3 little peg dolls without a little bag to carry them in.
 
 
I made this little girl purse in about 20 minutes, creating the pattern as I went along.  I'm really hoping to figure out how the heck to make this into a pdf but until then you will have to remain satisfied with the picture.  I used velcro instead of a zipper because it's what I had in my stash and ironed fusible interfacing to the outer pieces of fabric for more stability.  The fabric flower was made using this tutorial.
 
 
There are literally hundreds of fabric flower tutorials out there in the blog world but I really think this is one of the easiest.  I figure if I can do this flower with a 2 year old climbing all around me and on me then it's a score.
 
After realizing how simple this bag was to make I now have it on my to-do list for my neice Sophie.  She has just started carrying bags around putting all her little toys and goodies inside.
 

Friday, December 21, 2012

Christmas Memory Lane Game Finished!

I finally finished the game pieces to go with the Christmas Memory Lane Game I'm giving to my mom for Christmas this year.

 
I made 3 girls and 1 boy representing my brother, sister, mom, and myself.  I didn't try anything fancy with these because I needed them to be finished quickly, but I still think they are pretty darn cute.
 
 
For the "treasure" pieces of the game I chose to do wood discs with gifts on them.  I used my Cricut and the Joys of the Season cartridge to cut the gifts out.  I used mod podge to adhere them to the wood discs.  The object of the game is to gain 4 treasures, or gifts, and make it to the home space.  The first one home wins the game.
 
 
I added a title, "The Christmas Memory Lane Game", to the box top as well as photos from Christmas's when we were little.  I had the whole box finished without any photos on the top and just kept starring at it thinking there was something missing.  After adding the photos it gave it just the right nostalgic touch I wanted. 
Even my little guy can't wait to play.


 I'm really excited for my Mom to open this one and I'm hoping it becomes a tradition to play this game and share memories of Christmas's past.

LinkWithin

Related Posts Plugin for WordPress, Blogger...

Total Pageviews