I saw this idea for Dessert of the Month Club on Crafting Chicks when I did a random google search and thought it was such a cute Idea I would post about it. The idea was actually from a guest blogger at 30 Handmade Days and she used this gift idea for teachers. My little guy is still too young for school but when I read the post I immediately thought of grandparent gifts.
We lived with my mom and stepdad for a year and a half after moving here from out of state and my mom has said many times over that she misses the sweets and treats I used to make. Everything from cookies, cupcakes, granola bars, to muffins. She loved getting to enjoy the treats without actually having to make them herself or clean up the mess after they were made.
I thought of the Dessert of the Month as a great Grandparent gift because I have a hard time with gift ideas sometimes. It seems like most Grandparents have everything and I always end up figuring out a gift that involves pictures, which they always love but I like the idea of an alternative. It's homemade, which is my favorite kind of gift, and lasts way past the holidays, which is always fun. Kind of makes it Christmas all year:)
I think this gift would work for anyone on your list whether it's a teacher, friend, neighbor, Grandparent, sister, etc. Think, if you have a brother/sister in college how much they would appreciate a dessert every month. It's kind of difficult to bake in a dorm room or to even find the time to make treats when you're studying all the time. If not for Christmas what about Mother's Day, Father's day or someone's birthday? And one of the best parts about it is you can go as extravagant, like crème brulee, or simple, like chocolate chip cookies, as you want with the desserts. It's also a great last minute gift idea because you could probably raid your pantry for ingredients to come up with a dessert on the fly and attach a cute card with ribbon and there you go, no need to spend hours at the crowded stores searching for the "perfect" gift.
If you're looking for more inspiration I also found another blog here, she included a little book which told what dessert she was bringing each month. This way the recipient always knows what to expect. I don't know that I could do this because I like to bake whatever strikes my fancy in the moment and I usually bake according to what fruits and things are on sale during the weeks leading up to my baking days.
Showing posts with label mother's day. Show all posts
Showing posts with label mother's day. Show all posts
Saturday, December 14, 2013
Monday, May 14, 2012
Kindle Case for Mother's Day
My mom just got a Kindle and I immediately thought I could make her a case for the fast approaching Mother's Day. Of course then she ruined the surprise when she asked me to make her one and I very well couldn't tell her no, then she would have went out and bought one. Me being me I had to put it off until the day before because why would anyone start a sewing project any earlier than the day before you're giving it as a gift.
I measured my mom's Kindle and it was 5x7inches so I cut 2 pieces of fabric and 1 piece of heavy interfacing into a rectangle that measured 16x8inches so I would have a 1/2inch seam allowance. Layer your pieces in this order:
inner fabric wrong side up
outer fabric right side up
interfacing


I measured my mom's Kindle and it was 5x7inches so I cut 2 pieces of fabric and 1 piece of heavy interfacing into a rectangle that measured 16x8inches so I would have a 1/2inch seam allowance. Layer your pieces in this order:
inner fabric wrong side up
outer fabric right side up
interfacing

Pin your fabrics all the way around.
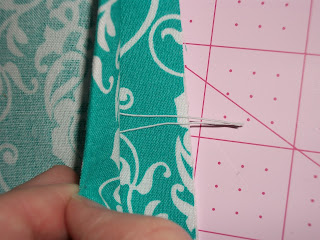
On one of the short ends of your rectangle place a looped piece of elastic, a thin hair tie, piece of ric rac, or ribbon as a closure for your case. In the picture below I have place my loop of elastic in between the right sides of my inner and outer fabrics with the ends of the elastic hanging over the end of my fabric. Be sure to pin this in place and double stitch over it to secure it in place.

Stitch around using 1/2inch seam allowance making sure to leave a 3 inch opening for turning. Clip corners.

Turn right side out and stitch around the outside, making sure to stitch the opening closed you used for turning, using a 1/4 inch seam allowance.

Fold one side of your case over about 6 inches and pin in place. Stitch only on either side, this will be the pocket for your kindle so you don't want to stitch it closed.
Stitch the button in place so you will be able to close your case.

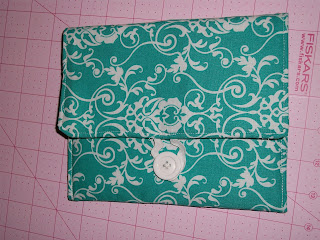
And here is what it looks like closed (I accidentally stretched my elastic out so it wouldn't hold my case closed. I used a small piece of ric rac and sewed it in place where the elastic is).

I'm so excited with how this case turned out and I absolutely love this fabric I bought at Hobby Lobby.
Subscribe to:
Comments (Atom)