I think every woman has a different list of items they feel is necessary in their hospital bag for when they give birth. I didn't have a clue my first time around and relied on friends and family members for tips. Some items they suggested I ended up using, others I found pointless to have. I also had a whole separate bag packed for Grant with a whole lot of stuff I never even pulled out.
So I thought I'd share what is going in my bag the second time around. The items I feel like are necessary as I have no desire to pack a bunch of crap I won't need. All that does is make more work for me unpacking it later.
1. flip flops- you must have these for the shower. I'm sure the janitorial staff does a great job cleaning showers but I still don't want my bare feet in the same shower that dozens of other people have used. I bought mine at the end of the season last year for $1. I have no intentions of bringing them back home with me since I bought them specifically for the hospital. They will get pitched before leaving, less for me to unpack at home.
2. Travel size shampoo/conditioner/body wash/deodorant- no reason to have large bottles of these items and if you have no use for them once you're home, just pitch these with the flip flops before leaving the hospital. Normally I'm not one to waste but I figure after I've been through childbirth I feel like I have the right to waste a little if I want.
3. Nipple Cream- I had a difficult time breastfeeding Grant and while in the hospital they will provide you with sample packets of nipple cream but you will go through it like crazy. The nurses do their best but sometimes it takes awhile to get more when you run out so I wanted to make sure I had my own this time around.
4. Vaseline in a tube- If you're going to have your little boy circumcised they will advise you to use Vaseline on the area to keep urine from aggravating it. Once again they can give you packets of this while you are there but if you're like me you will use a crap load every time you change his little diaper to keep him as comfortable and pain free as possible. Therefore you will go through those packets super quick and it could take longer than you'd like to get more if you're in the middle of a diaper change.
5. Travel size antibacterial gel: There will be plenty of this on the walls all over the hospital but you want to have this at arms length while you're there. You could be in pain from a C-section or just sore from natural childbirth but either way you don't want to have to get up and walk across the room every time you need a quick hand cleaning.
6. Travel Lotion- with all the handwashing and sanitizing you are going to be doing, you're hands will dry out pretty quick. Lotion will help.
7. Nursing cover- With all the people coming and going to visit you, you will want something to cover yourself if you're going to be nursing your little one.
8. Mini Loafa for showering- I bought a package of these at the Dollar tree when I put together a hospital kit for my cousin. Now I'm glad I did because I prefer using a loafa rather than the super thin hospital wash cloths they provide for you.
9. Pajamas- This is a comfort item because the hospital will provide gowns for you to wear but who wants to be stuck in those ugly things for 2 days with everyone you know coming to see you and your new little one and taking pictures. I was fortunate enough to receive a really nice set of nursing ones for Christmas and I ended up making my own hospital gown, but any comfy pajamas will do.
10. Granny panties- yep you read that right. The hospital will provide mesh ones, use these while you're there but you will need a pair of your own to wear home. Don't take your nice ones take the ones you don't care if they get stained and you have to throw them away. Last thing you want is to ruin your favorite pair.
11. Nursing bras- if you have sleep nursing bras take those because you will want to be as comfortable as possible but any nursing bras will work.
Now for your little ones bag.
When I packed a bag for Grant I packed burp cloths, receiving blankets, multiple outfits, hats, socks, and so many other things I thought I might need. I used very few of the items I packed. Here's what I'm packing this time around..
1. Outfit-Don't go nuts with the outfits because it's really not necessary. One for leaving the hospital and one for pictures if you want it different than his/her take home outfit.
2. 1 Receiving blanket: This isn't necessary as the hospital will provide ones for you to use while you are there but I like having one in a cute print so I'm taking one of my own, but only one.
And that's it for the little one. The hospital provides most items you will need, so keep that in mind.
Showing posts with label hospital survival kit. Show all posts
Showing posts with label hospital survival kit. Show all posts
Wednesday, April 9, 2014
Monday, April 7, 2014
DIY Hospital Eye Mask and T-shirt Headband
I had a few posts I was working on before Eva was born and I had intended to finish them before she came but with her early arrival I didn't get a chance, so I'll be posting those as I get them finished.
One thing I remember about my hospital stay with Grant is the lack of sleep. Between the nurses coming in, what seemed like every 15 minutes, and the noise, and the hallway lights, I got a total of zero hours sleep both nights. This time around I would like for that to be different so I decided to make an eye mask.
Sure I could have went to the Dollar Tree and bought one but what fun would that be when I can sew one myself. I used the same fabric I made my maternity hospital gown with so they would match.
First I drew a pattern then cut the pieces. You will need 2 pieces of fabric and a piece of batting. I used 100% cotton batting because I had it leftover from making nursing breast pads but you can use whatever you have on hand.
Now cut a piece of elastic, mine was 12 inches. Lay your batting and 1 piece of fabric on top of that with the right side facing up. then place your elastic on top of that pinning it in place.

I overlapped part of my elastic so it wouldn't get caught in the seam while I was sewing.
 I baste stitched the elastic in place on either side to make sure it wouldn't move out of place.

Now place the 2nd piece of fabric wrong side up (you want the right sides of each fabric piece facing each other with the elastic in between) on top of your elastic.

Pin it in place and stitch all the way around making sure to leave an opening for turning your mask right side out.


Turn right side out and pin your opening closed.
Stitch around the outside using 1/4inch seam allowance, making sure to stitch your opening closed.
 Now you're done, you have a super cute eye mask to match your hospital gown and hopefully get a little shut eye while you're there.
I also made a matching t-shirt headband. I happened to have a maternity shirt I wasn't crazy about wearing and it just so happens that it matched my hospital gown. I used this tutorial and it's seriously the easiest hair accessory I've ever made, I want to make a dozen more for the sole reason that I can finish them in about 5 minutes.

The tutorial is for a no-sew t-shirt headband but I already had my sewing machine out and didn't feel like heating up the glue gun so I ran mine through my machine to finish it off.


One thing I remember about my hospital stay with Grant is the lack of sleep. Between the nurses coming in, what seemed like every 15 minutes, and the noise, and the hallway lights, I got a total of zero hours sleep both nights. This time around I would like for that to be different so I decided to make an eye mask.
Sure I could have went to the Dollar Tree and bought one but what fun would that be when I can sew one myself. I used the same fabric I made my maternity hospital gown with so they would match.
First I drew a pattern then cut the pieces. You will need 2 pieces of fabric and a piece of batting. I used 100% cotton batting because I had it leftover from making nursing breast pads but you can use whatever you have on hand.
Now cut a piece of elastic, mine was 12 inches. Lay your batting and 1 piece of fabric on top of that with the right side facing up. then place your elastic on top of that pinning it in place.
I overlapped part of my elastic so it wouldn't get caught in the seam while I was sewing.
Now place the 2nd piece of fabric wrong side up (you want the right sides of each fabric piece facing each other with the elastic in between) on top of your elastic.
Pin it in place and stitch all the way around making sure to leave an opening for turning your mask right side out.
Turn right side out and pin your opening closed.
Stitch around the outside using 1/4inch seam allowance, making sure to stitch your opening closed.
I also made a matching t-shirt headband. I happened to have a maternity shirt I wasn't crazy about wearing and it just so happens that it matched my hospital gown. I used this tutorial and it's seriously the easiest hair accessory I've ever made, I want to make a dozen more for the sole reason that I can finish them in about 5 minutes.
The tutorial is for a no-sew t-shirt headband but I already had my sewing machine out and didn't feel like heating up the glue gun so I ran mine through my machine to finish it off.
Both of these have made their way into my hospital bag and are just awaiting this little one's debut.
*I was really fortunate this time around and the nurses I had were amazing. They didn't wake me up for vitals in the middle of the night if I was sleeping which was great. So I didn't need the eye mask as much as I thought I would.
*I was really fortunate this time around and the nurses I had were amazing. They didn't wake me up for vitals in the middle of the night if I was sleeping which was great. So I didn't need the eye mask as much as I thought I would.
Friday, March 7, 2014
Labor Day Bags
When I went into labor with Grant we had to drive 45 minutes to the hospital at 3:30 am with me having contractions every 3 minutes. It was miserable. Once we got to the hospital I was more concerned with getting out of the car and into the hospital room to try and get some relief and my husband was only thinking about getting the car parked and getting inside to be with me. Neither one of us thought about bringing my hospital bag inside and once we got to the room I refused to let Derrick leave my side to go get it.
Since it was so early in the morning when we left and every time I tried to stand up straight or move or pretty much do anything a contractions would hit me like a mac truck, I didn't take a shower or brush my teeth or anything else.
Of course I wasn't at all concerned about this while I was in labor. How I looked or how horrible my breath smelled was the very last thing on my mind. However once Grant was born and visitors started coming in to see us it dawned on me that I probably looked like a hot mess, with raunchy morning breath, and leftover makeup from the day before. I vowed the next time I had a baby I would be better prepared.
That's where the Labor Day Bag comes into play. This isn't the bag you pack for your hospital stay this is the small bag you have with essentials for a quick clean up before the guests start coming in and before you can actually take a shower, which is all you really want to do after you give birth.
Here are my essentials:
Colgate Wisps- these little baby's are fantastic to have for a quick brushing of the teeth. You will have a regular toothbrush and toothpaste in your overnight bag but chances are you won't even have time to get out of the bed before the Grandparents are going to wanna come in and see your little one. A quick once over with these and your mouth feels refreshed and your breath is no longer smelled from the other side of the room.
Headband- If you have an epidural maybe you won't be sweaty but if you are like me and go the natural route chances are you have spent hours upon hours in horrendous pain and sweating. A headband will take care of some of those flyaways and hide some of the grossness of you not taking a shower that morning.
Face Wipes- To wipe away any leftover makeup from the night before and give you a quick freshening up.
Chapstick- labor makes your lips dry, it's a fact.
Mascara- Ok so you can live without this one in your bag but people will have cameras and you will inevitably be in the pictures. After using your face wipes a quick swipe of mascara (no need for the works) and you will feel like a new woman.
Wash Cloth- Towards the end of labor all I wanted was a cold wet cloth on my forehead. Yes the nurse can get you one but nurses are pretty busy since you are not their only patient. I'm not one that wants to wait for anything while I'm in labor. I didn't get an epidural with Grant and don't plan on getting one with this one either. When I'm to the point I want a cold cloth I want to be able to tell Derrick and him have it readily available, not have to call the nurse and wait until she has the chance to bring one to us.
You want everything to fit in a small bag you can throw in your purse or carry as your purse. There will be time to get your overnight bag later and this way you have one less thing to worry about.
I also made a Labor Day bag for my husband. I vividly remember how horrible his breath was during my labor and I have already informed him I couldn't take that again for 9 hours straight. I needed him to be minty fresh this time around. Here's what I put in his bag:

Colgate wisps- for a quick teeth cleaning
Gum- just in case the wisps aren't strong enough, haha
Granola Bars and a Snickers bar- I refuse to have him eating anything major while I'm suffering and can't have anything but he will need something to hold him over if the labor is a long one.
Butterscotch candy- in case he just needs something to keep his mouth from being dry.
Water Bottle- The nurses can get you these but once again I like to have everything I can so I don't have to wait around for someone else to have time in their schedules.
Camera/Batteries-One of the few regrets I have about Grant's birth was not getting a single picture of the 3 of us or even him and I. I swore I wouldn't let this happen again so this all goes in Derrick's bag. I know everyone has a phone these days but I want actual pictures with a real camera.
Since it was so early in the morning when we left and every time I tried to stand up straight or move or pretty much do anything a contractions would hit me like a mac truck, I didn't take a shower or brush my teeth or anything else.
Of course I wasn't at all concerned about this while I was in labor. How I looked or how horrible my breath smelled was the very last thing on my mind. However once Grant was born and visitors started coming in to see us it dawned on me that I probably looked like a hot mess, with raunchy morning breath, and leftover makeup from the day before. I vowed the next time I had a baby I would be better prepared.
That's where the Labor Day Bag comes into play. This isn't the bag you pack for your hospital stay this is the small bag you have with essentials for a quick clean up before the guests start coming in and before you can actually take a shower, which is all you really want to do after you give birth.
Here are my essentials:
Colgate Wisps- these little baby's are fantastic to have for a quick brushing of the teeth. You will have a regular toothbrush and toothpaste in your overnight bag but chances are you won't even have time to get out of the bed before the Grandparents are going to wanna come in and see your little one. A quick once over with these and your mouth feels refreshed and your breath is no longer smelled from the other side of the room.
Headband- If you have an epidural maybe you won't be sweaty but if you are like me and go the natural route chances are you have spent hours upon hours in horrendous pain and sweating. A headband will take care of some of those flyaways and hide some of the grossness of you not taking a shower that morning.
Face Wipes- To wipe away any leftover makeup from the night before and give you a quick freshening up.
Chapstick- labor makes your lips dry, it's a fact.
Mascara- Ok so you can live without this one in your bag but people will have cameras and you will inevitably be in the pictures. After using your face wipes a quick swipe of mascara (no need for the works) and you will feel like a new woman.
Wash Cloth- Towards the end of labor all I wanted was a cold wet cloth on my forehead. Yes the nurse can get you one but nurses are pretty busy since you are not their only patient. I'm not one that wants to wait for anything while I'm in labor. I didn't get an epidural with Grant and don't plan on getting one with this one either. When I'm to the point I want a cold cloth I want to be able to tell Derrick and him have it readily available, not have to call the nurse and wait until she has the chance to bring one to us.
You want everything to fit in a small bag you can throw in your purse or carry as your purse. There will be time to get your overnight bag later and this way you have one less thing to worry about.
I also made a Labor Day bag for my husband. I vividly remember how horrible his breath was during my labor and I have already informed him I couldn't take that again for 9 hours straight. I needed him to be minty fresh this time around. Here's what I put in his bag:
Colgate wisps- for a quick teeth cleaning
Gum- just in case the wisps aren't strong enough, haha
Granola Bars and a Snickers bar- I refuse to have him eating anything major while I'm suffering and can't have anything but he will need something to hold him over if the labor is a long one.
Butterscotch candy- in case he just needs something to keep his mouth from being dry.
Water Bottle- The nurses can get you these but once again I like to have everything I can so I don't have to wait around for someone else to have time in their schedules.
Camera/Batteries-One of the few regrets I have about Grant's birth was not getting a single picture of the 3 of us or even him and I. I swore I wouldn't let this happen again so this all goes in Derrick's bag. I know everyone has a phone these days but I want actual pictures with a real camera.
Thursday, March 6, 2014
Hospital Goody Baskets
I started thinking about Grant and Derrick visiting me in the hospital and inevitably whenever you spend long periods of time in the hospital the vending machines and/or the cafeteria become your friends. You end up spending too much money on snacks, drinks, and junk. Money you probably don't need to be spending considering you just added a baby to your family.
That's when I thought of having a goody basket in my room specifically for my husband and Grant since they would be there the most. I thought about the snacks each of them likes, made my list, and headed to the dollar tree.
 For my little guy: Strawberry Banana teddy grahams, junior mints, koolaid pouch, Yoo-hoo milk boxes, Whales (cheese crackers), and ninja turtle ring pops.
For my husband: sunflower seeds, snickers, sweetarts, butterscotch candies, and gum
I probably won't keep it in this bin. The more I thought about it the more I thought a bag would work better. I want it easy to grab and go when the time comes, but it does look cuter in a container. This would be something really great to take to a new mom while she's in the hospital for her and her family if you know the snack foods they like. I know I'm always trying to come up with something to take to the hospital when someone has a baby that is useful and not something they see and are thinking it's one more thing they have to pack home.
That's when I thought of having a goody basket in my room specifically for my husband and Grant since they would be there the most. I thought about the snacks each of them likes, made my list, and headed to the dollar tree.
For my husband: sunflower seeds, snickers, sweetarts, butterscotch candies, and gum
I probably won't keep it in this bin. The more I thought about it the more I thought a bag would work better. I want it easy to grab and go when the time comes, but it does look cuter in a container. This would be something really great to take to a new mom while she's in the hospital for her and her family if you know the snack foods they like. I know I'm always trying to come up with something to take to the hospital when someone has a baby that is useful and not something they see and are thinking it's one more thing they have to pack home.
Wednesday, February 26, 2014
DIY Maternity Hospital Gown
I am super excited about this post, for a few reasons but one of them being I didn't actually think I was going to get this project finished.
I made my own hospital gown using this pattern. I've had this on my to-do list since early fall. Of course I had planned on making it way back then but fall is too busy a time to add projects I can technically put off until after the New Year. So I procrastinated like I always do, but this past weekend I finally made it in to Hobby Lobby in the hopes of them having the perfect fabric on clearance.
They didn't have the fabric I envisioned but I really like what I found. I'm normally more of a blue kinda girl and that's what I wanted but I found this chocolate brown with teal polka dots for $3 a yard and thought it would probably work better. I thought the dark color would be good considering it could possibly get a little messy, the brown will hide some of that if necessary. I ended up buying 3 yards in case I needed to add length to the gown. I also bought 2 packages of double fold bias tape and 1 spool (3yds) of 1 inch ribbon. Of course I used coupons for the bias tape and ribbon and the total for my gown ended up being $13 and some change. Not bad considering the ones online are $40 or more.
Here it is without the ribbon tie.
The ribbon isn't necessary but it makes me feel less of a huge whale waddling around. Plus it adds a cuteness factor to it.
I used Velcro on the shoulders instead of snaps like some other bloggers. My only reason for this is I had Velcro in my stash and I knew I could sew it on quicker than attaching snaps. Plus I really think Velcro will be easier to attach with one hand after nursing, rather than trying to re-snap a bunch of snaps.
I also liked the look of the ribbon around the waist or on top of my belly whichever way you wanna put it, so I added 2 small belt loops one on either side of the gown to hold it in place. I didn't notice anyone else adding this little detail but when I thought of having the ribbon I wanted to make sure if it came untied it wouldn't just fall to the floor. As I will probably be distracted I don't want to keep track of a ribbon.
The pattern and original directions didn't call for bias tape but I saw this blog and really liked the looks of it. I however am not great with bias tape and probably didn't do mine right. Actually I know I didn't but hey, I gave it my best shot and I'm not complaining with the results. One day I'm gonna learn how to put it on right.
The directions on the pattern confused me a little. None of the other blogs I read had any problem with them so I'm gonna assume it's a combination of my lack of brain function after a full day with a 3 year old and 2 year old and pregnancy brain on top of that. I followed the parts I could and was winging the rest but it's seriously so simple that even winging it was easy.
The pattern called for a button on each shoulder next to the neck line. I thought this was probably pointless so wasn't going to add them. Then when I finished the gown I realized they actually did serve a purpose. If you try to leave them out this is what your gown will look like.
Even after realizing this I still didn't want to do buttons so I added an extra piece of Velcro. I didn't want any part of the gown to be cumbersome when trying to nurse my little one.
I didn't add the pocket to the top for a heart monitor since I thought it was probably unnecessary for labor and delivery.
I wanted to make sure my backside was completely covered while making trips to the restroom and such, since I know from experience it's difficult to hold the back of your gown, the IV pole, and walk to the restroom all at the same time during labor. So instead of cutting the fabric following the left and right back pattern pieces. I instead did 2 left side pieces and positioned the ribbons accordingly.
I only did a 1/2 inch hem around the bottom and didn't end up adding any extra length and this came to just below the knees and I'm about 5ft 7inches. I'm ok with this length as I didn't want anything really long to have to mess with during delivery and exams. In a few of the blogs I looked at they added length because they felt like this length was too short. If your on the fence go ahead and add a few inches because it's easier to take away extra than to add more at the end.
While brown still isn't my favorite color, I'm thrilled with my gown. I love the fact that I won't have to wear one of the dingy white gowns the hospital provides. I love that I can use this when I get home as a nursing nightgown if I want so it's not just a one time use, not that it still wouldn't be worth it.
Here is the backside of the gown. I still need to trim the ribbon a little but other than that, it's ready to go in my hospital bag!
I just wish now that I had seen this pattern back when I knew a bunch of people having babies so I could make them one. They really are easy to put together and would make a really fantastic baby shower gift, especially for a 2nd or 3rd time mom as they usually already have most of the baby stuff covered and could use some mommy pampering.
Hopefully it won't be too long before I will have pictures of my gown in action with my little one in my arms!
Monday, February 24, 2014
Nursing Cover Clip
I had a friend make me a nursing cover for when Grant arrived with the boning and everything. I honestly wasn't really a fan of the boning. It made it difficult to fold and pack in my bag, and I didn't feel completely covered when I used it so this time around I was looking for something different. I wanted something that was easy to pack and didn't take up much room in my diaper bag.
I searched online for different options and the one I liked the best was a nursing clip you could use with any blanket to make it a nursing cover. This would be easy to keep one in the car, in my purse, diaper bag or even my pocket. I like to travel light when it comes to baby stuff these days. I think most of us always have a receiving blanket in our car or bag and this clip would easily turn that into a cover.

Unfortunately I didn't get any pics during the process of making this, I know I know I'm a slacker. I apologize profusely. I'll try to walk you through it as it's super simple.
I cut my fabric 4 inches wide by 22 inches long. Measure the length you want yours as you may need a little more or less. Then I folded it in half lengthwise and pressed it to create a center fold. Unfold it and take the one side and fold it to the center fold, press. Do the same with the opposite side. Then fold it in half (using the center fold you already pressed in the beginning). Fold your unfinished ends towards the inside so they won't show and straight stitch all the way down .
Then just loop each end through a suspender clip and stitch it down like shown below.


Hopefully that wasn't too confusing because they really are simple to make and really quick too. I want to make a few of them to keep in different places so I'm never without and it's one less thing I will have to remember to always pack in the diaper bag.
This is one more item that would go great in a hospital kit for a new mom or baby shower gift if you know the mom is going to be breastfeeding.
I searched online for different options and the one I liked the best was a nursing clip you could use with any blanket to make it a nursing cover. This would be easy to keep one in the car, in my purse, diaper bag or even my pocket. I like to travel light when it comes to baby stuff these days. I think most of us always have a receiving blanket in our car or bag and this clip would easily turn that into a cover.
Unfortunately I didn't get any pics during the process of making this, I know I know I'm a slacker. I apologize profusely. I'll try to walk you through it as it's super simple.
I cut my fabric 4 inches wide by 22 inches long. Measure the length you want yours as you may need a little more or less. Then I folded it in half lengthwise and pressed it to create a center fold. Unfold it and take the one side and fold it to the center fold, press. Do the same with the opposite side. Then fold it in half (using the center fold you already pressed in the beginning). Fold your unfinished ends towards the inside so they won't show and straight stitch all the way down .
Then just loop each end through a suspender clip and stitch it down like shown below.
Hopefully that wasn't too confusing because they really are simple to make and really quick too. I want to make a few of them to keep in different places so I'm never without and it's one less thing I will have to remember to always pack in the diaper bag.
This is one more item that would go great in a hospital kit for a new mom or baby shower gift if you know the mom is going to be breastfeeding.
Saturday, February 22, 2014
DIY Hospital Slipper Socks
I've slowly been gathering items for my hospital bag. I feel like I have plenty of time left so I've been procrastinating like crazy. I didn't use slippers much in the hospital when I had Grant, instead I just wore socks. They tend to be a little slippery on the tile floor in most hospitals and the last thing you want to have to worry about is slipping and falling after you've given birth.
I looked for slipper socks at a couple stores and was surprised to find them pretty expensive, or at least to me they were, but then again I'm pretty cheap when it comes to such things. I thought about scrapping the idea of having them in my hospital bag just so I didn't need to buy them, then I thought "why not make some myself?".
So I dug out some puff paint and a couple pair of socks.

Flatten the bottoms of the socks.
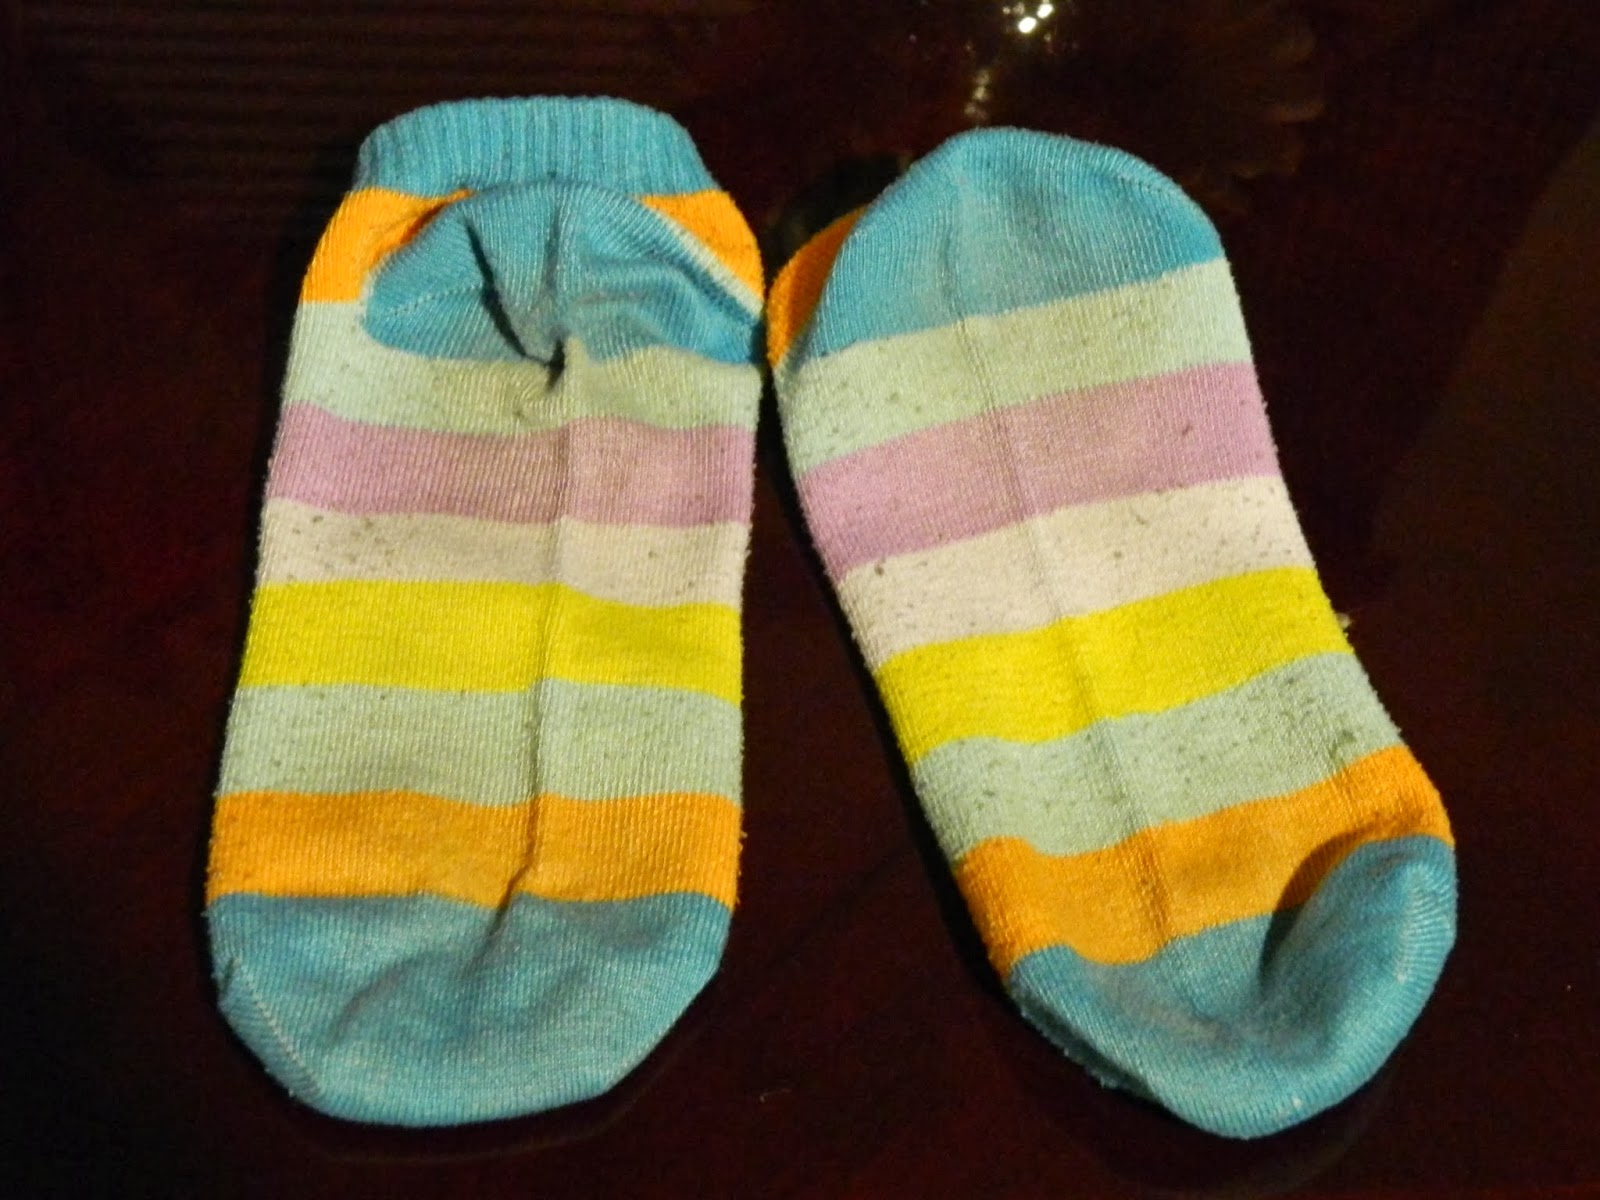
Then make some designs with your puff paint. I did circles and dots in 2 different colors. Then just let them completely dry.
 Now you have a super easy and way more affordable pair, or two, of hospital slip proof socks. This would be great to put in a hospital kit for a new mom as a baby shower gift, except spring for a new pair of socks instead of raiding your own sock drawer, haha.

I looked for slipper socks at a couple stores and was surprised to find them pretty expensive, or at least to me they were, but then again I'm pretty cheap when it comes to such things. I thought about scrapping the idea of having them in my hospital bag just so I didn't need to buy them, then I thought "why not make some myself?".
So I dug out some puff paint and a couple pair of socks.
Flatten the bottoms of the socks.
Please ignore the fact these have stains on them, I swear they are clean, just old.
Tuesday, February 18, 2014
DIY Face Cleaning Pads:Preparing for Baby
There were a few things I wish I had in my hospital bag after I had Grant and I promised myself this time around I would have everything I wanted/needed. One of those things were face wipes/pads. It didn't even dawn on me to have these last time until I had been up since 1:54am, was in the hospital after 9 hours of labor and visitors started coming in. That's when I thought, "man I wish I could quickly wash my face and freshen up".
Now I could have easily went to the store and bought some face wipes, but what fun would that be, right? So instead I googled making my own and found loads of tutorials and blogs for the wipes but I wanted something small and easy to carry with me. I also wanted more of a facial cleanser not really just a makeup remover, I found this blog and was super excited it was exactly what I was looking for. She used baby wash, I think, but I wanted to use my face wash I use in the shower instead.


Now I could have easily went to the store and bought some face wipes, but what fun would that be, right? So instead I googled making my own and found loads of tutorials and blogs for the wipes but I wanted something small and easy to carry with me. I also wanted more of a facial cleanser not really just a makeup remover, I found this blog and was super excited it was exactly what I was looking for. She used baby wash, I think, but I wanted to use my face wash I use in the shower instead.
1T vinegar
1T rubbing alcohol
1T face cleanser
1cup distilled water
cotton rounds
-mix all ingredients in a jar and shake. Put cotton rounds in a container and add enough of the cleanser solution to moisten them. Don't do like I did and overly soak them because you will just end up dumping the excess out, and you won't want to be wasteful like me.
I stored mine in a small plastic container with a lid. If you have an old facial cleanser container that would work even better but I didn't so this was my solution.
These are super convenient and work great. They don't dry out your face, just leave your skin feeling nice and clean.
Friday, June 21, 2013
Tie Applique Bibs & A Hospital Survival Kit
Let me start off by saying I'm so LOVING these bibs. I have actually contemplated keeping them (which would be ridiculous since Grant doesn't use them anymore and we have no baby around), they are just that adorable.
I saw a picture on the web (of course I saved the pic in my favorites file but no web address of where I found it) and knew if someone had a boy I would need to make them. Go figure not a few weeks later I found out my cousin was having a baby boy, JACKPOT!

I used brown corduroy and navy blue linen fabric and they turned out fantastic. I used old shirt scraps for the tie applique and it added just the right touch. If I ever have another baby boy I'm making a dozen of these.
I also put together a hospital survival kit. I know as a first time Mom I wasn't really sure of what to take and everyone told me something different. I, of course, packed a small suitcase for myself and a large bag for my new little guy, only to find out I didn't need 80% of the stuff I packed. So I ended up just making more work for myself when it was time to leave and repack all my crap and haul it to the car.

Here is what I included with a tag explaining why the item is necessary:
Flip Flops- hospital showers are not clean. I don't care how many times the cleaning people have been in to scour them out. I would not be bare foot in one, and that's coming from someone who has worked in a hospital.
Travel shampoo/conditioner-self explanatory & no need to pack them up and take them home, just pitch them before leaving.
Body wash & mini loafa-every new mom should have more than a cheap bar of soap and a thin wash cloth when taking a shower. We have been through enough, we deserve better.
Almay makeup remover- I use these as makeup removers but also as a facewash when on the go. After labor and delivery a quick freshening up before visitors arrive makes us new mom's feel a thousand times better.
Vaseline- if your little guy is going to be circumsized this is a must. When I had my son they told me to put vaseline on the area to prevent the diaper from sticking and to keep urine out of the area. The only problem with this is they only give you these teeny tiny packets of vaseline which I, of course, used 1 whole one every time I changed his diaper, and it seemed to take forever to get more when I ran out. It's something you don't want to have to wait for when changing a diaper.
Lotion: between the hand washing and Purell your hands will be dry as all get out and lotion is a must.
Stretchy headbands-I don't know one single new mom who wants to worry about her hair while in the hospital. These come in handy.
Lip Balm- labor and delivery makes your lips dry
Small Notebook- The thing I wish I had done more than anything else was write down my birth story. The funny things said and done leading up to my son's birth. What time I went into labor, what I was thinking and feeling. Who came to visit and their reactions. What it was like being new parents those first few days. You think you will remember all those little details but you forget sooner than you think. This is one item I will have in my next hospital bag.
**Not included in this kit but another must if you are going to be a breastfeeding mom (definately one I will include the next time I need a hospital kit) is nipple cream. I had a very difficult time getting Grant to latch on correctly and therefore became sore very quickly. The nurses gave me cream in these tiny packets (just like the vaseline), but once again I ran out quickly considering they wanted me to attempt nursing my new little one every 30 minutes to an hour, and getting more seemed to take more time than it was worth. I ended up doing without many times because I got tired of waiting. Nurses are very busy and I respect that which is why I will just bring my own the next time to make it easier on myself.
My intent was to put all these items in a cute little drawstring bag but of course I procrastinated and before I knew it, it was mid June (and she's due June 24th!) and I realized she could go into labor at any time and here half my gift is hospital stuff, which she can't use if she's already given birth and returned home before she received my gift. So I put all the items in a box and mailed it out as is. Hopefully she won't mind.
Subscribe to:
Comments (Atom)