Thursday, August 23, 2012

Mickey Birthday Bowling

I finished the bowling game I have planned for Grant's birthday.  I went back and forth on how I wanted to do it, what I wanted to use, etc.  Originally I saw toilet paper bowling over at Oopsey Daisy and thought for sure that's what I wanted to do.  However when I set my party budget at $50 (that includes food, drinks, favors, and decorations) I started trying to find ways to use things I already had around the house because any time you have a small budget, every dollar counts.  That's when I thought of using veggie cans.

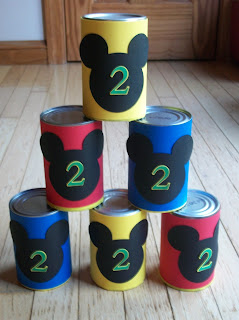
So after a few dinners I collected 6 veggie cans, took the lids off with a can opener and put masking tape over the rim in case of sharp edges.

 
I bought a package of primary colored cardstock at Hobby Lobby to use for multiple decorations throughout the party.  I picked yellow, red, and blue and wrapped the cans with them sealing them with glue dots. 
 
 
Of course I had to tie in Mickey so I decided to use my Cricut and my Mickey and Friends cartridge to cut out a black Mickey head.
 
(After taking the above pic I decided to put the can opening down so I switched the Mickey around)
 
Just a plain Mickey head wasn't enough so I added the number 2 to each of the cans.
 
 
I personally think they are too cute! Grant kept wanting to knock them over while I was trying to get pics of them to post, so even if they don't actually "bowl" with them I know they will at least knock 'em over and stack 'em up.


Monday, August 20, 2012

Mickey Mouse Clubhouse Subway Art

I saw birthday subway art here at Oopsey Daisy and thought it would be too cute to make one for my little guy's party.


At the very bottom is his birthday.  I downloaded the Mickey, Minnie, and Waltograph fonts from dafont.com.  I made my art in a Microsoft Works Word document by creating txt boxes of varied sizes.  It's pretty simple but I think it will look cute as part of the decorations on the gift table. 

Thursday, August 16, 2012

Mickey Mouse Clubhouse Water Bottle Labels

Last year for Grant's birthday I created these water bottle labels.  While I thought they turned out really cute, they were alot of cutting and glueing and I decided this year I didn't want to put up with all that.  So I'm keeping it a little more simple and classic.


I made each label with a different character because it's easy to get lost and only feature Mickey Mouse.  The more characters you showcase the more colors you will tie in.  I found all the character images using google searches and copying and pasting them into a word document.

Our party this year will consist of a family dinner, nothing too big, under 20 people but even still I have all the elements I want.  I love water bottle labels and they have become a staple at every party I've had since my wedding.  They are a cute, simple and inexpensive way to add a personal touch to any party.  Not to mention I don't like providing a bunch of 2 liters of sodas because the cost can add up quickly and we don't let Grant have soda yet.  I figure if it's his birthday why should we have a drink he can't even have.  So instead I plan on having homemade lemonade, sweet tea, and anyone who doesn't like either of those can have the water (but I don't know how anyone could not like my homemade lemonade).

Monday, August 13, 2012

DIY Christmas Memories Board Game

As I mentioned in my Christmas in July post I'm planning on making my Mom a Christmas memories board game.  I finally started on it and I'm so excited to get it finished.  I've been waking up extra early (when no one else is awake) and staying up late to work on it without her seeing anything.

I've been on the look out for board games at yard sales that I can upcycle for this project and a few others I have floating around in my head.  I found this one for $0.25.  What a score!
The box is in pretty good condition so it will get mod podged with Christmas scrapbook paper.

I didn't look at the game board before purchasing it.  It's a bit of an odd shape but for $0.25 I'll make it work.


I bought 2 pages of scrapbook paper at Hobby Lobby over the weekend when they were having a 50% off sale.  For both pages I spent all of $0.58.  I used the pages and glue dots to temporarily adhere the pages to the board.


After I get each of the games spaces cut out I will cover the entire board with clear contact paper.

I feel like I am on a roll getting started with crafty Christmas gifts this early in the year.  I have a tendancy to procrastinate and I'm trying really hard not to do that this year with my handmade Christmas gifts.

I will have more on this board game later but I wanted to show it coming together, and prove I have been crafting since I haven't been blogging a whole lot haha.

P.S. If you get started on your Christmas crafting late and yard sale season is over, you can always wait for Black Friday and you can find Candyland and Chutes & Ladders for about $3 each.  Just put the pieces aside and use the gameboard and box for your project.  It's not as good of a deal as $0.25 but you could still finish the whole project for under $10.


Saturday, August 11, 2012

Mickey Mouse Birthday Beginnings

I have been working on Grant's birthday decorations.  This year we are having a Mickey Mouse Clubhouse theme, both Grant and my neice love the Hot Dog dance.  My mom happened to find the Mickey and Friends Cricut cartridge last year for $13 on clearance so I'm using it for the decorations.
Here are the characters I've finished so far:

I also have Mickey, Minnie, and Goofy but I am lacking 1 color of cardstock to finish them.  As of now these character cut outs will be used to decorate for the bean bag toss.  Can we take a moment and say how much I love my Cricut.  It makes creating birthday decor so much easier and cuter than I could create by myself.

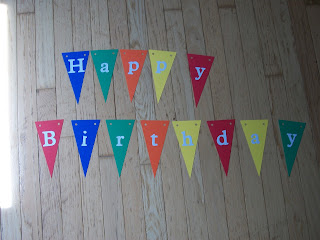
I used the Calligraphy cartidge to make the penants for his banner.  I made mine 7 inches.  The letters are from the Plantin Schoolbook cartridge and they are each 2 inches.  I have striped fabric that has all the primary colors I'm going to back each of the penants with but I haven't gotten them sewed yet.


His invitations are simple yet I think they are so darn cute! I looked all over the internet for invite ideas and saw some really cute ones I was going to copy, then decided to do something of my own. 

I'm going to use the invitation above and make an invite wrap to jazz it up a bit.  I bought a yard of striped fabric that incorporates all the colors I'm using for the party.  It will be used in the banner but I'm also going to create a wrap about 2 inches wide to go around the center of the invite (big enough to cover mickey, small enough you will be able to read the first 2 lines).  On top of this I want to layer a red smaller cardstock wrap with a black mickey head in the center with a 2 on top of that.  Does any of that make sense?  I'm super excited to get these decorations started and hope my steam doesn't run out before everything is finished.

What else is on my birthday to-do list?  Water bottle labels, bowling and bean bag toss games, lollipop tree, favor bags, cupcake stands, birthday shirt, and centerpieces.  My list isn't very long this year.  After the late nights I had preparing for Grant's Toy Story birthday last year I learned alot about time management, along with how to make things easier on myself.

Stay tuned over the next 2 months for more Mickey Mouse Clubhouse birthday tid bits.


Friday, August 3, 2012

Mens T-shirt into Boys PJ Shorts

I am a little obsessed, yes I said obsessed, with repurposing.  Especially when it comes to stuff for Grant.  Little ones are so expensive and they grow out of clothes so quickly (or maybe my child is the only one who went through a size a month for the first 6 months of his life) that I can't bring myself to constantly be buying new clothes for him.  I am an avid yard saler, mainly just for baby clothes, and try to buy the sizes he will need in between yard sale seasons (October-May). 

However when there are things I haven't come across yet and he still needs them I try to find a way to reuse and make them from items we already have.  The main items being pajamas and shorts.  I have a garbage bag full of my husband's old shirts and decided I could make some pajama shorts out of a few of those.  In case no one else has thought of his I decided to make a little tutorial.  Hopefully it will make sense, but it's super easy and you should be able to figure it out (if I can do it a monkey could do it).

First, find a pair of shorts that fit your little one now and fold them.
Lay your adult size t-shirt out making sure the seems are in the right place (on either side, sometimes with a worn out shirt they can be off a little) and the fabric is smooth.

(the t-shirt I used in the above picture did not have any seams on the sides.  In this case fold your shirt in half matching up the right and left sides of the shirt and smooth out your fabric).

Lay the pair of shorts you wan to use as a pattern with the straight side flush against the seam and the bottom of the shorts flush against the bottom seam of the shirt.  By using the bottom seam that's already finished you will save yourself time and energy by not having to hem the bottom of the shorts.

Cut around the shorts about a 1/2 inch from the shorts themselves.  When you get to the point and are cutting up toward the waist be sure to curve out with your cutting.  This is so you will have enough extra fabric for the waistband.


Take your 2 pieces and lay them flat with right sides together.  Pin the right and left sides from the waist (the top of your fabric) to the end of the curve.  You can see in the picture below the little pink dots are my pins.


After you pin the fabric together stitch along your line of pins with a 1/2 inch seam allowance.

Now bring your seems together still keeping right sides together.  These 2 seams will be your front and back center seams.  You can see in the picture below they are starting to look like actual shorts.  You will need to spread the 2 legs of the shorts apart and pin them each matching the front to the back.


Make one continuous seam starting at one end, sewing to the center seam, then sewing down the other leg.

Since I utilized the bottom hem of the t-shirt there's no need to hem the leg bottoms.  Now all that's left is the casing for the waist.  The size of the casing depends on how wide the elastic is.  I like to use 3/4inch for shorts so I make a casing of about 1 1/4inch to be on the safe side.  Thread your elastic through your casing, stitch closed the opening and you're done.


I ran out of elastic to finish the shorts from the shirt I've been photographing for the tutorial but the above shorts were made the same way.  This is a great way to use up your husbands old t-shirts.


Thursday, August 2, 2012

DIY Training Pants

As I mentioned in this post I'm thinking and planning on training my son, but the cost of store bought training pants is overwhelming and way more than we can afford.  This summer I've been scouring yard sales looking for underwear and training pants in good condition and last weekend I hit the jackpot.  I now feel like I have enough training pants and underwear to get through an entire day if he pees/poos in every single pair every half hour, haha.  Let's hope thats not the case, for mine and my washing machine's sake.
At one yard sale last weekend I scored 7 pair of white 2T underwear for $0.25 each.  I hate white underwear, especially for potty training because so many minutes of my day will inevitably be dedicated to stain removal.  So I decided to make all 7 of them into thick training pants.  I first saw the idea here, but didn't want to use up the few pair of cute underwear I had to make them.

To make the trainers I took some wax paper, a Sharpie, and a pair of the underwear.  I layed the wax paper over the underwear and traced a pattern around the front and then the back.  I cut it out and taped it together.


Then I cut the piece out of my prefold diapers, I'm gonna call it a soaker.


 Pin the soaker in place.

Now stitch it into place (sorry for the very poor quality of the pic below but at 5 am with no natural light, what's a girl to do). 


Here's how it looks turned right side out:

I didn't have white thread or you probably wouldn't even be able to tell there was a soaker sewn in.  These aren't water proof so I'll still have to have the rubber pants over top.  When I've discussed potty training with different people they have said using regular underwear can be a pain with the rubber pants because you get a puddle which ends up everywhere when you go to change them.  I'm hoping this sewn in soaker prevents this from happening. 

I have also acquired about 5 pair of these white training pants.  Again, I really hate plain white.


I have some PUL fabric I bought at Hobby Lobby specifically to use for training pants.  I'm in the process of adding a layer to my white training pants to cuten (is that a word, guess it is now) them up a little.

I haven't had the chance to sew the layer on but this is what it should look like.


I got the idea from this website.

I'm hoping over the next few days I will get to finish all my underwear trainers and my waterproof trainers to show off.





LinkWithin

Related Posts Plugin for WordPress, Blogger...

Total Pageviews