You know you're at the end of your pregnancy when......
You have to get a little momentum going in order to get off the couch.
You have to scoot your ever growing behind to the end of the couch and use your arms to push off the back of the couch in order to get off the same couch. So much work just to get up.
You wake up all hours of the night for no apparent reason and can't for the life of you get back to sleep.
You need no less than 6 pillows surrounding you and holding up your belly while you sleep.
Sleeping on your back makes you feel like you can no longer breathe and you sleep on your sides so much they actually get sore throughout the night.
You have acid reflux....horrible, never ending, doesn't matter what you eat, acid reflux.
Every time you get up you make a small groaning noise because your body literally hurts from the weight of your belly.
Your thighs ache all day because this baby is sitting right between them getting ready for it's debut.
Every weird ache you get you are saying a silent prayer it is the beginning of labor.
You pull a muscle, or multiple muscles, in your belly because you rolled over at night and had no support under your belly.
You wonder if your stomach stretches another inch if it's possible for it to actually burst.
The act of getting dressed makes you out of breath.
Bending over is a chore and requires some strategy.
Even your large maternity clothes are slowly starting to no longer fit.
Going to the store makes you exhausted and in serious need of a nap.
The sheer act of standing up makes you feel like you will pee your pants before you make it to the bathroom.
You use the restroom only to stand up, fix your pants and shirt, and have the overwhelming sensation you have to pee again.
Your belly is constantly hitting the counter and "in the way" while you're cooking.
You accidentally almost knock your 3 year old over with your belly because you have no real concept of how far it actually sticks out.
Your toddler constantly looks at your belly and says, "mama your belly's big!"
Your sister says "Lisa you're looking pretty humongous today", and doesn't think you should be offended by it.
You welcome the horrendous pain of childbirth so you can not only finally see your little one but so you also no longer have to be pregnant. You are that uncomfortable
Friday, February 28, 2014
Thursday, February 27, 2014
Bad Mom vs. Good Mom
Throughout this pregnancy there have been many times I've felt like being pregnant has made me a bad mom. What I mean by that is, when the exhaustion takes over simply from growing another human being my patience is zilch and therefore I would get short with Grant. I hate that and I always regret it later.
Or when the morning sickness was at it's worst and he was having a needy day I would get irritable a lot faster. Once again, I always kicked myself later and tried to love on him more, always apologizing for my shortcomings. Of course his response was always, "it's okay mama, don't be sad". Which is enough to make your heart melt a million times over. Kids are so forgiving.
Last night I felt like a good mom, and it was all because my belly is too big. I started letting Grant unload the dryer for me so I wouldn't have to either get down on my knees and dig them out or bend over to dig them out. He has loved helping with this and you can see how proud he is of himself. Usually after he unloads it into a basket I set it aside until naptime or after he goes to sleep. That's when I fold everything and put it away. It's a habit from when he was little and would constantly unfold everything or knock my stacks of laundry over. A few months back I taught him how to fold wash cloths, he was so excited, but because I am a creature of habit I still would save the laundry for when I was by myself and could get it done quickly.
Isn't that what most stay at home mom's do? You get so caught up in the day to day chores and finding ways to get them done as quickly and efficiently as possible you forget you have a little one who is craving to learn new things. So last night I decided to go ahead and start folding the towels and let him help me. He takes his time and sure I could get it done twice as fast but did I really have anything else I needed to rush to get done? No.
So I let him take his time, and it was so thrilling to see the pride on his face as he folded each one and made his 2 piles, one of wash cloths and one of rags. He was a little perfectionist, which I've never seen in him before.
It hit me while I was watching him that this could be one of the last times he is my only little one in the house, that he is my sole focus during the evenings and I should be taking advantage of every moment to teach him things and give him extra attention before my focus has to shift between him and his new sibling.
Kids are amazing, and watching them learn new things and gain confidence in their abilities is something I don't think we think about much. There are so many times when life gets in the way and I'm trying to rush through things not letting him help me because I just want to get the task done and move on to the next one. Watching him made me realize I truly need to stop rushing and start paying more attention. Is the world going to end if the dishwasher doesn't get unloaded first thing in the morning? No
Is the fate of mankind going to be affected if vacuuming takes me an extra 20 minutes? No.
Does it really matter if my usual tasks take longer by letting my little guy help? No.
Those tasks will be there later and there is always tomorrow, and if by chance someone stops by and my floor is covered in crumbs or the sink is full of dirty dishes, or the table hasn't been wiped down yet, do I really care what they think? No.
Seeing the pride Grant has in doing things himself, and hearing him say "thanks, mommy for letting me help", makes all the extra time tasks may take completely and totally worth it.
DIY Soothing Breast Pads
I've been trying to round up some DIY's that will make the recovery period after birth a little less painful and uncomfortable. Since breastfeeding difficulties was one of my big issues with Grant and the pain of sore nipples is horrendous, I want to make sure I have everything I can to make it less painful and an easier transition. I noticed soothing gel breast pads that go in the freezer at the stores and wondered if there was a way to make a version of them myself, because for 1 pair they were 12.99 which is crazy to me. plus plastic gel pads just didn't seem like they would be all that comfortable on sore tender nipples.
When I googled it I found this website and thought they would be perfect, not to mention simple to make. It reminded me of the Boo Boo Bear ice pack I made for the kids.
I made mine out of the softest flannel I had in my stash and rice I had in my pantry. The tutorial said to make them 6inches but that seemed huge to me so I did mine 5inches and used a bowl as a pattern.

I used a water soluble quilting pen to make the 1 inch circle in the center and stitched around it. You can see the blue markings in this pic:

The tutorial I found only had the 1 inch center stitched and around the outside but I was afraid all the rice would pile in the bottom of the pad and be bulky. So instead I made 4 straight line stitches to divide the circle into 4 quadrants. Then I filled each one with rice. Since I haven't used these yet I can't speak to how well they do or don't work but I'm optimistic. These will be in my freezer ready for when I come home.
They were really easy and quick to make so I figure if they work great I can make a couple more to always have a set in the freezer.
If you know of someone who is pregnant and going to be breastfeeding these would be great in a breastfeeding gift basket or along with a baby shower gift, or even with the gift your taking to the hospital after the baby's born.
When I googled it I found this website and thought they would be perfect, not to mention simple to make. It reminded me of the Boo Boo Bear ice pack I made for the kids.
I made mine out of the softest flannel I had in my stash and rice I had in my pantry. The tutorial said to make them 6inches but that seemed huge to me so I did mine 5inches and used a bowl as a pattern.
I used a water soluble quilting pen to make the 1 inch circle in the center and stitched around it. You can see the blue markings in this pic:
A damp cloth wiped over the markings erases them.
They were really easy and quick to make so I figure if they work great I can make a couple more to always have a set in the freezer.
If you know of someone who is pregnant and going to be breastfeeding these would be great in a breastfeeding gift basket or along with a baby shower gift, or even with the gift your taking to the hospital after the baby's born.
Wednesday, February 26, 2014
DIY Maternity Hospital Gown
I am super excited about this post, for a few reasons but one of them being I didn't actually think I was going to get this project finished.
I made my own hospital gown using this pattern. I've had this on my to-do list since early fall. Of course I had planned on making it way back then but fall is too busy a time to add projects I can technically put off until after the New Year. So I procrastinated like I always do, but this past weekend I finally made it in to Hobby Lobby in the hopes of them having the perfect fabric on clearance.
They didn't have the fabric I envisioned but I really like what I found. I'm normally more of a blue kinda girl and that's what I wanted but I found this chocolate brown with teal polka dots for $3 a yard and thought it would probably work better. I thought the dark color would be good considering it could possibly get a little messy, the brown will hide some of that if necessary. I ended up buying 3 yards in case I needed to add length to the gown. I also bought 2 packages of double fold bias tape and 1 spool (3yds) of 1 inch ribbon. Of course I used coupons for the bias tape and ribbon and the total for my gown ended up being $13 and some change. Not bad considering the ones online are $40 or more.
Here it is without the ribbon tie.
The ribbon isn't necessary but it makes me feel less of a huge whale waddling around. Plus it adds a cuteness factor to it.
I used Velcro on the shoulders instead of snaps like some other bloggers. My only reason for this is I had Velcro in my stash and I knew I could sew it on quicker than attaching snaps. Plus I really think Velcro will be easier to attach with one hand after nursing, rather than trying to re-snap a bunch of snaps.
I also liked the look of the ribbon around the waist or on top of my belly whichever way you wanna put it, so I added 2 small belt loops one on either side of the gown to hold it in place. I didn't notice anyone else adding this little detail but when I thought of having the ribbon I wanted to make sure if it came untied it wouldn't just fall to the floor. As I will probably be distracted I don't want to keep track of a ribbon.
The pattern and original directions didn't call for bias tape but I saw this blog and really liked the looks of it. I however am not great with bias tape and probably didn't do mine right. Actually I know I didn't but hey, I gave it my best shot and I'm not complaining with the results. One day I'm gonna learn how to put it on right.
The directions on the pattern confused me a little. None of the other blogs I read had any problem with them so I'm gonna assume it's a combination of my lack of brain function after a full day with a 3 year old and 2 year old and pregnancy brain on top of that. I followed the parts I could and was winging the rest but it's seriously so simple that even winging it was easy.
The pattern called for a button on each shoulder next to the neck line. I thought this was probably pointless so wasn't going to add them. Then when I finished the gown I realized they actually did serve a purpose. If you try to leave them out this is what your gown will look like.
Even after realizing this I still didn't want to do buttons so I added an extra piece of Velcro. I didn't want any part of the gown to be cumbersome when trying to nurse my little one.
I didn't add the pocket to the top for a heart monitor since I thought it was probably unnecessary for labor and delivery.
I wanted to make sure my backside was completely covered while making trips to the restroom and such, since I know from experience it's difficult to hold the back of your gown, the IV pole, and walk to the restroom all at the same time during labor. So instead of cutting the fabric following the left and right back pattern pieces. I instead did 2 left side pieces and positioned the ribbons accordingly.
I only did a 1/2 inch hem around the bottom and didn't end up adding any extra length and this came to just below the knees and I'm about 5ft 7inches. I'm ok with this length as I didn't want anything really long to have to mess with during delivery and exams. In a few of the blogs I looked at they added length because they felt like this length was too short. If your on the fence go ahead and add a few inches because it's easier to take away extra than to add more at the end.
While brown still isn't my favorite color, I'm thrilled with my gown. I love the fact that I won't have to wear one of the dingy white gowns the hospital provides. I love that I can use this when I get home as a nursing nightgown if I want so it's not just a one time use, not that it still wouldn't be worth it.
Here is the backside of the gown. I still need to trim the ribbon a little but other than that, it's ready to go in my hospital bag!
I just wish now that I had seen this pattern back when I knew a bunch of people having babies so I could make them one. They really are easy to put together and would make a really fantastic baby shower gift, especially for a 2nd or 3rd time mom as they usually already have most of the baby stuff covered and could use some mommy pampering.
Hopefully it won't be too long before I will have pictures of my gown in action with my little one in my arms!
Tuesday, February 25, 2014
Nesting...
Nesting...
I've been told by various people one of the signs you will be going into labor soon is you start nesting. You get the sudden urge to clean the house from top to bottom, organize everything, etc, etc.
Does this actually happen to people?
I have to say it would be nice if it did because my apartment could really use a once over. As I sit and type this at 4:30 in the afternoon in my pj's and fuzzy robe, I have 2 sinks full of dirty dishes, a table covered in sewing projects, toys scattered across the living room floor, a load of clothes waiting to be folded in a laundry basket, another load of clothes in the dryer and 1 in the washer, and a kitchen bar with various bits of everything covering it.
Do I have any desire to clean any of this?
Heck no!
What do I do instead? Sit in my pj's and bathrobe, eat some strawberry cheesecake my husband begged me to make, and surf the internet with Chuck the Truck cartoon playing in the background for Grant.
I feel exhausted and a little lazy but does that motivate me?
Heck no!
I actually haven't had one moment of overwhelming desire to clean or organize. this makes me feel like this baby is never going to come out.
I have a to-do list half a mile long with things I need to do before the baby arrives. What do those things include? I know you're just dying to know.
1. have husband put tv stand together and empty armoire drawers of DVDs so I'll have a place for baby stuff downstairs
2. combine Grant's clothes into 3 drawers instead of the current 6 they occupy so this baby will have somewhere for it's clothes to go.
3. finish packing hospital bag
4. make postpartum padsicles
5. mop kitchen floor
6. vacuum...everywhere
7. stitch the newly found hole in Grant's brand new comforter we bought him for Christmas
8. get baby stuff out of storage. Yes it's true we have nothing in this apartment for our new little one. except some diapers and wipes. No worries though right? I've got plenty of time.
9. finish boy fleece baby hat
10. finish the 4 or 5 posts in my drafts that have been sitting half finished for over a week
11. finalize a grocery list for this weekend
12. change the sheets on Grant's bed
13. clean bathroom counter
14. make a batch of waffles for the freezer
15. make a batch of pancake mix for the pantry
16. make a double batch of syrup to have on hand for easy breakfasts
17. DIY some nursing cami's
That's the majority of my list. Ok so it's not half a mile long but long enough that I should get my growing butt in gear and get some stuff marked off of it.
But actually reading this list makes me more tired and wanting another nap. Yep I said another one, because I took a short nap with Grant today telling myself I don't have much time left to relax and nap and that I should be taking advantage of these final days, and I mistakenly thought it would give me some energy.
Did I feel refreshed and ready to tackle anything on my list after this nap?
Heck no!
What did I do after this nap?
Changed into my pj's, came downstairs, wrapped up in a fleece blanket and laid down on the couch to watch tv.
Do you know what I want to do now?
Cover up with my fleece blanket, lay down on the couch, and watch a show other than a cartoon.
Is that gonna happen with my 3 year old full of energy after his nap?
Heck no!
Baby Bibs:Preparing for Baby
The other day I was thinking of basic baby stuff I will still need when he/she arrives. Most items I have, especially for a boy, but if this one's a girl I know there will need to be some shopping done. I thought about going out and buying some items like bibs, receiving blankets, etc. in gender neutrals but have you taken a look at gender neutral stuff recently. Pretty much you can only get items in yellow, gray, and occasionally green, and the prints are almost always ducks or elephants. While I don't have anything against those colors or even ducks or elephants, if I have a little girl I know I will want all the pink and purple with flowers, polka dots, and frills.
So my solution was to raid my fabric stash and make enough of these items with some of my own gender neutral prints to get us by in the first few weeks. I found 3 prints I liked and cut 2 bibs each using neutral flannel fabric for the backing. I found the pattern I used here. I liked that these fastened on the side instead of in the back. Grant had a very chubby neck and Velcro bibs often left imprints in his skin. These are not super thick but with as much slobbering as babies do they will get changed frequently anyway. I didn't like thick ones on Grant until he started eating baby food, so I think these will work great in the early months.

I figured if the baby's a girl I will add some fabric flowers and ruffles to make them ultra girly. If a boy is coming my way then I'm all set.
So my solution was to raid my fabric stash and make enough of these items with some of my own gender neutral prints to get us by in the first few weeks. I found 3 prints I liked and cut 2 bibs each using neutral flannel fabric for the backing. I found the pattern I used here. I liked that these fastened on the side instead of in the back. Grant had a very chubby neck and Velcro bibs often left imprints in his skin. These are not super thick but with as much slobbering as babies do they will get changed frequently anyway. I didn't like thick ones on Grant until he started eating baby food, so I think these will work great in the early months.
I figured if the baby's a girl I will add some fabric flowers and ruffles to make them ultra girly. If a boy is coming my way then I'm all set.
Monday, February 24, 2014
Nursing Cover Clip
I had a friend make me a nursing cover for when Grant arrived with the boning and everything. I honestly wasn't really a fan of the boning. It made it difficult to fold and pack in my bag, and I didn't feel completely covered when I used it so this time around I was looking for something different. I wanted something that was easy to pack and didn't take up much room in my diaper bag.
I searched online for different options and the one I liked the best was a nursing clip you could use with any blanket to make it a nursing cover. This would be easy to keep one in the car, in my purse, diaper bag or even my pocket. I like to travel light when it comes to baby stuff these days. I think most of us always have a receiving blanket in our car or bag and this clip would easily turn that into a cover.

Unfortunately I didn't get any pics during the process of making this, I know I know I'm a slacker. I apologize profusely. I'll try to walk you through it as it's super simple.
I cut my fabric 4 inches wide by 22 inches long. Measure the length you want yours as you may need a little more or less. Then I folded it in half lengthwise and pressed it to create a center fold. Unfold it and take the one side and fold it to the center fold, press. Do the same with the opposite side. Then fold it in half (using the center fold you already pressed in the beginning). Fold your unfinished ends towards the inside so they won't show and straight stitch all the way down .
Then just loop each end through a suspender clip and stitch it down like shown below.


Hopefully that wasn't too confusing because they really are simple to make and really quick too. I want to make a few of them to keep in different places so I'm never without and it's one less thing I will have to remember to always pack in the diaper bag.
This is one more item that would go great in a hospital kit for a new mom or baby shower gift if you know the mom is going to be breastfeeding.
I searched online for different options and the one I liked the best was a nursing clip you could use with any blanket to make it a nursing cover. This would be easy to keep one in the car, in my purse, diaper bag or even my pocket. I like to travel light when it comes to baby stuff these days. I think most of us always have a receiving blanket in our car or bag and this clip would easily turn that into a cover.
Unfortunately I didn't get any pics during the process of making this, I know I know I'm a slacker. I apologize profusely. I'll try to walk you through it as it's super simple.
I cut my fabric 4 inches wide by 22 inches long. Measure the length you want yours as you may need a little more or less. Then I folded it in half lengthwise and pressed it to create a center fold. Unfold it and take the one side and fold it to the center fold, press. Do the same with the opposite side. Then fold it in half (using the center fold you already pressed in the beginning). Fold your unfinished ends towards the inside so they won't show and straight stitch all the way down .
Then just loop each end through a suspender clip and stitch it down like shown below.
Hopefully that wasn't too confusing because they really are simple to make and really quick too. I want to make a few of them to keep in different places so I'm never without and it's one less thing I will have to remember to always pack in the diaper bag.
This is one more item that would go great in a hospital kit for a new mom or baby shower gift if you know the mom is going to be breastfeeding.
Saturday, February 22, 2014
DIY Hospital Slipper Socks
I've slowly been gathering items for my hospital bag. I feel like I have plenty of time left so I've been procrastinating like crazy. I didn't use slippers much in the hospital when I had Grant, instead I just wore socks. They tend to be a little slippery on the tile floor in most hospitals and the last thing you want to have to worry about is slipping and falling after you've given birth.
I looked for slipper socks at a couple stores and was surprised to find them pretty expensive, or at least to me they were, but then again I'm pretty cheap when it comes to such things. I thought about scrapping the idea of having them in my hospital bag just so I didn't need to buy them, then I thought "why not make some myself?".
So I dug out some puff paint and a couple pair of socks.

Flatten the bottoms of the socks.
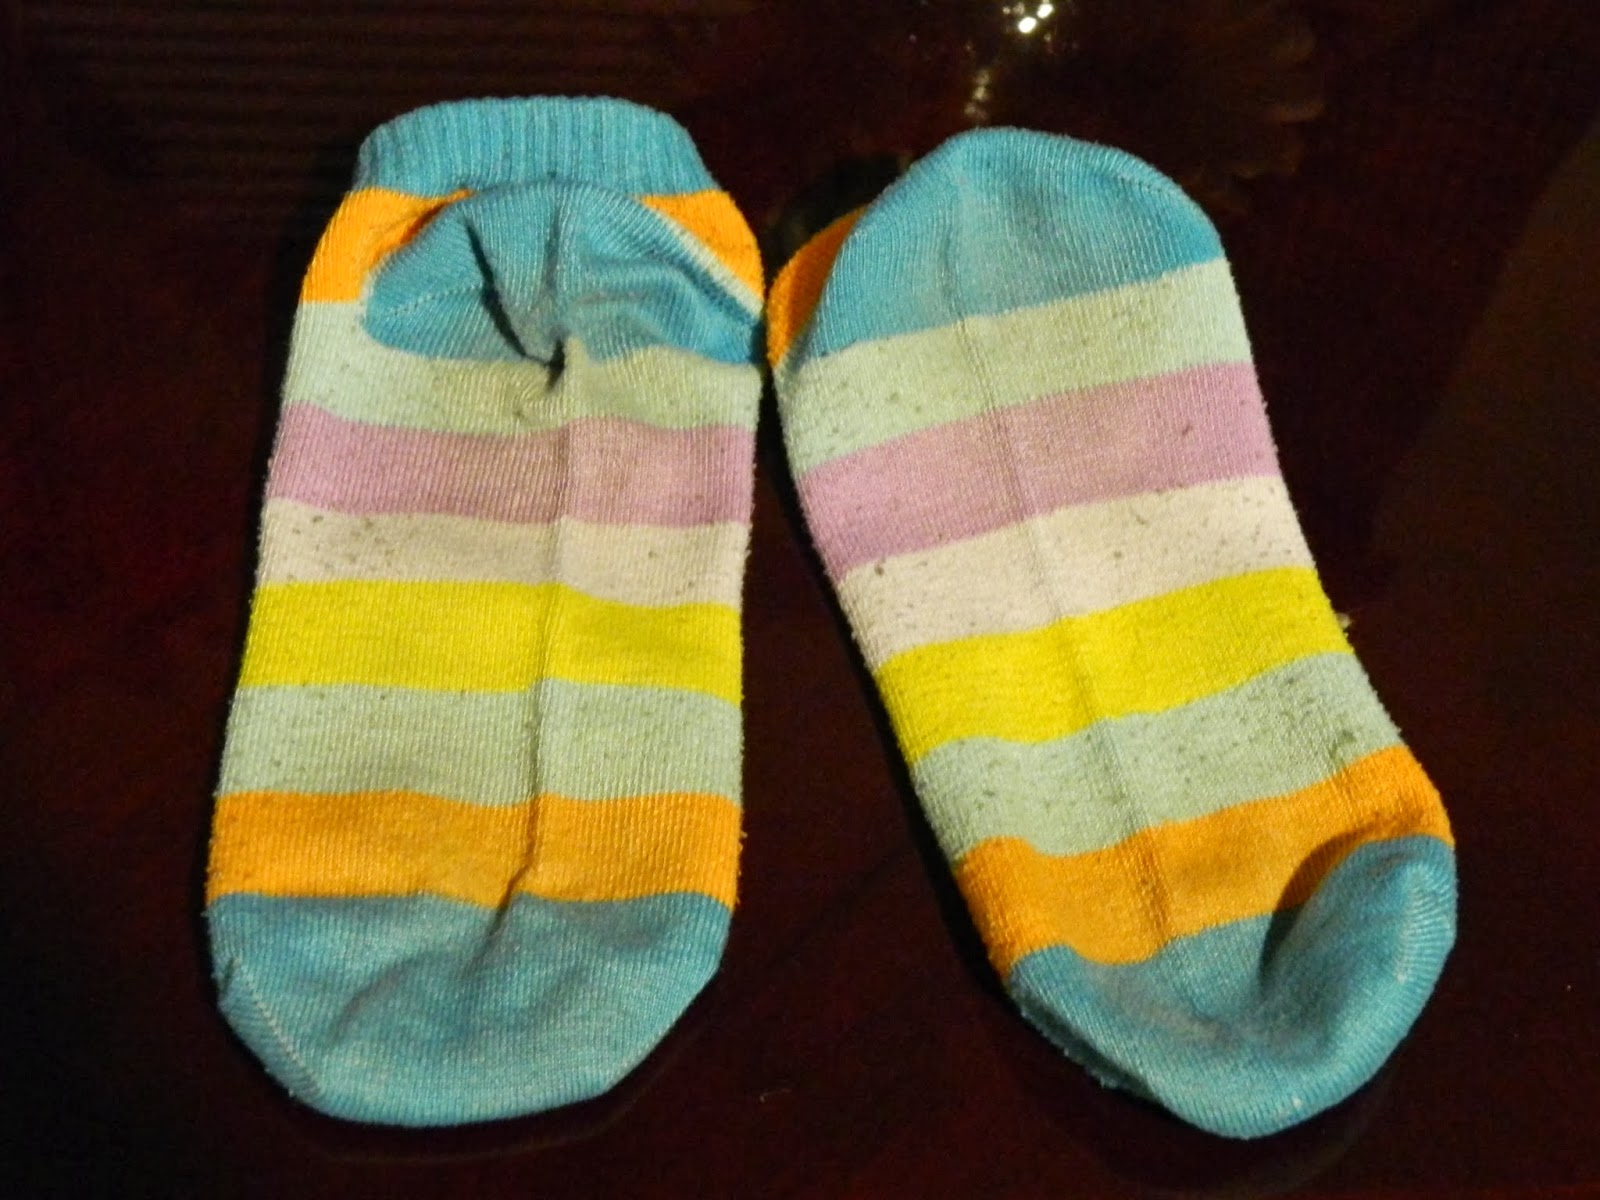
Then make some designs with your puff paint. I did circles and dots in 2 different colors. Then just let them completely dry.
 Now you have a super easy and way more affordable pair, or two, of hospital slip proof socks. This would be great to put in a hospital kit for a new mom as a baby shower gift, except spring for a new pair of socks instead of raiding your own sock drawer, haha.

I looked for slipper socks at a couple stores and was surprised to find them pretty expensive, or at least to me they were, but then again I'm pretty cheap when it comes to such things. I thought about scrapping the idea of having them in my hospital bag just so I didn't need to buy them, then I thought "why not make some myself?".
So I dug out some puff paint and a couple pair of socks.
Flatten the bottoms of the socks.
Please ignore the fact these have stains on them, I swear they are clean, just old.
Friday, February 21, 2014
Homemade Instant Oatmeal Packets: Preparing for Baby
I love Quaker instant oatmeal packets. I love them and yet I haven't bought them in years because they are so overpriced in my mind. I can buy a large container of quick oats for $2.29 at my local Aldi and the Quaker packets I can't usually get any cheaper than $1.99 and that's when they are on sale. So had the thought of making my own instant oatmeal packets and figured someone else out there probably already thought of this and could give me some pointers.
I found this website and decided to take her recipe and alter it a little to suit my needs. Here's what you're going to need to make these:

I didn't want to use my whole container of oats, since I already did my big shopping trip, so I didn't do the full 10cups of oats. Not to mention I don't eat oatmeal every day so I made 10 packets and used 5 cups of oats.
1st I measured out 5 cups quick oats. I took 1 1/2 cups of the oats and pulsed it with my Magic Bullet. Add the 1 1/2cups back in with the remaining 3 1/2 cups quick oats. Then I added 1c non dairy dry coffee creamer (I purchased mine at walmart for $1), 1t salt, and mixed it all together.
I used the snack sized bags I found at the Dollar Tree and measured 1/2 cup of the oat/creamer/salt mixture into each one. The recipe at the website above said to add the brown sugar in with the oats/creamer/salt but I chose not to do this because I was afraid there wouldn't be enough brown sugar in each baggie to satisfy me. So instead I chose to add the brown sugar after I had the oat mixture all measured into the snack bags. I used a regular cereal spoon and measured out about 2 of them into each bag. I also always add cinnamon to my oatmeal so I gave a couple shakes of cinnamon to each bag as well.

Then just seal and shake the bag to mix up all the ingredients and you have your very own instant oatmeal packs.
 I put all 10 of mine into a larger gallon size ziploc bag and used a piece of masking tape to tell how much water to add and how long to cook it in the microwave.

I'm so excited to have these ready to go for a quick breakfast after the baby is here. I have also posted about the waffle mix, muffin mix, and pancake mix I use and have made multiple batches of in preparation for the baby. You may be wondering why I have been stocking up on breakfast foods and not so much on dinner foods and the answer is simple.....When Grant was an infant I always forgot to eat breakfast because I was too involved in his eating habits, naps, and the daily household stuff and I didn't want that to happen this time. Not to mention I have Grant now and I want some quick stuff so I don't have to put forth much energy to make his breakfast in the morning.
**UPDATE: It's been a little over a month since Eva was born and these oatmeal packets have been so great to have in the pantry. I already made a second batch because I eat them about every morning. It's so simple to throw it into a bowl and nuke it for a couple minutes, I love it. I keep frozen peaches and blueberries in my freezer and add a handful to each bowl for added flavor and nutrients. Yummy!
I found this website and decided to take her recipe and alter it a little to suit my needs. Here's what you're going to need to make these:
I didn't want to use my whole container of oats, since I already did my big shopping trip, so I didn't do the full 10cups of oats. Not to mention I don't eat oatmeal every day so I made 10 packets and used 5 cups of oats.
1st I measured out 5 cups quick oats. I took 1 1/2 cups of the oats and pulsed it with my Magic Bullet. Add the 1 1/2cups back in with the remaining 3 1/2 cups quick oats. Then I added 1c non dairy dry coffee creamer (I purchased mine at walmart for $1), 1t salt, and mixed it all together.
I used the snack sized bags I found at the Dollar Tree and measured 1/2 cup of the oat/creamer/salt mixture into each one. The recipe at the website above said to add the brown sugar in with the oats/creamer/salt but I chose not to do this because I was afraid there wouldn't be enough brown sugar in each baggie to satisfy me. So instead I chose to add the brown sugar after I had the oat mixture all measured into the snack bags. I used a regular cereal spoon and measured out about 2 of them into each bag. I also always add cinnamon to my oatmeal so I gave a couple shakes of cinnamon to each bag as well.
Then just seal and shake the bag to mix up all the ingredients and you have your very own instant oatmeal packs.
I'm so excited to have these ready to go for a quick breakfast after the baby is here. I have also posted about the waffle mix, muffin mix, and pancake mix I use and have made multiple batches of in preparation for the baby. You may be wondering why I have been stocking up on breakfast foods and not so much on dinner foods and the answer is simple.....When Grant was an infant I always forgot to eat breakfast because I was too involved in his eating habits, naps, and the daily household stuff and I didn't want that to happen this time. Not to mention I have Grant now and I want some quick stuff so I don't have to put forth much energy to make his breakfast in the morning.
**UPDATE: It's been a little over a month since Eva was born and these oatmeal packets have been so great to have in the pantry. I already made a second batch because I eat them about every morning. It's so simple to throw it into a bowl and nuke it for a couple minutes, I love it. I keep frozen peaches and blueberries in my freezer and add a handful to each bowl for added flavor and nutrients. Yummy!
Thursday, February 20, 2014
Super Easy Fleece Scarf
My mom made a friend of hers an Ohio State Buckeyes fleece blanket for Christmas. She knows I find all kinds of uses for scraps of fabric so she's always saving me her remnants. This time was no different. As soon as I saw how large the remnant was I knew I needed to make a scarf out of it. I've been wanting to make an OSU one for awhile I just haven't bought the fabric, so this was perfect.
I didn't want this project to take much time, since I'm all about quickies, which is why I made this fringe one. Years ago I saw tutorials about how to make one and I've kept it in my mind all this time. After having made one now I question why the heck it took me so long to actually get it done. It seriously took no time at all. The most time consuming part was cutting the fabric.
I cut 3 strips of fabric 7 inches wide and 67inches inches long, stacked them on top of each other, and stitched one long line down the center.


Then cut strips on either side of the center line about 1 inch wide, making sure not to cut the center seam.

Shake it out a little bit and seriously that's all there is to it. No hemming, no trimming, no nothing. Super simple, and I love it.

I'm really wanting to make some pink ribbon ones for me, my mom, and sister, how cute would those be? Not to mention if you're looking for a quick winter birthday gift or Christmas gift this would be perfect and cost effective if you have quite a few people you're needing to gift to. With the temps being single and negative digits, and so much snow I feel like I'll never see grass again, I'm so glad I have this to keep me extra warm.
I didn't want this project to take much time, since I'm all about quickies, which is why I made this fringe one. Years ago I saw tutorials about how to make one and I've kept it in my mind all this time. After having made one now I question why the heck it took me so long to actually get it done. It seriously took no time at all. The most time consuming part was cutting the fabric.
I cut 3 strips of fabric 7 inches wide and 67inches inches long, stacked them on top of each other, and stitched one long line down the center.
Then cut strips on either side of the center line about 1 inch wide, making sure not to cut the center seam.
Shake it out a little bit and seriously that's all there is to it. No hemming, no trimming, no nothing. Super simple, and I love it.
I'm really wanting to make some pink ribbon ones for me, my mom, and sister, how cute would those be? Not to mention if you're looking for a quick winter birthday gift or Christmas gift this would be perfect and cost effective if you have quite a few people you're needing to gift to. With the temps being single and negative digits, and so much snow I feel like I'll never see grass again, I'm so glad I have this to keep me extra warm.
Wednesday, February 19, 2014
Pregnancy and the Waddle
Everyone told me, when I was pregnant with Grant, that I would know when I was getting close to the end because he would drop. I asked these people how I would know when he dropped and their response was, it will feel like his head is sitting right between your legs. I remember thinking on my due date that this little boy was never going to come out because he hadn't even dropped yet. I never felt him in my pelvis, never felt like his head was sitting between my legs, never felt pressure from him being low in my pelvis. Not until I was actually in labor which happened the day after my due date. Because he never dropped, I never waddled. I worked up until the day before he was born, 40 hours a week in a doctor's office seeing around 70 patients a day. I walked from the parking lot to the office which I swear seemed like half a mile and up 2 flights of stairs. I rarely took the elevator because in all honesty every day I was walking in (in my final pregnancy weeks) I was saying silent prayers that walking like this would cause my water to break so I wouldn't have to go in to work, haha. Needless to say my water never broke until the doctor broke it for me at 7cm.
Fast forward to this pregnancy and I feel the waddle coming on. There is no doubt in my mind this baby has dropped. I feel it burrowing it's head into my pelvis like it's trying to find it's way out regardless of me being in labor or not. Sometimes I'm walking and I feel like the baby suddenly dropped a couple inches more and that's when the waddle starts. While I realize this is a good sign, it means the end is coming and I'll get to meet my little one soon, it's freakin uncomfortable and I don't like to waddle. It makes me feel like I'm huge! Of course, maybe I am and I'm just telling myself I'm not to make me feel better.
My stomach has stretched so much that my belly button actually hurts when my pants rub against it. Did you know that could happen?
Am I the only one who didn't?
I actually almost knocked Grant over the other day with my big belly, hahaha. I'm actually laughing out loud while I type this because he gave me such a dirty look for invading his space. I of course apologized after I stopped laughing but I seriously can't gage where my stomach is most of the time. Maybe my whole body is in denial about how big it is, haha.
I keep reminding myself the end is getting closer every day, and while there is not one single part of me that's looking forward to the pain that is labor, I'm sooooo ready to hold my little one and find out if Grant has a brother or sister.
I'm counting down.
DIY Reusable Nursing Pads
With baby's impending arrival I've been trying to get a little prepared with some DIY's that will end up saving me money. I've had reusable nursing pads on my to-do list since summer. Why I put it off until the end is beyond me but I guess that's just my way. I found quite a few different tutorials and everyone had different ways they thought worked the best.
After reading a bunch of them I decided to make mine my own way using some pointers from other blogs. I used 3 different kinds of fabric, flannel, fleece, and PUL. I also used cotton batting as the inside layer in all of them. Some people used multiple layers of flannel instead of the batting but I was too lazy to dig through my stash for that much flannel and cut that many circles.
Some blogs used fleece as the waterproof layer on the outside, other's used PUL. I happened to have both so I made some of each.

Since I haven't used them yet I can't say if one or the other works better but I like the feel of the fleece over the PUL. I wasn't going for perfection with these since, let's face it, no one but me is actually going to see them. So I didn't make sure the edges were finished

and I didn't match up the thread color with the fabrics either. They will serve their purpose regardless.
At first I didn't plan on making them contoured, just round. I used a disposable nursing pad as a pattern so I would know what size I needed. I cut 3 layers of fabric for each pad, a layer of fleece or PUL, a layer of flannel, and a layer of cotton batting. Make sure your batting it 100% cotton and not a polyester, the cotton works better for absorbancy and looks better. Stack these 3 layers with the cotton batting as the center layer.


 After I made the first pad round and tried it in my nursing bra I realized it bunched up a little more than I liked so I needed to add some pleats, or darts, or whatever they are called, to make them contoured.
Once I put those in they fit perfectly. The first few I made with pleats I didn't sew them down and they looked like this when I was finished.
 After trying them on I thought you might be able to see them sticking up through my more form fitting shirts so I did a few like this:

They turned out perfect as far as fit, size, and you couldn't see anything through my shirts so I made all the rest with the pleats stitched down.
 One thing I love about these is there's no crinkling of fabric like the disposable ones. I truly hated that sound. And these are really soft against my skin which I think will be great, especially in the beginning with soreness.
I made about 13 pair and plan on making a few more. I really want enough to wear 1 through the day and 1 pair at night. I didn't actually ever have a problem with leaking when I nursed Grant. I never leaked one time and kind of felt like I was wasting my disposable nursing pads because they never had anything on them. I've been told by numerous other mom's who've nursed that this isn't normal haha. I think because Grant never latched on right my milk flow never got to be enough to make me leak. Either way this time I'm prepared and I love knowing I don't have to stock up on disposable pads. Those things can become costly really fast. If I remember they were about $6 a box when Grant was an infant and if you tend to leak I'm sure you can go through them quickly. When you're buying diapers, wipes, and nursing pads your bank account can take a hit fast, do yourself a favor and make some of these. I probably made 6 pair within an hour once I got on a roll and figured out exactly what worked for me. That's not too shabby in my opinion. Not to mention if you know someone who's having a baby and going to be nursing these would make a great baby shower gift.
After reading a bunch of them I decided to make mine my own way using some pointers from other blogs. I used 3 different kinds of fabric, flannel, fleece, and PUL. I also used cotton batting as the inside layer in all of them. Some people used multiple layers of flannel instead of the batting but I was too lazy to dig through my stash for that much flannel and cut that many circles.
Some blogs used fleece as the waterproof layer on the outside, other's used PUL. I happened to have both so I made some of each.
Since I haven't used them yet I can't say if one or the other works better but I like the feel of the fleece over the PUL. I wasn't going for perfection with these since, let's face it, no one but me is actually going to see them. So I didn't make sure the edges were finished
and I didn't match up the thread color with the fabrics either. They will serve their purpose regardless.
At first I didn't plan on making them contoured, just round. I used a disposable nursing pad as a pattern so I would know what size I needed. I cut 3 layers of fabric for each pad, a layer of fleece or PUL, a layer of flannel, and a layer of cotton batting. Make sure your batting it 100% cotton and not a polyester, the cotton works better for absorbancy and looks better. Stack these 3 layers with the cotton batting as the center layer.
Pin them together. Notice mine don't exactly match up all the way around. This is the beauty of these pads is perfection is unnecessary. You will be trimming around the seam later, so your edges don't have to match up.
Stitch once around using a 1/4inch seam allowance using a straight stitch. Then go around again with a zigzag or if you have a serger you can use that to finish the edges. This will add stability and make your pads last longer. Remember these are going to get lots of use and washed a lot too, you want them to hold up well through all that.
Once you have finished your edges cut around your zigzag stitch, making sure to cut close to it but not cutting through your stitching.
Now straight stitch a cross pattern
I didn't get a picture of the cross stitch before I added the pleats above so pretend they aren't there and you're just looking at the straight stitches.
Once I put those in they fit perfectly. The first few I made with pleats I didn't sew them down and they looked like this when I was finished.
Notice the pleats are stitched down.
They turned out perfect as far as fit, size, and you couldn't see anything through my shirts so I made all the rest with the pleats stitched down.
I made about 13 pair and plan on making a few more. I really want enough to wear 1 through the day and 1 pair at night. I didn't actually ever have a problem with leaking when I nursed Grant. I never leaked one time and kind of felt like I was wasting my disposable nursing pads because they never had anything on them. I've been told by numerous other mom's who've nursed that this isn't normal haha. I think because Grant never latched on right my milk flow never got to be enough to make me leak. Either way this time I'm prepared and I love knowing I don't have to stock up on disposable pads. Those things can become costly really fast. If I remember they were about $6 a box when Grant was an infant and if you tend to leak I'm sure you can go through them quickly. When you're buying diapers, wipes, and nursing pads your bank account can take a hit fast, do yourself a favor and make some of these. I probably made 6 pair within an hour once I got on a roll and figured out exactly what worked for me. That's not too shabby in my opinion. Not to mention if you know someone who's having a baby and going to be nursing these would make a great baby shower gift.
Tuesday, February 18, 2014
DIY Face Cleaning Pads:Preparing for Baby
There were a few things I wish I had in my hospital bag after I had Grant and I promised myself this time around I would have everything I wanted/needed. One of those things were face wipes/pads. It didn't even dawn on me to have these last time until I had been up since 1:54am, was in the hospital after 9 hours of labor and visitors started coming in. That's when I thought, "man I wish I could quickly wash my face and freshen up".
Now I could have easily went to the store and bought some face wipes, but what fun would that be, right? So instead I googled making my own and found loads of tutorials and blogs for the wipes but I wanted something small and easy to carry with me. I also wanted more of a facial cleanser not really just a makeup remover, I found this blog and was super excited it was exactly what I was looking for. She used baby wash, I think, but I wanted to use my face wash I use in the shower instead.


Now I could have easily went to the store and bought some face wipes, but what fun would that be, right? So instead I googled making my own and found loads of tutorials and blogs for the wipes but I wanted something small and easy to carry with me. I also wanted more of a facial cleanser not really just a makeup remover, I found this blog and was super excited it was exactly what I was looking for. She used baby wash, I think, but I wanted to use my face wash I use in the shower instead.
1T vinegar
1T rubbing alcohol
1T face cleanser
1cup distilled water
cotton rounds
-mix all ingredients in a jar and shake. Put cotton rounds in a container and add enough of the cleanser solution to moisten them. Don't do like I did and overly soak them because you will just end up dumping the excess out, and you won't want to be wasteful like me.
I stored mine in a small plastic container with a lid. If you have an old facial cleanser container that would work even better but I didn't so this was my solution.
These are super convenient and work great. They don't dry out your face, just leave your skin feeling nice and clean.
Monday, February 17, 2014
Waffle Mix: Preparing for Baby
The other day I made a muffin mix to help save time and make my life a bit easier after the baby arrives. Shortly after that I was making waffles for dinner, I love breakfast for dinner, and as I was starting to mix the dry ingredients I thought, I should make a double batch of this. I already have a homemade pancake mix I keep in my pantry and I swear by it. Now whipping up a pancake mix or waffle mix from scratch for a meal doesn't take hours, and it's far from difficult, but why not take short cuts when possible. I think we all have moments when it's time to cook breakfast (especially me because I can't seem to get the gumption to fix anything beyond cereal in the mornings) when even making pancakes from scratch seems daunting. With the mix already made I dread it less and it literally takes me under 5 minutes to mix up the batter. There's less of a mess because I only have to get out the milk and an egg, and anything that saves me some clean up I'm all about.
I love homemade waffles. Since I got my waffle iron and started making them from scratch I can't bring myself to buy them from the store. They just don't measure up, and we use it so much I'm wanting to upgrade to a waffle iron that makes four waffles at a time instead of the 2 mine makes. I have to say, I think mine are pretty darn delicious and I've had others confirm it. One batch usually makes about 15 waffles, give or take, so I don't have to mix up batter every time I want waffles but wouldn't it be nice to have half the work done for me already? The answer, yes.
I didn't have enough flour to make a whole canister of mix like I would have like to, but I did have some quart size baggies. Generally I hate using these for anything other than freezer stuff because I seem to run out of them too quickly and I hate buying them, but I decided this was worth it. So I took 2 quart size baggies, mixed up the dry ingredients:
1 3/4c flour
2T Sugar
1T baking powder
1/4t ground cinnamon
and put them in each baggie, labeling them with the wet ingredients needed to make the batter:

1 3/4c milk
1/2c oil or melted butter
2eggs
1t vanilla
I didn't add the directions for mixing because it's really just mixing the wet together and adding it to the dry. When I get more flour I want to make a canister of waffle mix and if you have enough to do this then each time you make a batch you will need 2cups of the dry mix.
I love these little short cuts and having things already made up. I feel like I'm getting more and more prepared for after the baby arrives, with ways to make things easier for me. This would also be great to do if you know you're going to be having company staying with you. Mix up a batch of dry ingredients and store it in your pantry so you can spend less time in the kitchen and more time visiting and spending time with your family.
Saturday, February 15, 2014
Hubby's Valentine's Day Gift: a day late
Every year since my son's birth my husband and I have made it a rule to stick with a simple Valentine's Day and to keep gifts $5 or less. The first year I made him a snicker's candy bar bouquet, the 2nd year I made him his favorite strawberry cheesecake, last year I bought his favorite candies, Smarties and Sweetarts, and put them in upcycled Starbucks Frappacino bottles that I painted and wrapped in scrapbook paper. This year I drove myself nuts for a good 3 weeks trying to come up with something different and simple and 2 days before V-day I realized I had no good DIY ideas and wasn't finding anything online that jumped out at me either so it was time to go to plan B, store bought.
I know I know, store bought gift for the hubs, what kind of DIY chick am I?
The answer is a very pregnant one with a loss for unique gift ideas. What else can I say? Sometimes you have to give in and take the easier way out. I decided to post this because I thought maybe next year someone will be on the search for a last minute idea that's not necessarily DIY or homemade but just cute and easy to grab at the store.
We got a blue-ray player for Christmas this year so we have been slowly finding inexpensive Blue-ray discs here and there. Let me tell ya it's a lot harder to find cheap blue-ray discs than it is to find cheap dvd's. We've lucked out finding some for $5 and I thought maybe I'd get lucky, that the Valentine's Day God's would smile down on me but no such luck. Instead I found the Hulk movie, which we had actually been wanting to see anyway, and added his favorite kind of soda that we never buy because it's a little pricey, Cream Soda.
 I was so lazy this year I didn't even go the extra mile to make him a card. Nope, instead he got a pink piece of cardstock with the note:
I know I know, store bought gift for the hubs, what kind of DIY chick am I?
The answer is a very pregnant one with a loss for unique gift ideas. What else can I say? Sometimes you have to give in and take the easier way out. I decided to post this because I thought maybe next year someone will be on the search for a last minute idea that's not necessarily DIY or homemade but just cute and easy to grab at the store.
We got a blue-ray player for Christmas this year so we have been slowly finding inexpensive Blue-ray discs here and there. Let me tell ya it's a lot harder to find cheap blue-ray discs than it is to find cheap dvd's. We've lucked out finding some for $5 and I thought maybe I'd get lucky, that the Valentine's Day God's would smile down on me but no such luck. Instead I found the Hulk movie, which we had actually been wanting to see anyway, and added his favorite kind of soda that we never buy because it's a little pricey, Cream Soda.
Sit back and relax with a six pack!
Happy Valentine's Day
The funny thing is, he ended up turning the card over and writing his message to me on the other side, haha. Can you tell neither of us planned ahead this year? Some wives might of been upset by this, I got a good laugh out of it and thought, this is what almost 5 years of marriage, 2 kids, and an extra long work week does to ya.
Red Velvet Cupcakes-Cupcakes for a Cure
The official beginning of the Relay for Life year started September 1st, and I had such good intentions to send cupcakes to work with my mom once a month starting then. However, as always September through December is a crazy busy time of year with the holidays and Grant's birthday and I never ended up getting around to it.
So I figured I only have 4 months from now until the end of the school year to raise money with cupcakes and I better get started. Naturally with Valentine's Day this week I thought red velvet would be the perfect flavor, plus I have never made red velvet and have been wanting to for awhile now.

I used the red velvet recipe from the girls of Georgetown Cupcakes except I didn't use red food coloring, I used the Red Velvet Emulsion I also used for the Red Velvet cut out cookies. Since the recipe was from Georgetown Cupcakes I thought I would be blown away with a really great flavor but I have to say I was a little disappointed. There wasn't enough of a chocolate flavor to satisfy me. The recipe calls for 2 1/2T cocoa and I have to say next time I will be using 1/4c to add more flavor. Most of the recipes from Katherine and Sophie say they will make 12 cupcakes and I always somehow end up with 18, I thought this would be the same for their red velvet recipe so I only added 1 1/2T red velvet emulsion. This recipe ended up making 24 cupcakes so I really should have added 2T of the emulsion and I plan to next time I make them.
All this being said, my husband said they tasted good and they were really moist right out of the oven. They rose perfectly and other than wanting a little deeper red color and a little extra cocoa flavor they seemed perfect.
So I figured I only have 4 months from now until the end of the school year to raise money with cupcakes and I better get started. Naturally with Valentine's Day this week I thought red velvet would be the perfect flavor, plus I have never made red velvet and have been wanting to for awhile now.
I used the red velvet recipe from the girls of Georgetown Cupcakes except I didn't use red food coloring, I used the Red Velvet Emulsion I also used for the Red Velvet cut out cookies. Since the recipe was from Georgetown Cupcakes I thought I would be blown away with a really great flavor but I have to say I was a little disappointed. There wasn't enough of a chocolate flavor to satisfy me. The recipe calls for 2 1/2T cocoa and I have to say next time I will be using 1/4c to add more flavor. Most of the recipes from Katherine and Sophie say they will make 12 cupcakes and I always somehow end up with 18, I thought this would be the same for their red velvet recipe so I only added 1 1/2T red velvet emulsion. This recipe ended up making 24 cupcakes so I really should have added 2T of the emulsion and I plan to next time I make them.
All this being said, my husband said they tasted good and they were really moist right out of the oven. They rose perfectly and other than wanting a little deeper red color and a little extra cocoa flavor they seemed perfect.
Friday, February 14, 2014
Red Velvet Heart Cookies
I have had it in my mind to make Red Velvet cookies for awhile now and I figured with Valentines day being this week it was the perfect time to give it a whirl. I don't even really know when the idea came to me but I saw it first here. She used Red Velvet Emulsion and one of the things that's kept me from making red velvet cupcakes and cookies is that I didn't want to have to buy large amounts of red food coloring. Not to mention it's difficult to get a deep red color in frosting let alone in cookie and cake batter. The emulsion seemed like the perfect solution and I immediately bought mine at Walmart.
While I originally saw this recipe for Red Velvet cut outs I didn't want to buy the dry buttermilk the recipe called for because I figured it would expire before I could use it all since I don't have any other recipes that call for it. I searched around and came across this recipe and decided to give it a try with a couple changes.
I only made half a recipe since it was the first time I've made them and didn't know how they would taste and I didn't want a crap load of cookies sitting around for me to eat. Here is the half recipe with the addition of the Red Velvet Emulsion and baking powder since the original recipe didn't call for any and I thought that was a little weird. I also used margarine sticks instead of real butter because they are less expensive and it's what I use in all my other cookie recipes.
Red Velvet Heart Cookies
1 stick margarine at room temp
1c sugar
2T cocoa powder
1 egg
1 1/2t vanilla
1/4t salt
1 3/4c flour
1/4t baking powder
1/2t Red Velvet Emulsion
Cream butter, sugar, and salt. Add egg, vanilla, and Red Velvet Emulsion. Mix until combined. Add flour, cocoa, and baking powder. Beat until dough is forming a ball and coming away from the sides of the mixer bowl. Wrap in plastic wrap and refrigerate for 2 hours or over night. Roll and cut into shapes. Bake at 350 degrees for 10 minutes.
Grant had so much fun helping mix the dough together and then putting sprinkles on the frosted cookies.

I had intended to make homemade cream cheese frosting but didn't have enough cream cheese so instead I used a store bought can of frosting. Grant doesn't like frosting on his cakes or cookies so I left half of them unfrosted. They are tasty either way.

I had intended to make homemade cream cheese frosting but didn't have enough cream cheese so instead I used a store bought can of frosting. Grant doesn't like frosting on his cakes or cookies so I left half of them unfrosted. They are tasty either way.
Thursday, February 13, 2014
Homemade Muffin Mix:Preparing for Baby
I've been looking for ways to make life easier after baby arrives, mainly when it comes to cooking since it seems like Grant's stomach is never full. I know once the baby comes, at least in the beginning while we are all adjusting, I won't have a lot of time to bake or just won't feel like it. Grant loves mini muffins and I make a couple batches a week for him to eat for breakfast and snacks. I don't buy muffin mixes, all mine are made from scratch, and while it doesn't take forever to make some it does take time to get everything out, mixed, etc. especially with Grant always wanting to help.
I noticed my homemade pancake mix in my cabinet the other day, I haven't bought Hungry Jack mix in years, and wondered if there was a recipe for a homemade mix for muffins out there. Of course I went to the computer and googled it, what else would I do?
I found one on this site and decided to make a slight adjustment to the recipe (I used all white flour) and I ended up halving it so I could use one of my canisters instead of baggies. I loved the blog I found the recipe on since it also gave ideas for altering it with variations of spices and fruit. This is just what I wanted and needed since I get bored making the same kind of muffins and my husband and son have different favorites.
Muffin Mix
6c all purpose flour
1 1/4c sugar
2T baking powder
1 1/2t salt
Mix all the ingredients in a large bowl with a whisk until they are all incorporated. Pour into a canister or gallon size baggies making sure to tape the directions on the front.
 I ended up taping a note card with the liquid ingredient variations to the front and the add-in variations to the back of my canister.

This way I would have no reason to hunt down a recipe card. I made the chocolate with mini chocolate chip variation the other night and Grant LOVED them. I think my husband would prefer a more chocolatey flavor, but I have to be honest, I think he's wanting a chocolate cupcake instead of a muffin haha. I tried them and I'm not even a big fan of chocolate muffins and I thought they were delicious. Actually I'm wanting one right now, but I'm trying to refrain. Darn these cravings!

One batch made 24 mini muffins and 9 regular sized muffins. They bake beautifully:

Don't you wish you had some on your counter right now?
I'm so excited to have this mix in my cabinet. I've gotten so much use out of my pancake mix, I swear by having it ready to go in my pantry, and I know this muffin mix will make me hesitate a lot less when it's time to whip up a batch. The time it saved just making these chocolate ones was fabulous, and it was so easy for Grant to assist me, he had a ball.
I noticed my homemade pancake mix in my cabinet the other day, I haven't bought Hungry Jack mix in years, and wondered if there was a recipe for a homemade mix for muffins out there. Of course I went to the computer and googled it, what else would I do?
I found one on this site and decided to make a slight adjustment to the recipe (I used all white flour) and I ended up halving it so I could use one of my canisters instead of baggies. I loved the blog I found the recipe on since it also gave ideas for altering it with variations of spices and fruit. This is just what I wanted and needed since I get bored making the same kind of muffins and my husband and son have different favorites.
Muffin Mix
6c all purpose flour
1 1/4c sugar
2T baking powder
1 1/2t salt
Mix all the ingredients in a large bowl with a whisk until they are all incorporated. Pour into a canister or gallon size baggies making sure to tape the directions on the front.
This way I would have no reason to hunt down a recipe card. I made the chocolate with mini chocolate chip variation the other night and Grant LOVED them. I think my husband would prefer a more chocolatey flavor, but I have to be honest, I think he's wanting a chocolate cupcake instead of a muffin haha. I tried them and I'm not even a big fan of chocolate muffins and I thought they were delicious. Actually I'm wanting one right now, but I'm trying to refrain. Darn these cravings!
I did add about 1tsp vanilla to the liquid ingredients even though the recipe didn't call for it.
Don't you wish you had some on your counter right now?
I'm so excited to have this mix in my cabinet. I've gotten so much use out of my pancake mix, I swear by having it ready to go in my pantry, and I know this muffin mix will make me hesitate a lot less when it's time to whip up a batch. The time it saved just making these chocolate ones was fabulous, and it was so easy for Grant to assist me, he had a ball.
Wednesday, February 12, 2014
DIY Cloth Wipes
I made cloth wipes when Grant was a baby and used them frequently. When we moved to Ohio they got lost in the move so I made a trip to Walmart and bought a package of cheap washcloths ($4 for 18 if I remember right) and used those, both kinds worked great. My husband finds cloth wipes disgusting and pointless as he says, "a box of wipes costs like a dollar Lisa, I think we can afford that". For me its not about whether or not we can actually afford it, it's the fact that if I don't have to buy it and I can make something that can be used again and again, then why not? Even if I'm only saving a dollar here and there, that's a dollar that can be used for something else. And if I'm already using cloth diapers, which I did with Grant and plan to use again with this new baby, using cloth wipes isn't any extra work. You just throw the diaper and wipe in the wash instead of in the trash. Plus I really like not having to rely on store bought items, no running to Walmart at 9 o'clock at night because I didn't realize we were almost out of wipes. It's a great feeling.
It dawned on me the other day I needed a new stock of cloth wipes, so I raided my fabric stash and searched for any flannel I could use to make some. I made these a little bigger than the ones I made years ago and made sure to hem them so they wouldn't fray. I measured squares 8x8inches and used 2 for each wipe. I put right sides together, stitched around all 4 sides leaving an opening for turning. Then turned them right side out and zigzag stitched around all for sides for durability. You could easily use one 8x8inch square and just hem it around all four sides. That's what I did before with Grant's wipes but I plan on using these for a couple years (until potty training time) and I wanted them to be thick and durable.

I ended up making about 12 wipes out of the scraps I found and I'm sure I'll end up making more over time but this will at least get me started. The first few weeks at home after the baby's born I use disposable everything, it's just easier when your trying to get used to a new routine and adjust to the lack of sleep etc. etc.

This is a great way to use up flannel scraps and save a little money as well. With Grant (when he was 1-2years old) I was only using a 1 package of disposable diapers a month and 1 container of wipes about every month to month and a half, that is when I wasn't making my own disposable wipes. Can you tell I'm big on doing things myself instead of buying them?
It dawned on me the other day I needed a new stock of cloth wipes, so I raided my fabric stash and searched for any flannel I could use to make some. I made these a little bigger than the ones I made years ago and made sure to hem them so they wouldn't fray. I measured squares 8x8inches and used 2 for each wipe. I put right sides together, stitched around all 4 sides leaving an opening for turning. Then turned them right side out and zigzag stitched around all for sides for durability. You could easily use one 8x8inch square and just hem it around all four sides. That's what I did before with Grant's wipes but I plan on using these for a couple years (until potty training time) and I wanted them to be thick and durable.
I ended up making about 12 wipes out of the scraps I found and I'm sure I'll end up making more over time but this will at least get me started. The first few weeks at home after the baby's born I use disposable everything, it's just easier when your trying to get used to a new routine and adjust to the lack of sleep etc. etc.
This is a great way to use up flannel scraps and save a little money as well. With Grant (when he was 1-2years old) I was only using a 1 package of disposable diapers a month and 1 container of wipes about every month to month and a half, that is when I wasn't making my own disposable wipes. Can you tell I'm big on doing things myself instead of buying them?
Tuesday, February 11, 2014
Diy Simple Cloth Napkins
I made some cloth napkins a couple Christmas's ago that were supposed to go to my cousin as a gift. Well, I never made it to her house, she lives an hour and a half away, and then we moved and then she moved and I decided I would just use them at our place rather than save them forever. Back then I made 12 out of a table cloth I found at Target on clearance. They work perfectly and are thick fabric which I love.
I've finally gotten my son and husband to use cloth napkins (when they are washed and ready) instead of the paper towels. I hate buying paper towels but it seems like 12 cloth napkins don't last very long and before I know it they are all in the dirty clothes and we are back to using paper towels. I've kept my eye out for another table cloth on clearance but with no luck I decided to raid my fabric stash.
 I went back to the fabric I used to make dish cloths a couple weeks ago and found a yard of another fabric I had no use for as well. I ended up getting 7 15x15inch napkins out of these 2 fabrics. The fabric is just regular cotton so it's not very thick like the others I have but they will serve their purpose.

I used the same tutorial here, that I used for the receiving blankets and the other napkins I made. I think I'm in nesting mode trying to get some things done before baby arrives and my crafting comes to a serious slow down for a couple months. These cloth napkins have been on my to-do list for quite a while and I'm so glad they are finally done. I'm still going to watch for inexpensive table cloths so I can have a crap load of napkins and there will be no excuse for anyone in our house to use up paper towels just for wiping off their hands. But if you are wanting to get started using cloth napkins and have regular old cotton fabric lying around, go ahead and give it a whirl. Most of the time we don't actually need really thick napkins anyway, it just feels more like the fancy ones you get in restaurants than the cotton ones. I'm sure no one in my house will notice the difference between the two, they will be too busy eating to worry about what they are wiping the mouths with.
I've finally gotten my son and husband to use cloth napkins (when they are washed and ready) instead of the paper towels. I hate buying paper towels but it seems like 12 cloth napkins don't last very long and before I know it they are all in the dirty clothes and we are back to using paper towels. I've kept my eye out for another table cloth on clearance but with no luck I decided to raid my fabric stash.
Subscribe to:
Posts (Atom)