Wednesday, November 30, 2011

Crayon Roll: A Hospital Gift

I thought a crayon roll would be a perfect addition to the little activities for Kirk's hospital stay.  I looked online at a couple different tutorials then just kind of winged it (is that a word, oh well).  If you are wanting to make one there is a great tutorial on Skip to My Lou, or you can just google, Crayon Roll tutorial.

I used ric rac I had on hand as my closer, but you could also use a button and elastic.


I printed coloring and activity sheets I found online and put them with his crayon roll.  By the way has anyone priced coloring books lately, Holy Moly.  Since when are they $6 a piece.  Whatever happened to the 99 cent ones!

Tuesday, November 29, 2011

Cars Tic-Tac-Toe: A Hospital Gift

My brother's girlfriend's 5 year old son is having open heart surgery in December and I decided I wanted to make him something to occupy his time in the hospital, So over the next couple days I will post what I came up with for him. 

I have seen homemade tic-tac-toe boards before and always thought they were cute, but since my little one is way too young I've never had a reason to make one, until now.  I'm sure there are a million ways you could do this but here is how I made mine....

First I took a sheet of white felt and cut out a square, you could make this square as big or small as you like depending on your needs.  I then sewed a piece of black fabric to the back to give it a little more thickness and trimmed my edges.


To make the lines on my board I used regular old ribbon.  This is the ribbon you can get at walmart for all of 97 cents.  To figure out the placement of my lines I took the width of my square and divided it my 3, since I needed 3 columns.  When I did this the number I got was about 2.5, so I measured over 2.5 inches from each of the sides and that's where my ribbon was placed.  My one majore piece of advice....used lots and lots of pins to make sure your ribbon stays in place.


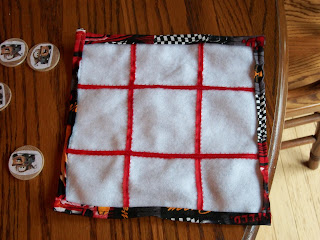
Sew directly on top of the ribbon, then turn your square and place and sew your other 2 pieces of ribbon using the same technique.  This is what you should end up with so far: 


  Lay your felt game board down on the fabric that will be your backing.  Cut this piece about 1/2 inch from all sides to allow enough room for turning your edges.  Do not sew your game board to your backing yet! 

Now I have no pictures of the next step because little man decided to wake up and I had to move quickly, which meant no time for pictures.  To hold your game pieces you will need a pocket.  I made mine about 3 inches high and 5 inches long.  I turned all sides in approximately 1/4 inch and ironed them down.  After ironing sew all the way around. 

Next cut a piece of velcro and sew one piece in the middle of your pocket and the other piece on the fabric that will be your backing.  To figure out placement just place your pocket where you would want it to be on your backing and place your opposing velcro accordingly.  Stick your sewn on velcro pieces together to make sure you sew your pocket in exactly the right place. Pin pocket on 3 sides and sew around leaving the top open. 

Now place your game board on top of the fabric that will be your backing, wrong sides together.  Turn your edges all the way around and pin.  Sew all four sides, and your game board should now look like this..


Here is the back side, with the pocket.


You could make your game pieces out of whatever suits your fancy.  I already had these round wood pieces.  I found images of 2 Cars characters, copied and pasted them into a word document, resized them so they would fit on my wood circles, printed and cut them out.

I used mod podge to adhere the images onto the wood circles.  Had I had enough time I would have painted the wood circles to match the whole set, however that was not the case so here is what mine looked like


Make sure your pieces are dry, put them all in the game board pocket, and your ready to play some tic-tac-toe!

Monday, November 14, 2011

Chicken Casserole

You know those blogs that have the gorgeous pictures of food, just taking 1 look makes your mouth water and forces you to make a trip to the grocery store to make your very own masterpiece......

This is not that blog.

One day maybe I will have a camera that takes pictures that will make your mouth water, until then you are stuck with my good ol' cheapy Kodak.

Now on to the recipe for tonight.  I made a chicken casserole.  Yes, very simple, very cheap, and pretty quick too.

I'm sure everyone out there already knows how to make one of these.  It seems to be a staple for most moms, however I just last year discovered how to make this and am so loving it for something quick and thought I'd share how I make mine.

(I know, I took another picture after Grant and I ate a chunk out of it)

Here's the recipe:

2 chicken breasts-cooked and shredded (I boiled 2 split chicken breasts til they were cooked through then shredded them both).

1 box stuffing (use the cheapest you can find, no need for name brand, it will still taste good)

1 large can cream of chicken soup

Frozen peas (this is optional and most people do not put this in their chicken casserole but I find any way I can to hide veggies so Grant will actually eat them)

Put your shredded chicken in the bottom of a casserole dish or pyrex dish.  Pour the can of cream of chicken on top and as many peas (if you are adding them) as you like and mix it all together.  Cook your stuffing as directed on the box and put it on top of the soup/pea/chicken mixture.

Bake at 350 for about 30 minutes.

Now eat it up!

Thursday, November 10, 2011

Tuna Noodle Casserole


Are you wondering why 1/4 of the casserole is gone already?  I, of course, forgot to take a picture before tasting it.

Now I know no one is going to look at the above picture and think, "holy moly that looks so good, I have to make it for dinner!".  But I promise you, it was really good and I'll definately be making it again.

Here is what I used:

3/4 box of rotini noodles
approximately 1/2 c milk
large can cream of mushroom soup
italian seasoned bread crumbs (I only had unseasoned so I sprinkled some italian seasoning over top before baking)
2 cans tuna
frozen vegetables of your choice (I didn't realize I forgot these until after I ate it, oops)

Cook your noodles.  Put cooked noodles into 8x11 glass baking dish.  Dump soup, tuna, milk, and vegetables into the baking dish too and mix well.  Bake at 350 for about 20 minutes.  Take out of oven and sprinkle bread crumbs over the top.  Bake again until the soup bubbles and the bread crumbs are a wonderful golden brown, about 20-30 more minutes. Enjoy!

I love casseroles.  They always make great leftovers and are thrown together quickly.

Tuesday, November 8, 2011

One Of THOSE Days

You know when you wake up and the thought of going to work just makes you wanna throw the covers over your head, squeeze your eyes shut, and hope no one finds you.

I'm having one of those days.

As I'm sitting here I am desperately trying to rack my brain for some reason I "need" to call off and stay home.  I am sitting thinking of all the things I could get done if I just didn't have to go to work.  You know, the laundry that is piling up because I went to bed early last night, the dishes that have taken up permanent residence in my sink, and the bathroom that desperately needs some bleach taken to it.

If you know me, you know I can't just call off for no reason.  I am the one going to work barely able to speak from a sore throat because "I can still do my job, I just wont be able to speak to anyone".  I'm the one going to work after throwing up the night before because, "I'm not throwing up now, and I don't have a fever".  I'm the one going to work with severe diarrhea because, "I'll just take some Immodium, and the bathroom is only a few feet away".  I mean seriously, why am I like that?

Days like today I wish I was one of those people who woke up, said to themselves "I don't want to go to work today", and then called off without a second thought. 

I am not one of those people.

I have never had a job where it really didn't matter if I showed up because there were 20 other people there to do it.  I've always had the jobs where it is all up to me.  Of course with these places of employment I am the one thinking of everyone whose job I will be making more difficult by not showing up.  I am the one thinking of all the stuff I didn't get done the day before because "I can get it done tomorrow".  I am the one with the guilt because I wasn't actually "sick".

Why oh why can't I be one of THOSE people??????

I guess I have to go to work now.......

Thursday, November 3, 2011

Last week my school had a "wear pink" day in honor of Breast Cancer awareness month.  Since my mom and 2 of my aunts are breast cancer survivors I knew Grant was going to have to support the cause as well as myself.

Here is what the finish product was, minus the chocolate stains and the wrinkles.  Please excuse those as I was finishing this onesie up literally 2 minutes before I walked out the door for work and didn't even think to snap a picture.


I went in search of a pink t-shirt, and would you believe I couldn't find one! How crazy is that, just a plain pink shirt and no store had them that didn't have ruffles or capped sleeves and all girly. My next stop was the resale store where I found this:


It was as close as I could get to what I was looking for.  I used a seem ripper and took the ribbon off the sleeves, then cut the frilly stuff off the ends of the sleeves and hemmed them.

I used my cricut to make a stencil out of cardstock that said "boys wear pink", used some black paint to paint the words on the onesie (if I had planned on him ever wearing this shirt again I would have used fabric paint, however I knew this was a one time deal so Used acrylic).

I had leftover breast cancer fabric that had little pink ribbons on it, and since I accidentally made a black paint smudge in the upper left corner I decided to cut one of the ribbons out and cover my mess up.

I think everyone was suprised to see him going through the halls in bright pink but it was all for a good cause.

Wednesday, November 2, 2011

Whoas of a Working Mom

Have I said yet that I so very much miss being a stay at home mom.  If I havn't, I'm saying it now.

I miss it.

Alot.

Not to say that every day was a 1950's tv show with the wife/mom in her heals cooking dinner and the kids playing quietly, so well behaved.  Many days my husband came home to me in my pj pants and grant laying on the floor screaming because I was trying to get dinner cooked and not paying him the attention he thought he deserved in that moment.

Now however I am slowly realizing how little time I have with him and he is growing so fast!  In the mornings I get at the most 1 hour, of which the majority is me getting ready and getting the diaper bag and lunches packed.  By the time I get home I get approximately 4 hours. 

Can I just say, 5 hours in a day is not enough, its just not.

Don't get me wrong I realize there are women out there who get less time, and those who never got the 9 months I was blessed with to stay home.   Call me spoiled but I want more.  I am realizing how quickly this time goes and how short of a time children are actually children.  The time in their life you are the center of their world and they think of you as super woman who can do anything.  I want every second of it I can get and right now it's just not happening.  Hopefully this won't be a forever thing and before my little man starts school I will get my stay-at-home-mommy days back.

To all of you reading this who are at home with your little ones, be thankful every day.  Even through the screaming and tantrums, because it's all worth it to be there when you dry their tears and they start smiling.

Tuesday, November 1, 2011

Halloween Dress Up-Charlie Brown Costume

I had grand plans of a spectacular Halloween party full of games, movies, and of course all kinds of treats.  Needless to say, it didn't happen. 

After the baby shower at the end of September and 2 birthday parties for Grant, I was all partied out this year.  Maybe next year things wont be so busy.

The daycare Grant goes to had a little Halloween party and went trick or treating through the school classrooms.  Oh my they were so cute!  I had originally planned on making Grant a train conductor but spending $17 on the pair of bib overhauls I found at Target just didn't seem like the best idea right now.  My next thought as I was in Target wondering around their very tiny boys clothing section, was a skeleton made from a black sweatsuit.  I purchased the sweatsuit and white felt to make the bones and figured it was decided and I'd get it finished Saturday, well that didn't happen either.  I just wasn't feeling the costume and was not at all excited about it which meant I couldn't get the gumption to start the costume.  So as I was perusing the internet Saturday morning it came to me....Charlie Brown.  And it just so happens Grant looks a little like Charlie Brown, haha.

I found a yellow polo shirt at the Goodwill for $1.29 and black shorts on clearance at Walmart for $2.50.  I free handed the zig zag pattern onto notebook paper, then cut it out, pinned it to black felt, and cut.  I appliqued the felt onto the polo shirt but didn't use any heat n bond since I plan on removing the zig zag so he can wear the shirt to church.


Here is the little man on the run towards me.  I can't seem to get a decent picture anymore since he is on the go, all the time.


I think this was the easiest and most inexpensive costume idea I had, not to mention pretty darn cute!
I'm hoping next year there wont be so many parties around the same time so I will have more time to do his costume.

LinkWithin

Related Posts Plugin for WordPress, Blogger...

Total Pageviews