Monday, February 25, 2013

Baby Adelyn Gift

I've gotten a little bored with my normal baby gifts. 

Ok I admit I've been having a huge brain fart and been in a baby gift making rut.

I usually make changing pads, wipes cases, burp cloths, and binky clips.  I have made these items for at least 4 people in the last year and I was racking my brain for something different.  The only problem is I always get really great responses with these gifts and it's nothing they will receive an over abundance of which is always nice but I'm not getting the same excitement at making them as I used to.  Now it's more of a chore, so it's time to change things up.

Before my son was born a friend of mine offered to help me make anything else I needed before Grant came (she is a fellow crafter who knew how long my to-make list was and how little time I had left before the big day).  I directed her to this tutorial for a car seat carrier cover.  She made it for me and I absolutely loved it.  It was so great when we were going in and out of stores.  If there is one thing that drives me nuts it's people touching my brand new baby with their germy hands.  After all it was flu season when Grant started going out on the town and I was a regular 'ol germ-o-phob. 

I saw this post on Small Fry and Co and it reminded me of the cover I had and I knew immediately I wanted to make one for my cousin's wife, whose baby shower is the end of March.  I'm hoping she will find it as useful as I did.

 
I love this fabric.  Normally I always end up buying flannel and I saw this too cute elephant fabric and had to snatch it up.
 
 
Hopefully baby Adelyn will love it too!
 
This project
 

Tuesday, February 19, 2013

Teenage Mutant Ninja Turtles!

I am so super excited to have this little project finished.  I bought these wood peg people about  a month ago from here.  The only ones I could find in the craft store were too small for my two year old, so I got online and found some that were 3 1/2 inches tall.  They ended up being the perfect size.

Anyways, so our new show around here is Teenage Mutant Ninja Turtles, or as my son calls it, "turtles".  When I first bought the wood peg people my intention was to make them all into superheroes like Spiderman and Superman (I'm sure you've seen hundreds of them around blogland), but while watching the Turtles I got the idea to make 4 of them into the green ninjas.

Are they cute or what?  I haven't seen any like these anywhere else so I just watched the cartoon to figure out the details to each turtle and used acrylic paint and paint pens.
 
 
Grant has bugged me to death since I painted them green and started painting their masks.  He immediately recognized them as the Ninja Turtles and wanted to play with them.


My intention was to give these to Grant in his Easter basket but he was so excited seeing me work on them, I just couldn't put them away and not let him play.
 
So I guess I'll have to find something else to fill his easter basket.


Tuesday, February 12, 2013

Making the Switch to Homemade Liquid Laundry Detergent

I wanted to give a bit of an update on the laundry detergent I use.  I know I like to know how long things like this will last me if I make them myself.  Mainly because I'm an obsessive planner and it comforts me to know when I need to restock different things.

Last May I switched from using homemade powdered laundry detergent to homemade liquid laundry detergent.  I used the tutorial found here.

What was my reason for switching you ask?  For whatever reason my Mom's washing machine wasn't dissolving the powdered detergent as well as mine did.  Instead it was leaving a white powder on my dark clothes forcing me to rewash them.  Which I was not happy about. 

So rather than doing what some people would do and resorting to buying regular detergent I decided to try making my own liquid laundry detergent instead.  It was really easy and I ended up with a 5 gallon bucket full of liquid detergent.  I used Ivory bar soap instead of the Fels Naptha that others use, mainly because I'm cheap and I get the Ivory soap for about $0.60 or less for 3 bars with coupons. 

Now for the big question, How long does a 5 gallon bucket of homemade liquid laundry detergent last a family of 3?   For us it still isn't gone yet.  That's right it's been 9 months and I'm still on the same batch I made back in May of last year and I probably do about 4-5 loads of laundry a week (give or take).  The powder I used to use didn't last near that long and used more ingredients so I'm sticking with the liquid from now on.  You really can't beat the price.  I probably ended up spending less than $5 for the ingredients used in my batch and it's lasted 9 months.  I don't even think I could coupon and get that good of deals with regular store bought detergent. 

So for anyone out there wondering whether or not they should try to make their own and wondering if it will be worth their time......
DO IT!
 
Go to the store, buy what you need, make 5 gallons and sit back knowing you won't have to buy or make any more for a really long time.

Saturday, February 9, 2013

16th Birthday and a Customer

My entire Saturday morning was spent creating these:

 
Ok Technically I spent all morning making these and trying to keep Grant's little hands off the counters.  He's a little theif when I'm not looking.
 
I had a request from a family friend to make cupcakes for her daughter's 16th birthday.  I could not have been more excited (and a little nervous) to have a "customer".  I love making cupcakes.  I love the way they smell when you take them out of the oven and look how darn cute they are.  They make people smile, which makes me smile.  I am normally a from scratch baker of cupcakes (probably because I watch too much cake boss) but can I say how much I truely value cake mixes.  The mother and daughter requested vanilla and red velvet (no pictures, oops) made from cake mixes.  At first I was a little disappointed because when a cake mix cupcake tastes great I don't get the same satisfaction as when a scratch cupcake tastes great, as if all the flavor was created by me. 
However this order was for 100 cupcakes.
 
That's right 100!  Which may be a drop in the bucket for seasoned bakers but not for me.  I'm used to making no more than 40.  So the cake mixes were a godsend.  Less thought, less room for error, and almost fool proof.  I think they turned out adorable and the guest of honor said they looked "perfect".  Is there anything better to hear when you put a lot of work into creating something for someone.


Friday, February 8, 2013

Baby Renee Gifts

My cousin and his wife are having their first baby and I whipped them up a few goodies for the baby shower unfortunately because of the snow I didn't get to attend but I still finished everything and can't wait to give it to them.

These are becoming my go to baby shower gifts because they are easy, quick (2 of my favorite qualities in a project) and they don't take much in supplies.  I always try to stock up on fabric during Joann's black friday sale.  Every  year they have flannel for around $1.70/yd.  I bought like 7 yards of various fabrics.  Now it's February and most of them are used, I'm wishing I would have bought more.

Anyways.....

I have tutorials for most of these so I won't bother you with more step by steps.  I'll just link them.  I also added a bottle of baby shampoo, a Playtex Ventaire bottle ( my personal favorite for Grant, can't say I miss those days of washing bottles), and a package of 2 Playtex binkys. 


 Changing pads have become my go to gift for babies since my son was born.  I made myself 2 of these 2 keep in the car and at home.  The tutorial is here, I love these because they are made with bathroom hand towels so I don't have to measure and cut that fabric, they are large enough to use on public changing tables covering the majority of the table, keeping your little one germ free, and you just throw them in the washer to clean them.
 
This is the first time I have attempted wash cloths and I think it may be my last, haha.  You would think cutting 2 squares and stitching them together would be about a 10 minute project but that minky fabric is a nightmare for me.  I had never used it before and thought it would be like any other cotton, FYI it's not. 
 
Minky is stretchy, am I the only one out there that didn't realize that....probably. 
 
Anyway, I cut 9 inch squares of the flannel and minky fabric, stitched them right sides together, turned them right side out and stitched around the outside using 1/4inch seam allowance.  My advice if you are planning on making these and haven't used minky before, use lots and lots of pins.  I also baste stitched a cross pattern 2 keep the fabric in place (along with using lots and lots of pins).  I think they turned out cute and I'm glad I made them but I'm a sucker for the easy peasy projects that don't take much thought (after all my little one interupts me about a dozen times during a 10 minute project making it a 40 minute project).
 
I was attempting to do something different with this binky clip.  In my vision I wanted a little ruffle action going on since this is for a little baby girl, however after attempt #2 failing I gave up that idea and got what you see above.  In the past I've used ribbon for binky clips but I wanted one that could be easily thrown in the washer if it gets covered in spit up or formula.  To make the one above I cut a piece of fabric 2 inches wide and at whatever length you want (make it longer than you think you will need because you will be scrunching it up).  Pinned right sides together making a very long rectangle, and stitched.  I turned it right side out and with a 1/4inch seam allowance used a basting stitch on either side.  I pulled one strand of the thread to make it ruffle or scrunch up.  Since I didn't take any pictures during the process of the clip above it would probably be easier to follow the rest of the tutorial here.
 
 
I absolutely love these burp cloths.  I originally saw a version of them at Homemade by Jill.  I use quilt batting in between the layers which I don't think she did and let me just say that it is the way to go.  A package of quilt batting makes a lot of burp cloths and they are the perfect thickness.  When I had Grant my mom and I joined together and made enough to last me a week or more inbetween washes and let me tell you it was a Godsend.  I never had to worry about spit up leaking through onto my clothes and in a pinch they can double as a changing pad (just don't use it as a burp cloth after you change a diaper on it, Yuck).
 
And last but not least I had to make a wipes case to match the changing pad.  I have a tutorial here. I'm still a bit iffy on whether I like the trim I used on it.
 
 
It's the first time I've used a ribbon type trim but there's no way in heck I'm ripping it apart.  I was so excited to cross these gifts off my to-do list.  Seems like everyone is having a baby right now.  I have another baby shower at the end of March and I'm throwing a baby shower at the end of April so I'm in full swing with baby projects around here.
 
Which means you will get to see quite a few more baby projects!

Wednesday, February 6, 2013

Jambalaya Recipe

For whatever reason I always thought Jambalaya was a difficult meal to make.  I wish now I had just attempted to make it to find out for myself how really simple of a dish it is.  I'm sure if I was Rachel Ray or Bobby Flay or someone like that I could jazz it up with some ingredients I have to search the grocery store high and low to find, but I am neither of those people.  I like simple ingredients and ingredients I more than likely have in my pantry at all times.  I have no desire to spend $6 on 1 spice or seasoning I've never heard of and will only use it once.   Now don't get me wrong I love me some Rachel Ray I just don't cook like her.

I found a few different recipes and in true Lisa style I created my own using a few things from each.  So If you read this recipe and find you are missing 1 or 2 of the ingredients just switch them out for ones you do have or leave them out all together.

1 other thing I have found out when it comes to food......

I'm a HORRIBLE photographer of food.  Ok not like I'm a fabulous photographer of other things but food is so dang hard to get good pictures of. Not to mention the time of day I cook most things the lighting in the kitchen is horrible, there are tons of people around (ok maybe not tons maybe just 4 or 5 but it seems like more), and everyone is starving.  Who wants to stop and take a pretty picture. Not me.  Especially when I've tried and they all turn out awful.

Are you done reading my rambling?

Sorry, on to the recipe.

2 ribs celery diced
1 large onion diced
2 garlic cloves minced
1 can diced tomatoes
1 green pepper diced
1 red pepper diced
1 yellow pepper diced
2tsp cajun seasoning
3 bay leaves
1/4t thyme
1T olive oil
salt and pepper to taste
1lb smoked sausage (could also use shrimp or chicken)
1 can kidney beans (these can be left out if you don't have any, thrown in if you do, or used instead of the sausage for a vegetarian meal)
White rice- prepare while other ingredients are simmering according to package directions.

heat olive oil in a pan, add celery, green pepper, red pepper, yellow pepper, and onion.  Saute til soft.  Add garlic and cook another minute.  Add smoke sausage, beans, tomatoes and seasonings, let simmer while rice is cooking.  Serve on top of rice.

Yumm-O!
 
I think I'm channeling Rachel Ray......

I've also made it taking out the red and yellow peppers, kidney beans and celery.  I like using these ingredients when I have them on hand because it makes a bigger meal when we have alot of people to feed.  It's an easy way to bulk up the dish.  But trust me it is just as yummy either way you make it.

Enjoy!

Tuesday, February 5, 2013

Valentine's Day Chair Pouch

I made my son a Valentine's day chair pouch before he could sit up on his own. 

Why you ask?
Because I thought they were so stinkin cute I couldn't wait a whole year to make one. 

Fast forward 2 years and 3 moves later and I havn't got the slightest clue where its at.  I take that back, I know exactly where it is.  It's in a box in the room in the basement.  Of course so is just about everything I own so in reality I just have no idea which box it's in.

Rather than being annoyed with this reality (as I am with so many other things I have had to remake or rebuy for lack of wanting to search through boxes that are stacked higher than my head) I decided it was a great opportunity to make a newer, cuter V-day pouch.  This year I think Grant will actually be excited to wake up from naptime and see a few little surprises waiting at his high chair. 

So as I do any time I get the idea to do something I googled valentine's day chair pouch to get ideas on the shape I wanted and how I wanted it to be embellished.  Then as I also always do I threw all that out the window and started cutting and sewing. 

I don't advise this if it is late at night and you have spent way too much time fighting with your 2 year old to not dump the entire contents of his toy box on the floor, clear off all the shelves in the living room, or trying to figure out why in the world they are standing in front of you mouth wide open screaming out of the blue as if you should know what in the heck they want.  In the crafting world, or at least in my crafting world, this results in ripping out seams, recutting fabric, and my sewing machine being subjected to dirty looks and name calling.

Don't judge, I know you have secretly done the same.

I had grand plans of a beautifully written and photographed post of this wonderful V-day pouch I was making, however as you can guess from the name calling I referenced earlier all the pictures didn't get taken and after looking back through them I can tell you I was confused so I knew I wouldn't be able to acurately write a great tutorial.

Yes I know if I was a top knotch blogger I would have that tutorial regardless but I had no desire to remake this pouch.  Even though it was actually super easy to make.  I'm really happy with how it turned out and can't wait to fill it with a couple treasures.

 
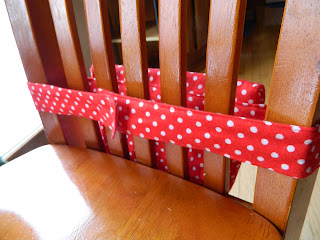
I made mine to fit on the bar stools we have our highchair sitting on.  I've seen some made with backpack like straps but I thought the one single wrap around strap would make it easier for Grant to get into it himself.  It's just at his height.
 
I stitched the stap to the back of the pouch and used velcro as a closure.
 
There are a ton of different ways you could design your pouch, I liked the messenger bag type look so that's how I did mine.
 
Since it's for Valentine's day I had to put a heart somewhere so I cut a white and red from felt and stitched it on the flap to cover where I stitched the velcro on.
 
I used the basics of making a messenger bag and you can find those tutorials everywhere.  Just change the measurements to make them the size you need. Here is a great one.  I think mine ended up being 10 inches wide and 6-8inches tall (not including the flap).  It was very easy to make and I used interfacing on all the pieces to give it a sturdier shape so hopefully it will hold up over the years and I won't have to make my little Nutty Buddy a new one.


Friday, February 1, 2013

Snow Days & Spring Days

For the past 3 days I have planned to go to the store for various items.  Wednesday it was freezing cold and the wind was blowing like crazy.  Decided I didn't need to get Grant out in it and risk an ear infection.  Thursday it did this all day:

 
Don't get me wrong, it's beautiful to see coming down, especially when I know I don't have to be out in it.  So naturally I thought no biggie I'll just run to the store Friday.
 
Except today I woke up to almost every school in the county on delays or closed due to the 3-4 inches of snow on the ground and -9 temps.  Normally it wouldn't be a big deal to wait until tomorrow to go to town but my mom and I are supposed to go to a baby shower and of course I procrastinated and don't have her gift completed.  I started on her wipes case, like this one, and ran out of glue for my glue gun when I got to the trim.
 
UGH!
 
It's so frustrating to be so close to being done and yet about a foot of trim is all that's holding you up.  Well and the weather I guess.
 
Especially when Monday we had like 65 temps and Grant and I were outside enjoying the muddy grass and warm breeze.
 
 
I guess it wouldn't be Ohio if there weren't spring days mixed in with bitterly cold, snowy, winter ones.  Makes me long for spring......
 
Anyway...one day when the snow stops, the roads are cleared (cuz we live on quite a hill and when it snows we can't get off it), the wind doesn't knock me over, and I actually make it to the store, I'll have a project to show you.
 
Actually a couple.


Maybe 3.


Ok, I'm done now.
 
Enjoy the snow if it's in your neighborhood too!

LinkWithin

Related Posts Plugin for WordPress, Blogger...

Total Pageviews