
Friday, April 29, 2011
Sophie's Gift Finished
Thursday, April 28, 2011
The Role of Mommy
Nothing is more satisfying, or more stressful than being a mom. I love every minute of it, but even after everyone tells you these things you don't fully know until you become one. I had been around kids my entire life and while I didn't pretend I knew everything, I thought I was pretty well prepared for motherhood. I was under no illusion it would be all smiles and cuteness. I was well aware of the getting up every 2 hours to feed, the crying fits when you have no clue why they are crying, the diaper blow outs, the being tired, etc, etc. However the things I don't think about was the every day things you do that suddenly become harder to accomplish, or require a "game plan" so to speak. For example every time I need to go to the store (any that aren't around the corner from my house), I have to start planning the night before. I'm going over the list of things that need to be in order before leaving the house, diaper bag packed, clothes laid out, plan what time I need to shower, what time we will need to leave in order to not interrupt nap times or eating times. And of course there is the routine before you leave the house, eat bottle, change diaper, get dressed, bib on (spit up is inevitable if you're planning on going anywhere), purse and diaper bag next to door, keys in pocket (otherwise they will be locked in the house), quick scan around to make sure everything is unplugged, turned off, and closed, change diaper again because leaving the house means it's time to poop. All this takes about 30 minutes, 2 arm loads of stuff, and one screaming child for reasons unknown.
No longer are there leisurely dinners out. No, eating out requires another bag of goodies to distract Grant with in order to keep him from screaming and disrupting others while they try to enjoy a meal. We walk into a restaurant with arm fulls of stuff including a diaper bag, high chair cover, blanket (he's still learning balance), and multiple toys. Inevitably I pull out a jar of baby food and feed him while I shovel in a few bites and eventually give up eating my meal all together deciding it's just not worth it to try and do both at the same time.
Being sick yourself is a whole other ball game. When you're not a mom you can crawl in bed and spend the day there, only getting up for the bathroom and another box of tissues. When you're a mom there is a little one who doesn't want to lay in a bed, and they require feeding, changing, and attention regardless of how horrible you feel. It's almost a garauntee there will be a huge diaper blow out that will make you vomit one extra time and it will be the one day they refuse to nap, meaning you get no rest.
Instead of staying up until 11 watching tv or talking to one another, my husband and I are usually in bed before the clock hits double digits. When Grant goes to sleep, we go to sleep. Weekend or not there is no difference. Babies don't know the weekend is suppose to be for sleeping in. No, moms and dads don't get to sleep in. Regardless of how tired you are or what day it is, Grant is up at 5am, laughing and talking wanting your attention.
Being a mom you do learn a few things, you learn how to take a 5 minute shower, you learn how to do just about anything around the house with a baby on your hip, how to change a diaper with your little one on his belly (after he learns how to roll), how to do 10 things at one time, how to do your makeup in 30 seconds flat (if you decide to put any on at all). You learn to stay in sweats unless company is coming or you're leaving the house because projectile spit up is bound to be all over whatever you wear on a daily basis. You can now fold laundry, type on the computer, look through grocery ads, clip coupons, and eat all with a little one grabbing at everything you are touching. And one of the biggest things I've learned is keeping the house spotless, the laundry always caught up, the sink empty of dirty dishes, and being on time anywhere, is a waste of my time.
When people say it is the best and worst job there is, it's true, but the best far out weights the worst. I wouldn't change anything, but that doesn't mean it doesn't take some getting used to and some adapting. My life is no longer my own, I have a little one who relies on me now and seeing his little smile makes all the sleepless nights, all the exhaustion, and all the tears completley worth every minute.
Wednesday, April 27, 2011
Sleepy Bunny
I had planned on buying the Sleepy Bunny pattern from mmmcrafts while I was pregnant with the intentions of making Grant one for his Easter Basket. Being the procrastinator I am, I waited, then my husband lost his job and I couldn't justify spending the extra money on it. My mom got online and looked at the pattern, thought it was too adorable not to purchase, and bought it for me if I would make one for baby Sophie and the grandbaby of a woman she works with. I bought fabric, a 1/4yard is all it takes (ended up costing $1.22) and I already had the stuffing and coordinating fabric.
 For anyone else out there thinking of making a Sleepy Bunny here are my words of advice:
(Warning! a not so great picture on a dark and cloudy day)
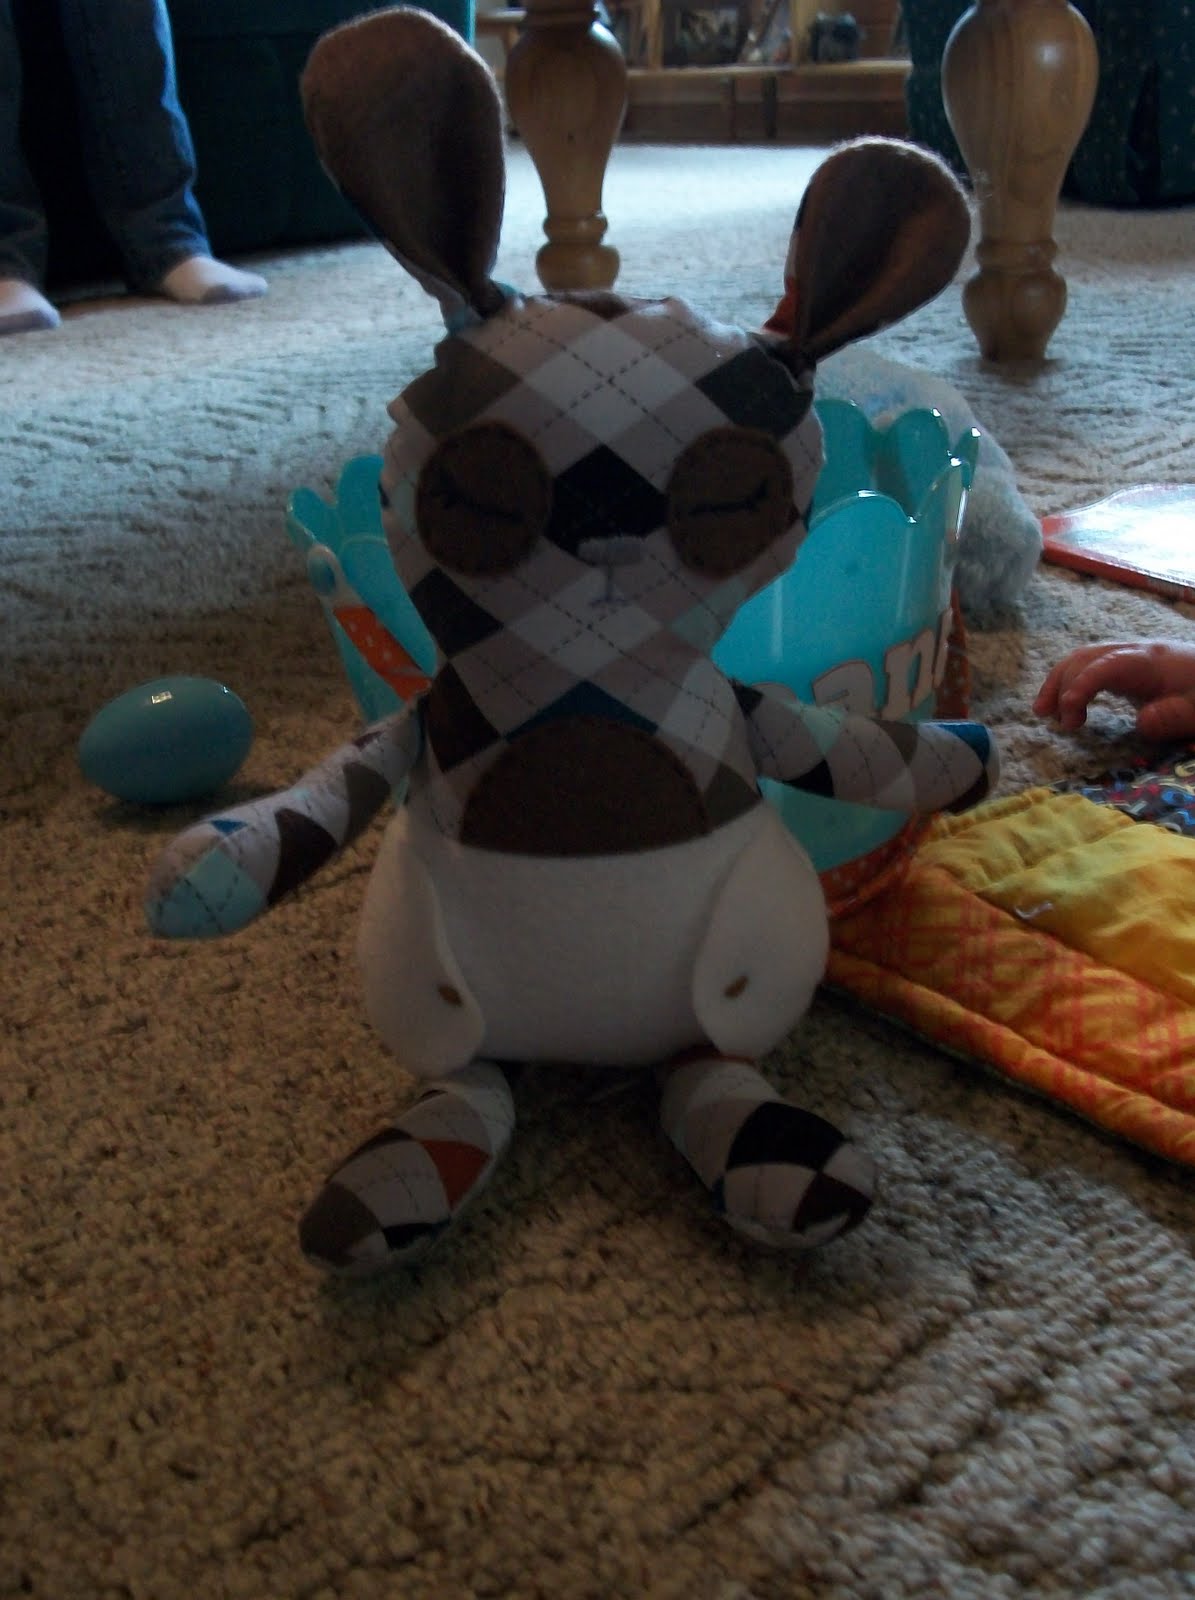
Double stitch your seems. Stitch around once then go back and stitch over top of the same one. This will hold better when you start stuffing. Some of my seems started busting because I tend to over stuff.
I picked a patterned fabric and kind of wish I had picked a solid print for the front. I thought mine was cute but a little busy (just something for you to think about)
The pattern is really easy to follow and doesn't take long to finish. I'm always weary of new patterns and afraid they will be beyond my skill level but I had fun making this bunny.
I didn't get a picture of Grant's full Easter basket before he dumped it over but here is what I had in it: 2 board books from Target $1 spot, Bambi DVD, felt chocolate bunny, Sleepy Bunny, and his first Football. All together a total of $16 was spent. I don't think that's too bad for his first visit from the Easter Bunny.
Tuesday, April 26, 2011
Recipe Box
I was asked to buy a recipe box for the bridal shower, but of course I see no reason to buy something already made when I can get crafty. So I puchased a wood box from Hobby Lobby ($2.99)


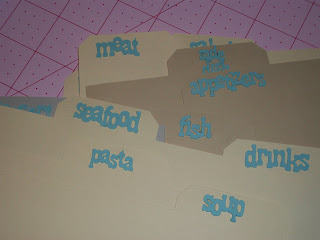

I used contact paper and covered the tab dividers so they would not get worn as quickly. When it came to decorating the outside of the box, I wanted to keep it simple so I used my Cricut and cut out the word RECIPES and glued a ribbon around the box.


Used some Acrylic paint I already had and painted it light blue.

Then I mod podged some scrapbook paper I bought at Hobby Lobby around the outside.

I was so excited with this project because I knew I could use my cricut cartridge, From My Kitchen, to dress it up. So I cut out some images and words for the outside of the box.
Then I made some dividers, and recipe cards using the same cartridge.


wood box $2.99
scapbook paper $1.18
total cost = approx $4.50
Now hopefully the bride to be will think it is as cute as I do!
Monday, April 25, 2011
Cloth Wipes
Yes I have found one more way to save a few dollars. I made these cloth wipes before Grant was born in my attempt to save us as much as possible during my maternity leave. I had every intention of using them at the beginning. However I had forgotten babies have dirty diapers almost every time you change them when they are first born and I had no desire to clean that mess up with cloth wipes. Weird too, because the cloth diapers didn't bother me but the idea of cloth wipes along with it didn't seem worth it anymore.
Now that Grant is bigger and most of his diapers are just wet, I have started using the wipes I made. I only use them when he is wet but that in itself has made my throw away wipes last more than twice as long.
I took scraps of flannel fabric, which I had alot of, and cut them to size. I cut mine to 4x8 inches.

I then zigzag stitched around each one to prevent fraying.
I used an empty wipes case and put them in, then used 1/2 cup water with a large squirt of baby wash and a small squirt of baby lotion (I no longer measure since I have made it so many times but nothing needs to be exact) wisk until its combined and pour it over the wipes. Let it soak into them for about 10 minutes before using just to make sure they are all saturated.

Friday, April 22, 2011
Dish Towels
We were at Walmart the other day, walking through the clearence aisle, and they had a whole set of really nice chocolate brown dishes for $16. Can you believe that, what a deal! I immediately thought they would go perfect with the fabric I used to make dish towels for my Dad's wife for Christmas. Yes you heard correctly, I am already thinking about Christmas, but I figure with my procrastinating ways I need to start extra early if I want to finish anything before Christmas Eve.
 These were intended to be gifts for this past Christmas but I found something else instead and decided to save these for this year and add to them. All I did to dress up these plain green and blue dish towels was purchase fabric, cut it into to strips and sew it onto the towels. It took me all of about 10 minutes to complete and I still have about a yard and half of fabric left. My plan is to make a valance, hot pad, and maybe an apron.

Saturday, April 16, 2011
Cakeing (is that a word?)
I am praticing with cake flavors to decide what the second layer of my sister's graduation cake should be. I asked what she wanted and she decided on Chocolate with chocolate chip cookie dough filling and told me I could suprise her with the other flavor. So of course that means I'm going to have to experiment with a bunch of flavors, which means I wont be fitting into my old jeans any time soon, haha. I made a Nilla wafer cake last week with banana mousse filling and buttercream icing, it was delish. I ended up giving it to my mother in law for her birthday. My decorating wasn't spectacular but hey I'm just starting.
This week I made an orange dreamsicle cake with vanilla mousse and orange flavored buttercream. I was concerned there might be an overwhelming orange flavor but nope, it was just enough to make it melt in your mouth and that was without any filling or frosting.


This week I made an orange dreamsicle cake with vanilla mousse and orange flavored buttercream. I was concerned there might be an overwhelming orange flavor but nope, it was just enough to make it melt in your mouth and that was without any filling or frosting.
Here they are cooling:

Yum!

I got the recipe from cakecentral.com in this thread, and here is the link to all the recipes collected if you don't have time to read through all 376 pages of that thread, haha. I think I learned more about baking cakes, making filling and icings, and coming up with flavor combinations from that thread than all my hours of watching cake boss and reading cookbooks combined.
My one warning for anyone who attempts to make one of the recipes is that it is a very large recipe. I used my largest mixing bowl and it was almost full to the top with batter. 1 recipe for me made 2 9inch cakes and 11 cupcakes (of course there are only 10 cupcakes in the above picture because I had to taste test).
Here is my finished cake. I didn't do any decorating because it was just for us and I really just wanted to try the flavor to see if it would be in the running for the graduation cake.

I love the way layered cakes look. My husband isnt' a fan of orange flavored anything but he even ate this cake. I'm over all very proud of myself, especially with this being only my second attempt at making cakes like this.
I'm even more excited that my cousin asked me to help her with a bridal shower this weekend. She wants me to make lemon flavored cupcakes. So I'm going to make 12 lemon cupcakes with lemon cream cheese icing and 12 lemon cupcakes with blueberry filling and cream cheese icing, yum doesn't that sound delish. I've been wanting to try the lemon cake recipe so of course I said yes, and then proceeded to offer my services to make a cupcake stand, recipe box, recipe cards, and some decorations. I love bridal and baby showers so I just couldn't help myself.
Friday, April 15, 2011
Making Baby Food
I opened my cupboard last night and realized I forgot to buy any baby fruit while I was out. So rather than go out at 9 pm to get some I decided, why not make my own? Have you seen the infomercial for the Baby Bullet, its like the Magic Bullet but specifically for baby food. I saw it one morning while feeding Grant and I immediately wanted to order one, however, who has $80 to drop on one of those. Plus I already have the Magic Bullet, that I love, and they both pretty much do the same thing.
Anyways, we had apples on the counter and I had already done some research and read that you needed to steam the fruit to soften it. By steaming it, the fruit supposedly retains all its nutrients. I bought the Ziploc steam bags a while ago just for doing this.
I took 3 regular sized apples, mine where Golden Delicious, peeled and cut them into chunks. I placed them in the steamer bags and on the bags it tells you how long to microwave different vegetables. Potatoes where listed and I figured apples are kind of the same consistency as potatoes so I nuked them for 5 minutes.
Next I took out my Magic Bullet blender, used the chopping blade, put half my apple chunks in with a bit of water, then pureed it for a minute or so. When its mixed well check to make sure it is the right consistency, if it's too thick add a bit more water and mix again.
I save my store bought baby food containers so I know how much to give for each serving, so I just put my homemade applesauce into those containers and I was finished. 3 apples made about 5 days worth of stage 1 food or roughly 3 days worth of stage 2.
I bought some sweet potatoes to do the same but instead of steaming them I baked them wrapped in foil in the oven at 350 for about an hour, more or less depending on how large the potatoes are. After they were baked I took the peeling off, put them in my Magic Bullet, added some water, and blended to the consistency I thought appropriate. I had three smaller sized potatoes and here is how much they made:

That is about 8 or 9 days worth of stage 2 veggies or 16 days of stage 1, and I paid $2 for the sweet potatoes so that's about $0.25 a day for the stage 2. I don't think you can get that kind of deal on baby food in the store even with a great sale or off brand.
I think alot of people think making baby food is going to be time consuming and difficult, because that's what I thought, but it's actually really simple and quick.
Thursday, April 14, 2011
Chocolate Bunny
I had every intention of buying a little chocolate bunny for Grant's Easter basket, and the more I thought about it I thought why buy one when he's too young to even eat it and my hips don't need any more chocolate. That's when I came across this post on Just Deanna, and I thought it was a perfect solution.
I'm always on the lookout for little things to entertain Grant as he walks around in his walker. So I found this bunny pattern and decided to make a felt chocolate bunny. I couldn't make the pattern Just Deanna used work correctly for me so I found this pattern and it worked great. On the inside I put some crinkly stuff (pop tart wrapper) and a jingle bell. He loves things that make noise so a regular old bunny wouldn't do.
I'm always on the lookout for little things to entertain Grant as he walks around in his walker. So I found this bunny pattern and decided to make a felt chocolate bunny. I couldn't make the pattern Just Deanna used work correctly for me so I found this pattern and it worked great. On the inside I put some crinkly stuff (pop tart wrapper) and a jingle bell. He loves things that make noise so a regular old bunny wouldn't do.
So the list of things you will need:
Felt
Pop tart wrapper
Jingle bell
Thread
This is a quick and easy project. Place your pattern on your felt of choice and cut around it.
Make sure to cut out an eye or stitch one on if you're concerned about small pieces being swallowed by your little one. I used some blue thread for mine, Grant is chewing on everything so I didn't want to chance him swallowing something.
I blanket stitched around the outside, leaving a small opening to put stuffing, a jingle bell (I actually put 2 bells because mine were the small ones and didn't make enough noise to satisfy me with just one), and a pop tart wrapper inside, then stitched the opening closed.


Now you have the perfect chocolate bunny for your little one.
Wednesday, April 13, 2011
Easter Pail
My intention was to make Grant a fabric Easter basket this year. I found a tutorial I liked, had my fabric out and ready and then after trying to make a bag that ended up being a horrible crafting disaster, I scrapped the idea. I didn't want to waste fabric if it ended up not turning out the way I envisioned and I figured with me going to Ohio Easter week I should take an easier way out.
I went to the dollar tree in search of a plastic bin, bucket or pail, not necessarily an Easter one, but one I could dress up and I found this:


I went to the dollar tree in search of a plastic bin, bucket or pail, not necessarily an Easter one, but one I could dress up and I found this:

They had them in blue, green, purple, and pink. I immediately went for the blue knowing I had some orange ribbon to dress it up, my husband is a big Tennessee Vols fan so I thought he would appreciate the orange.

I whipped out the glue gun and glued ribbon around the handle and around the bottom of the pail. I used my Cricut and the Don Juan cartridge to cut the letters of Grant's name out at 1 inch, then glued those to the pail as well. I showed my husband the finished pail all excited because I thought it was cute and he hesitated when I asked him what he thought. Of course once again he thought what I made looked a little girly due to the polka dots on the ribbon. Maybe it does but Grant is 5 months old I think cute little polka dots are allowed at his age. Either way I think the pail is adorable and will be perfect for his first Easter, and who can complain with a $1 Easter basket. Maybe next year I'll come up with a more "manly" basket, do they even make those in pastel colors? haha.
Tuesday, April 12, 2011
Full Week
I was up at 4:44am this morning, that is the time little Grant decided he wanted to wake up for all of 10 minutes, long enough for me to not be able to fall back asleep. I was laying there thinking of all the stuff I needed to get done this week. Why I do this to myself when I know I should be sleeping is beyond me but it happens quite frequently.
My mom is coming down to visit us this weekend, which of course means I need to clean up my craft/spare room. Grant and I will be going back to Ohio with her so I have to make sure everything that is going with us is in order, clean, and packed. I won't be home the week before Easter so any of my projects need to be finished this week. My cousin asked me to help her with a bridal shower that is this Sunday so I need to make 24 cupcakes, cupcake stands, a recipe box with recipe cards and dividers, and four poms for decorations. I will be taking baby Sophie's gift with me so I need to have everything for it finished and packaged ready to go. All that on top of the usual feedings, diapers, laundry, dishes, dinner, and cleaning.
Seeing all that really makes me realize how much is still left to do, I better get started!
Cricut Labeling
I have had my sugar, flour, cornmeal, and laundry soap in these nice little canisters for months now. As soon as my mother in law gave them to me I got excited knowing I could use some vinyl and my Cricut and label them. Like most things, it has taken me awhile to get to it, but alas I have finished them.
 For the sugar, flour, and cornmeal I used the Don Juan cartridge and the Calligraphy cartridge for the laundry soap canister. Took all of about 20 minutes, probably would have been less but little man was on my lap grabbing at everything. Either way they are finally done, and I'm happy with how they turned out.

Monday, April 11, 2011
The Birthday Gifts
I'm so excited. This past Saturday we had dinner for my mother-in-law's birthday. My neice and nephew walked in and my neice was carrying the purse I made her. Whoo hoo! I was nervous about giving it to her only because I have never done homemade gifts for either of them before. Then in talking to my sister-in-law she said how much Chase loves the pj pants I made for him, and he wears them all the time. I think as a crafter nothing makes you feel better than when someone loves what you made them and uses, wears, or plays with it. Now maybe I'll have that confidence to trust myself and make them something for Christmas.
Friday, April 8, 2011
Bibs for Grant
Grant is one slobbery (is that a word?) baby. We go through 5 or more bibs a day and he soaks through them in 2 hours max. I thought I had plenty of bibs when he was born, after all there were stacks of them. However I didn't realize how chubby his little neck was so I didn't even get to use most of them. The other day after feeding him his veggies I went to get a bib out of the drawer and realized I only had one clean one left, knowing it takes sometimes over 2 hours to do one load of laundry from start to finish (no high efficiency washer and dryer for us haha), I had to either let him slobber all over his shirt, go buy a few, or make some.
Of course I decided to make a few. I dug out all my flannel and the yard of water proof fabric (there is a specific name for it but can't for the life of me remember what it is) I had in my stash and started cutting. I didn't take pictures during the process but it's fairly easy to describe. I used one of Grant's larger bibs, folded it in half, placed it on newspaper and cut out a pattern.
Place the pattern on the fold of the flannel and the waterproof fabric and cut. Now you have the front and back of your bib.
Place right sides together (the slippery side of the waterproof fabric is the wrong side, you want it on the inside of your bib to prevent moisture from leaking through), and stitch around the bib leaving and opening for turning.
Turn right side out and stitch once again all the way around your bib making sure to stitch the opening closed.
Now Grant has a few more bibs, I satisfied my crafting craving, and I used up some of my fabric stash, don't you just love that!

Thursday, April 7, 2011
Shoes For Baby Shophie
My last little homemade gift for baby Sophie is of course a pair of cloth shoes using the Stardust shoe pattern. I don't think there has been a baby born among my family and friends that has not received a pair of these since I found the pattern. They are addicting once you make one you can't help but make 5 more, and BONUS you can get rid of some of your fabric scraps so no need to purchase any. I made these to match the onesie I posted about here.


My next step with her gift is to get a few necessities such as diaper rash cream, package of wipes,diapers, etc. Just some small things she will need. I'm so excited to get it all put together.
Wednesday, April 6, 2011
Comfy Shorts For Grant
Last week, in the 80 degree weather we were having, I realized Grant had no cotton shorts. He has a few pair of jean shorts but I like for him to be in comfy clothes when we are around the house. I figure if I wear sweats, he should too. I wanted to be resourceful and save money, so I got to thinking I could probably use the same tutorial at Handmade Mommy I use for pj pants to make shorts. I was so excited I went and dug out my flannel stash (I stocked up when Joann's had it on sale for $1.29/yd) and made a pair in less than 15 min. I've only got 1 done so far but plan on making at least 2 more.
Here are Grant's comfy little shorts:

Here are Grant's comfy little shorts:

Are they too cute or what? Especially when they are on his chubby little legs. Seeing the picture of them makes me want to run to my craft room and make a few more, but no can do I hear little man waking up from his morning nap.
Tuesday, April 5, 2011
Toy Tie
I went to lunch the other day with a friend and took little Grant with me. He sat in the highchair and proceeded to throw every single one of the toys I brought on the floor. I spent the majority of our time in the restaurant trying to catch them before they hit the ground or wiping them off with baby wipes. On the way home I began thinking of how I could make things easier when we are out and Grant is in the grocery cart, his stroller, or a highchair playing with his toys. Then it came to me, a toy tie. I'm sure someone out there has already thought of this but I felt pretty smart because I havn't seen them before. It's along the same line as a binky clip but no velcro.


Here's what you will need:
Ribbon and a mitten/suspender clip (you can find these in the notions section at Joann's or Hobby Lobby)

Cut your ribbon to the length you desire. I cut mine fairly long but it is up to you. Now make a loop at one end and stitch it together.

Take the other end and loop it through the suspender clip and stitch.

Now when you are ready to go out and about take the toy of your choice, put the suspender clip end of the ribbon through the loop and pull, like so:

Clip the suspender clip to your car seat, stroller, your child's bib, or anything else you can think of. I couldn't wait to try mine out so we went grocery shopping and I clipped his toy to the cart cover and it worked like a charm. No more toys hitting the dirty ground and no more spending so much energy trying to catch them before they hit.
Friday, April 1, 2011
Birthday Gifts
My neice and nephews birthday party is this weekend. We already bought Kaitlyn a Barbie and Ken doll (came in the same box for $2.50, Score!) to go with the Barbie dream house her mom is getting her, and we bought Chase the football he has been asking for. My husband has this thing that if you find a gift cheap then you need to buy something else to go with it. As if someone will know you didn't spend much and be offended or something, ridiculous to me. Well now is not the time to be spending alot of money so I reminded him of the purse I made and fabric for pj pants I bought 2 years ago. Both of which were suppose to be birthday gifts for them back then. Here is the purse, made from the buttercup bag pattern from Made by Rae.

The only thing I added was this ribbon flower to cover up where I stitched the velcro on.

Here are the pajama pants I made using my favorite tutorial at Homemade Mommy.

His dad is in the army so he loves anything that has camo. I originally was just going to purchase some camo fabric and then came across this at Hobby Lobby, it was perfect!

So in about a half hour I had two finished gifts to go with the store bought gifts we already have. Hopefully they will appreciate them. For whatever reason I always get a little nervous when giving homemade gifts to my husbands side of the family, I guess maybe it's because no one on his side ever does homemade gifts. Where as my side is always making gifts or putting together homemade treats in gift baskets. Either way I am satisfied with how they turned out.
Subscribe to:
Posts (Atom)